How To Stretch Your Calf Muscles - The Importance Of Foot Position
Technique is EVERYTHING with calf stretches!
Here's how to avoid the common mistakes and stretch your calf muscles properly.
This video uses excerpts from Ansell Chiropractic's Calf Stretching Exercises video, with permission: 🚩 https://youtu.be/YGcqGD88JPw
🚩 https://www.ansellchiropractic.com.au/
0:00 INTRO
Tight calf muscles change the way forces are applied to your foot. It increases the duration and magnitude of load across the ball of the foot; the Achilles tendon pulls earlier on the back of the heel; it can make the arch flatten with more force; and it can make your toes do funny things. This one issue can play a significant role in why you get blisters over many areas of your foot.
It’s the most common stretch I give people for lots of foot problems, including some blisters – because tight calves have such an influence on foot function. However, technique is everything with calf stretches. I see people spending weeks or months on stretching, only to have been doing it incorrectly and wasting their time.
So, to help you get your technique right, I went searching on Youtube for a great video that demonstrated great technique. I looked high and low and, as difficult as it was to find one I liked, the best by far was from Ansell Chiropractic in Townsville, Queensland:
🚩 https://youtu.be/YGcqGD88JPw
🚩 https://www.ansellchiropractic.com.au/
Let me show you the elements of great calf stretching technique that are demonstrated so well in this video. Plus, one vital element that isn’t so visible here, which is to do with foot position.
1:20 GASTROCNEMIUS STRETCH
Face the wall, step forward and place both hands on the wall and lean your hips towards the wall. You’ll notice:
✅ The knee is locked right back so that back leg is completely straight
✅ The heel is firmly planted on the floor
✅ And the arms are straight
Unfortunately, we don’t really get a good look at the feet in this video. And there’s one massively important thing to make sure of when you do a calf stretch. And that is, correct foot position. This is the most common mistake I see people make.
2:14 Foot Position
👣 When you go to do this stretch, you’ll probably notice your back foot is pointing straight ahead or a little bit out-toed. What I want you to do, is slightly in-toe with that foot. Imagine there’s a line on the floor perpendicular to the wall. I just want you to line up the outer border of your foot with that line. When you do, if you look down at your foot, you’ll see it looks a bit in-toed. That’s what we want. It might feel a bit weird, but this makes sure the stretch goes through the Achilles and calf instead of your foot flattening and the stretch going elsewhere.
You should feel this stretch mainly at the top half of the calf. This is the gastrocnemius muscle. If you’re not feeling it here:
✅ Make sure your knee is locked right back
✅ Make sure your heel hasn’t lifted - really press that into the floor
✅ And double-check your foot position is a little bit intoed
👍 If you’re still not feeling the stretch, take your back foot back a little bit further. This is how you increase the stretch as the weeks go by. Just make sure that foot is still intoed.
👍 By the way, there should be very little weight going through the front leg. It’s just got to hang somewhere. This stretch isn’t about the front leg, it’s all about the back leg.
Remember: Toe-in. Heel down. Knee back.
Hold the stretch for at least 30 seconds. No bouncing – just hold it nice and still. And if you feel it give a little bit as it relaxes into the stretch, just lean in a bit further to maintain that same tension.
4:01 SOLEUS STRETCH
From here we’re going to target the other main muscle in the calf that shares the Achilles tendon - the soleus muscle. We do this by bending that back knee now instead of locking it back. You should feel this stretch more in the lower half of your leg. If you’re not feeling it there, bend your knee more and make sure you keep your back heel firmly planted on the floor – don’t let it lift up. And hold for at least 30 seconds.
4:28 How Long / How Often
I get people to do this:
▶ 3 times on each leg
▶ 3 times a day
▶ Plus after exercise
▶ For 8 weeks.
The effect of this stretch doesn’t kick in straight away, so you need to keep plugging away at it. Trust me, it will be worth it, in so many more ways than just blister prevention.
4:47 Disclaimer
Of course, if you experience any pain or discomfort when performing any exercise, stop immediately and seek the advice of your health care professional.
5:05 WRAPPING UP
If you’ve got tight calves and you’re having trouble with blisters under the ball of your foot or the back of your heel especially, make a start on these stretches. And if you’re not sure whether tight calf muscles are relevant to your blisters? Head over to https://www.blister-prevention.com, search for your blister location and find the answers you’re looking for.
Thanks for watching :)
Rebecca Rushton BSc(Pod)
Видео How To Stretch Your Calf Muscles - The Importance Of Foot Position канала Blister Prevention
Показать
Комментарии отсутствуют
Информация о видео
Другие видео канала
![BlisterPod Hydrocolloid Blister Plaster 6-Packs [PRODUCT UPDATE OCT 2023]](https://i.ytimg.com/vi/N4Lu62r4PF8/default.jpg) BlisterPod Hydrocolloid Blister Plaster 6-Packs [PRODUCT UPDATE OCT 2023]
BlisterPod Hydrocolloid Blister Plaster 6-Packs [PRODUCT UPDATE OCT 2023]![Providing Foot Care (Mostly Blister Management) at Athletic Events [Blister Prevention Office Hours]](https://i.ytimg.com/vi/HwEieg3SIa8/default.jpg) Providing Foot Care (Mostly Blister Management) at Athletic Events [Blister Prevention Office Hours]
Providing Foot Care (Mostly Blister Management) at Athletic Events [Blister Prevention Office Hours]![How To Use Compound Benzoin Tincture (Friar's Balsam) Single-Use Ampoules [Blister Prevention]](https://i.ytimg.com/vi/OaGWj_YefgI/default.jpg) How To Use Compound Benzoin Tincture (Friar's Balsam) Single-Use Ampoules [Blister Prevention]
How To Use Compound Benzoin Tincture (Friar's Balsam) Single-Use Ampoules [Blister Prevention] #30 Bow-Tie (Butterfly) Island Dressings For Toes
 #14 Hydrocolloid Blister Plasters (Like Compeed) - Which Blisters Do They Suit?
 #38 You NEED High Friction Levels To Give Your Foot Traction (Even If You’re Getting Blisters)...but
![Staying Blister Free in Summer: Moisture-Management Strategies [Blister Prevention Office Hours]](https://i.ytimg.com/vi/rMytxSN4V08/default.jpg) Staying Blister Free in Summer: Moisture-Management Strategies [Blister Prevention Office Hours]
Staying Blister Free in Summer: Moisture-Management Strategies [Blister Prevention Office Hours] Blister Prevention Office Hours - Foot Blister Q&A with Rebecca Rushton
 #40. Are foot blisters inevitable in your sport?
![Blister Prevention Masterclass For Professionals [Sneak Peek]: The Double Meaning of Friction](https://i.ytimg.com/vi/0n4QQUjPhH0/default.jpg) Blister Prevention Masterclass For Professionals [Sneak Peek]: The Double Meaning of Friction
Blister Prevention Masterclass For Professionals [Sneak Peek]: The Double Meaning of Friction![Update On Dr Doug Richie and Rebecca Rushton's Blister Research [Blister Prevention Office Hours]](https://i.ytimg.com/vi/K115sT8gAJQ/default.jpg) Update On Dr Doug Richie and Rebecca Rushton's Blister Research [Blister Prevention Office Hours]
Update On Dr Doug Richie and Rebecca Rushton's Blister Research [Blister Prevention Office Hours] Blister Prevention Office Hours - Breaking Down Posterior Heel Blisters
![Foot Blisters In Netball [Blister Prevention Office Hours]](https://i.ytimg.com/vi/yBeV18tofQo/default.jpg) Foot Blisters In Netball [Blister Prevention Office Hours]
Foot Blisters In Netball [Blister Prevention Office Hours]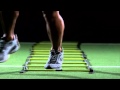 Blisters caused by side-to-side shear
 #7 Are Callouses Protective Of Blisters?
 #18 Which Blisters Will Orthotics Help Prevent?
 #3 Toe Socks For Blisters Between Toes - This Is How They Work
 #20 Blister Powders – How Much Moisture Do They Absorb? And Do They Keep Your Feet Dry?
 Testing 12 Fixation Tapes - Comparing Properties to Fixomull Stretch (The Gold Standard)
 #28 Quick Tip: Blister Lubricants + Blister Dressings