An old Coal scuttle from the remains - Renovation
In today's video, I would like to show you how to assemble an antique coal from the remnants of various coal.
Already in the past, I have renovated several coal pieces and I have some extra parts left. So I used it :)
If you have any information, you can share it with others on my Facebook page:
https://www.facebook.com/groups/951735661652138/
If you have any questions about the process, use machines or other things, ask me in the comments. I try to answer everyone and as soon as possible.
I'm sorry for my bad English, it's not my language.
I'm uploading videos about recovering mechanical things. I'm uploading videos about restoring old wooden things. I fix things as I can. I am self-taught. Therefore, if some practices are bad, then forgive me. Thank you.
Share and send if you like this recovery :)
Thanks for your advice on how to improve this channel!
youtube channel https://www.youtube.com/user/veradona1
action index:
00:01 Presentation of suitable remnants of coal
01:35 First I picked the right parts and saved the rest ...
01:47 As usual, soak all the parts in the caustic for 24 hours, and this time I used electrolysis.
03:15 Parts leach us so I have time to make a new handle and knob.
06:52 After 24 hours of leaching, I rinse the parts and mechanically clean the paint residue. This time the paint was more durable.
08:56 I swapped old feet for a better fit.
10:30 As usual I used a wire blade to remove rust
12:14 Hinge adjustment was necessary
14:00 ... even fine-tune the hinge stop
14:25 I welded the original holes in the carcass corpus because they were out of the top of the carcass.
16:08 There was still a need to close the hinges. This hill was originally a double-sided stump.
17:08 For the protection of the material I used a proven rust remover with tannin.
18:10 After the rust remover has dried, wipe off the dried residue with a metal wool.
18:50 Remaining handles for the top handle. I didn't have those anymore.
22:05 We shorten the welding shortcomings with polyester putty.
23:59 After grinding the dried putty we coat the surface with golden paint. I use a kitchen sponge. You can also use a brush, but usually it is destroyed.
24:59 Spray the metal parts with the base paint. Primer
25:45 We deepen the deep and various defects on the corpus. For these things, it is quite a problem that everything is 100% equal. Therefore, after sealing and grinding I chose again butt this time black black paint (mat) on which potential inequalities will not be seen.
28:01 After the paint has dried properly, we can start riveting.
28:40 The lines are stuck. For that I used a gold paint marker. (It is better if it is slightly dry to prevent it from slipping under the paper tape. Or spray the tape with clear varnish to drink from the ink paint and not to leak.)
32:33 The gold hills are left to be set before the assembly. For that I use black synthetic spray. Which is then best wiped with a cotton cloth.
35:40 Comparison before and after
36:20 Functionality test :))
My Patreon Page: https://www.patreon.com/VeradonaRestoration
My PayPal: veradona@email.cz
Видео An old Coal scuttle from the remains - Renovation канала Veradona Restoration
Показать
Комментарии отсутствуют
Информация о видео
Другие видео канала
![1920s Rare Battery Charger [Restoration]](https://i.ytimg.com/vi/60RTSNMrcOE/default.jpg) 1920s Rare Battery Charger [Restoration]
1920s Rare Battery Charger [Restoration] American machine - Restoration
 Rusty old Excelsior nut grinder - Restoration
 Antique Kitchen Scale - Restoration
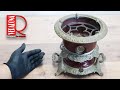 Small, travel, kerosene stove - Restoration, petrolejový vařič jaký jste možná ještě neviděli
 Old Christmas tree stand Restoration
 Antique Firefighter Helmet Restoration
 Do you know this press? - Restoration
 Old Travel Cooker - Restoration
 Old rusty table lamp Restoration
 I Restored And Repaired This Antique Ship Compass
 Antique Stone Gas Lamp Restoration with AMAZING outcome
 Door closer - Restoration
 Old rusty parquet polisher Restoration
 Rusty bone grinder - Restoration
 Salami slicer - Restoration, kráječ salámů
 90 Year Old Ice Cream Maker Restoration
 Antique and Broken Stove Restoration
 Rusted of antique iron Restoration
 Manual nettle cutter - restoration , Ruční řezačka na kopřivy