Simple Silk Screen : How to do it
A simple guide on how to screen print at home a small batch of shirts without the typical screen printing materials. Subscribe to the channel: https://bit.ly/2SaaYmX
Watch the one of a kind Birdhouse Episode (https://youtu.be/eYvMqk0hKGY)
Watch the MASSIVE Roof Sign Episode (https://youtu.be/Jcx2VoJEusc)
FOLLOW:
https://www.instagram.com/makeforothers/
#howto #diy #silkscreen
I'd been working on a Star Wars Boba Fett helmet for my friend George and while I’m pretty sure he’s going to wear it a lot...there may be places where he just can’t...like a work meeting or a wedding….so I wanted to make him something for those times and a t-shirt seemed like a great way to go.
First thing I did was take a reference picture of George’s helmet to use.
The photo got taken into Adobe Illustrator and I turned most of the distinguishing characteristics into lines. I combined those lines in different ways until ending up with the simplest shapes that would resemble a Boba Fett helmet.
George’s absolutely favorite band is “Rush” so I used the font they use for their logo for the Boba George on his shirt.
Once that was finished, I did a test of the design by cutting it out on cardstock with my silhouette cameo cutter. I like to do test of things before moving onto the final since there’s usually a difference between seeing something on screen and holding it in your hand.
This type of vinyl has a self adhesive back which makes connecting it to the screen really easy.
Some of the cuts weren’t perfect so I did some fixes with an x-acto blade.
Then, I cut out enough screen material to insert into the hoop that was a little bit bigger than the shirt design. After tightening the hoop a bit, I stretched out the screen as much as possible, tightened the hoop more and repeated. The goal was to get the screen as stretched out and as flat as possible.
A piece of transfer tape got cut so the vinyl could be taken off of it’s original backing and put onto the hoop screen without stretching out the vinyl or moving any of it around. This transfer tape had a medium tack (some people call it stickiness) because if it was too strong the vinyl would get damaged. After pressing it down, it slowly got pulled up with the vinyl attached and then it all got placed and pressed onto the hoop screen.
After pressing down a bunch to make sure the vinyl and screen were connected, the transfer tape got slowly pulled away. I used the low and slow technique so the vinyl and screen wouldn’t get damaged.
The screen around the vinyl got covered in duct tape so ink could only get through where it was supposed to go and it also gives the screen a little more structure.
An old shirt got used to do some tests since this design was the most complicated one I’d done with this technique. Scraping the ink over the screen like printers do with a typical shirt screen didn’t work out that great with this design.
When cleaning the screen I was careful to keep it facing down so the water pressure wouldn’t separate the vinyl from the screen. At this point you may be thinking this technique isn’t that great...and if you’re printing a complicated design on a lot of shirts with a lot of colors you would be right. But, I’m just doing one shirt with one color.
Tried again, but this time used a foam brush. The straight up and down worked better, but it still isn’t as good as it could be.
After another rise and repeat I tried again and pushed down more times over the whole design. Some areas still weren’t great so I tried just painting straight on the shirt. This actually worked out pretty well because of the shirt design.
After another rinse and repeat it was time for the final shirt. I mixed the red and black screen printing inks to get to a color close to Boba Fett’s, but didn’t mix the colors completely so there would be some color variation.
Did a double dab on the screen print to make sure it all got covered, pulled away the screen while almost getting my friendship bracelet in the fresh ink and then went in to tweak some details with a small brush. Still wanted to the keep the imperfect rough feel of the ink so I didn’t fill everything in.
It dried overnight and the next day I used a sheet of parchment paper and a hot iron to set the ink. Your ink may have different requirements so definitely read the instructions before doing your thing. After about 4 minutes, the ink was set and the shirt was ready to go!
Видео Simple Silk Screen : How to do it канала Make For Others
Показать
Комментарии отсутствуют
Информация о видео
Другие видео канала
 Making a Star Wars Story
 Funko Pop Custom Build: Megatron
 Spaghetti and Meatballs (minimal tools)
 Custom Yard Signs for Jason SURPRISE l How to Make
 How to Make Landscape Photos AWESOME
 Turn a House into a Bird House
 How to Make Dog Lover’s Birthday SURPRISE!
 How to Make the Voltron Blazing Sword
 Making a Halloween Memory
 Star Wars : Boba Blues (Trailer)
 How to Make a Custom K-2SO Funko Pop
 How to Make a Birthday Surprise for Barry
 How to Make Star Wars Jawa : Custom Funko Pop
 Jawa Funko Pop DIY Build
 How to Make Chess Set and Table
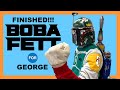 Star Wars "Casual Cosplay"
 Star Trails : Tutorial
 How to Make Simple Storage Tower : Speed Build
 Funko Pop Custom Build: K-2SO
 How to Make Customized Bumblebee: DIY Funko Pop Build