IPSi Print Lab - Epson C6000/C6500 Series Full Bleed Printing Guide
How do I get my artwork to cover the whole label?
Epson C6000 Driver Download - https://epson.com/Support/Printers/Label-Printers/ColorWorks-Series/Epson-ColorWorks-CW-C6000A/s/SPT_C31CH76101
Epson C6500 Driver Download - https://epson.com/Support/Printers/Label-Printers/ColorWorks-Series/Epson-ColorWorks-CW-C6500A/s/SPT_C31CH77101
For more information, contact us through https://www.ipsiscan.com
For ordering ink, labels, or supplies, check out https://www.infinitylabelgroup.com
0:00 - Intro
0:26 - What is a full-bleed label?
0:43 - What is the problem we are trying to solve?
1:15 - Step 1: Make sure your label is set up correctly in your design software.
2:07 - Adjusting print position using the LCD interface
2:44 - Adjusting print position using the PrinterSetting application.
4:54 - Showing our results.
5:29 - Outro
[Instructions]
Let's go into our menu, go to media setting, scroll down to print position adjustment. And through this menu, we can make very small adjustments. That'll let us line up the image to the label exactly the way we want it. In order to do this, we're just going to select top position or left position depending on what your label needs and move it in very small increments, test printing between each one to see if we're closer. You'll have to use your judgment to decide how much to move it one way or the other. The other way to make adjustments to our printing position is through the Epson printer setting utility, which is downloaded when you get the drivers for your printer off of Epson's website, if you don't have those drivers yet, I'll make sure to put links in the description to the drivers for the C6000 and 6500 printers. If you do have them already, in order to find them you're going to go down to your windows search and just type C6500 or C6000, and then click on the application. It'll take a minute to search for your printer. And once you have this screen, you can select the printer from this menu. We can hit 'okay'. If you're using USB, it should show up right away, but if you're using a printer over the network, you might have to hit the 'Ethernet' button and then hit search. Mine showed up right away, so I'll select it and hit 'okay'.
You can begin communicating with the printer. It may take a second, but once it's done, you should arrive at this screen. This utility has lots of useful tools for your Epson printer, but for this demonstration, we're only going to be using the position adjustment tab. You can see a menu, very similar to the one we saw when we were adjusting our position, using the printer interface in order to make our adjustments. All we're going to do is select vertical or horizontal direction. Hit 'Start Adjustment' and here we have a very useful picture that tells us which way we need to move this value in order to get the label where we want it. If I decided that the label needs to be moved further to the right, well here, we can see that. That means we need a value that is further negative. So I have it at 0.7, maybe I need to go down to 0.5. I'll hit 'Apply Settings'. I'll hit 'Yes' and it may take a second, but you should get a screen that says 'Finished' and confirms that the information has been sent to the printer.
Now it's time to run another test print and see what your new label looks like. If you're satisfied with your results, congratulations, you're ready to get printing. If you're not then head back into your adjustments and change those values as you see necessary. Through our adjustments, we've minimized the amount of ink that's printing on the liner, and we have a beautiful, full bleed color label.
Видео IPSi Print Lab - Epson C6000/C6500 Series Full Bleed Printing Guide канала Integrated Productivity Systems LLC
Показать
Комментарии отсутствуют
Информация о видео
12 декабря 2020 г. 4:00:38
00:06:10
Другие видео канала
 IPSi Print Lab - Epson ColorWorks C6000A: Unboxing And Quick Setup
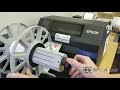 IPSi Print Lab - Epson ColorWorks C6500: DPR Label Unwinder/Rewinder Demo
 How Easy Is It? Episode 3: Epson ColorWorks C6500 Printing Borderless Labels
 Epson ColorWorks GP-C831 End-Of-Sale: What To Do Next (C831/C6500 Comparison)
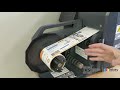 IPSi Print Lab - Epson ColorWorks C7500G Print Speed Demo
 IPSi Print Lab - Epson ColorWorks C6500: Maintenance Box Replacement
 IPSi Print Lab - Epson C6000P: Peel-And-Present Demo
 We are printing labels! The new Epson C6500 print shop update :)
 IPSi Print Lab - Epson C6500A: Loading Internal Roll Labels
 How fast the Afinia L801 Prints vs the Epson C6500 and Label material / sticker paper
 IPSi Print Lab - Epson ColorWorks C3500: Loading Fanfold Labels
 Epson ColorWorks C6000 /C6500 Series Color Label Printers - FIRST LOOK
 How Easy Is It? Episode 5: Epson ColorWorks C6500 Matte Black Ink Version
 Stickers VS Labels - Label printer and printing stickers.
 IPSi Print Lab - Epson C6000A: Unboxing & Quick Setup (4K)
 IPSi Print Lab - Epson C6000P: DPR Roll-To-Roll Kit Setup & Demo (4K)
 Redefining DTG Printing with the Epson SureColor F3070
 Epson ColorWorks C7510G Label Printer
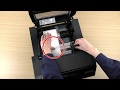 Loading Roll Paper in the Printer (CW-C6000/CW-C6500 Auto Cutter Model)
 IPSi Print Lab - Epson ColorWorks C3500: Diagnosing Blurry Edges & Adjusting Louvers