Arduino RC interface for helicopters
My friend is a model maker of RC helicopters.
For about forty years he has been building helicopters that are big, and I find it amazing how he can make them fly. However, he has no experience in Arduino and asked my help for a specific project that he’s making.
He needs to have a stabilised camera and the rear black headlight mounted on the helicopter move with a specific rotation angle and loop when a command on the analog remote control is activated.
Specifically, we would need to connect one channel of a Futaba RC Receiver so that, by operating the channels in question from a switch on the Radio Transmitter and only then, the servo control connected to that channel starts to make a series of preset movements on Arduino, until it is always deactivated by the same switch.
More precisely:
channel 1 switch in position 1: servo stopped in initial position with light OFF
channel 1 switch in position 2: switch on the led light (search light)
channel 1 switch in position 3: servo starts the movement with light ON
So we managed to get both in a room and while my friend was explaining what the servo needed to do, I was coding on the Arduino IDE.
At the end the result was done and we are here to share it with whoever may be interested.
As usual the sketch and the diagrams are available by asking on the YouTube chat.
Hope you enjoy and, if you did, subscribe to my channel!
Видео Arduino RC interface for helicopters канала Carlo Stramaglia
Показать
Комментарии отсутствуют
Информация о видео
Другие видео канала
 NextPCB Hi-Fi Phono Pre Amplifier #nextpcb #hifi #phono
 Fantastic IOT dashboard with ESP32 and TagoIO @TagoIO
 Car Garage Detection System
 Pioneer CD Player lens focus fix (PD-6700)
 Send Encrypted LoRa messages using Reyax RYLR998
 Seeed LoRa E5 Tutorial with ST programmer
 LoRa E5 mini tutorial
![LoRa e Arduino Cloud IOT [ITA]](https://i.ytimg.com/vi/nbRPRY1xNRQ/default.jpg) LoRa e Arduino Cloud IOT [ITA]
LoRa e Arduino Cloud IOT [ITA] Two way LoRa mobile transmitters
 LoRaNow Gateway and Node
 DFRobot Transparent Display Clock
 Arduino TV Audience Measurement
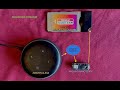 CAM WiFi pilotata da Alexa usando Arduino Nano 33 IOT. Si può cambiare canale con Alexa
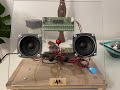 Bluetooth VU Meter Receiver
 Arduino TTN LoRa node device using PCB Way
 Arduino Tea Bag Timer
 APAN Arduino
 Elegoo starter kit easy tutorial. Quick installation guide.
 Subscribe Carlo Stramaglia
 Smart Timer with #Arduino #DFRobot Gravity DFR0760 Speech Synthesis module