Flattening a Chainsaw Milled Slab | DIY Router Sled
---⏱️Timestamps⏱️---
0:00 How to flatten slabs with a router
00:37 Making a slab flattening jig
03:24 Dust collection for a slab flattening jig
06:52 Flattening a wood slab
09:28 Making levelers for stacking lumber
10:30 How to make a level surface for stacking slabs
I love milling my own lumber using an Alaskan chainsaw mill. Unfortunately, when I went to cut this oak log I just couldn’t get it down off the pile of logs. It was wedged in there pretty good. What I ended up doing was cutting the first few slabs off the top of the log. That lightened it up enough to finally pry it loose and get it onto the ground. What complicated it even more was that I hit metal…a lot of metal…while milling. All of this combined for some really wonky slabs. What I decided to do is build a slab flattening jig that allows me to flatten and stack the slabs so they will eventually be ready for use.
This jig is made with construction lumber, MDF, and plywood. The walls of the sled were made from 10ft long 2x8 boards that I cut to approximately 7” wide. I connected the sides using 2x4s that I cut to 3” wide. Cutting the edges off the boards gave me good, smooth edges for aligning the boards when constructing the jig. Once the lumber was screwed together, I laid a piece of MDF on top so that I had a smooth surface for loading and unloading slabs.
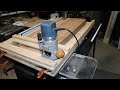
The jig that holds the router is made from 3/4" plywood. Essentially, it’s a trough that holds the router so that it has enough room to slide back and forth with no friction, but not loose enough to wiggle around. There is about a 2” gap in the center of the jig for the router bit to fit through. Lastly, I added a dust port so that I can hook up my shop vac.
Here is your public service announcement for this project: please wear your protective equipment. No matter what dust collection you are using, dust gets everywhere. You don’t want that in your lungs. Also, eye protection is a must as shavings and chips can go flying.
I put the slab on the sled and stabilized it with a few wedges. Then it was back and forth with the router, inching (literally) closer to the end. Once I felt the slab was flat enough, I flipped it over and did the other side. When I use these slabs for their final project, I’ll do this once more, making a lot of passes to ensure a smooth surface.
Slabs have to have some place to go. I made some steel levelers that allow me to create a flat surface for them to lay upon. They are made from 1/4" square tube and bolts. The bolts allow me to adjust the height of the levelers.
I hope that this video helped you to get an idea for how you can make your own router sled. As an Amazon Associate I earn from qualifying purchases.
•• Tools & Materials ••
Dust Deputy: https://amzn.to/3aXeqe6
Rigid shop vac: https://amzn.to/2U1V6Gz
Makita circular saw: https://amzn.to/2O54epZ
Makita drill: https://amzn.to/2U6DJnP
Bosch Router: https://amzn.to/30Yus2A
Jet table saw: https://amzn.to/2RwQTJa
Spax 2-1/2” screws: https://amzn.to/2OaLm8X
1-1/4” coarse screws: https://amzn.to/2GBt5xn
Slab flattening router bit: https://amzn.to/38S4ssi
CA glue: https://amzn.to/38VSy0V
CA activator spray: https://amzn.to/36AvS4I
Dust mask: https://amzn.to/2O4x3Tx
Eye protection: https://amzn.to/37F5M1N
•• Tech Gear ••
Nikon DSLR Camera: https://amzn.to/2vtIJJ5
HP Omen PC: https://amzn.to/2RxxXtH
Asus 24” Monitors: https://amzn.to/2RVGky9
•• My Links ••
Website: https://genealogistwoodworker.com/
Instagram: https://www.instagram.com/genealogistwoodworker/
Facebook: https://www.facebook.com/genealogistwoodworker/
Esty: https://www.etsy.com/shop/GenWoodworker
Видео Flattening a Chainsaw Milled Slab | DIY Router Sled канала Newton Makes
0:00 How to flatten slabs with a router
00:37 Making a slab flattening jig
03:24 Dust collection for a slab flattening jig
06:52 Flattening a wood slab
09:28 Making levelers for stacking lumber
10:30 How to make a level surface for stacking slabs
I love milling my own lumber using an Alaskan chainsaw mill. Unfortunately, when I went to cut this oak log I just couldn’t get it down off the pile of logs. It was wedged in there pretty good. What I ended up doing was cutting the first few slabs off the top of the log. That lightened it up enough to finally pry it loose and get it onto the ground. What complicated it even more was that I hit metal…a lot of metal…while milling. All of this combined for some really wonky slabs. What I decided to do is build a slab flattening jig that allows me to flatten and stack the slabs so they will eventually be ready for use.
This jig is made with construction lumber, MDF, and plywood. The walls of the sled were made from 10ft long 2x8 boards that I cut to approximately 7” wide. I connected the sides using 2x4s that I cut to 3” wide. Cutting the edges off the boards gave me good, smooth edges for aligning the boards when constructing the jig. Once the lumber was screwed together, I laid a piece of MDF on top so that I had a smooth surface for loading and unloading slabs.
The jig that holds the router is made from 3/4" plywood. Essentially, it’s a trough that holds the router so that it has enough room to slide back and forth with no friction, but not loose enough to wiggle around. There is about a 2” gap in the center of the jig for the router bit to fit through. Lastly, I added a dust port so that I can hook up my shop vac.
Here is your public service announcement for this project: please wear your protective equipment. No matter what dust collection you are using, dust gets everywhere. You don’t want that in your lungs. Also, eye protection is a must as shavings and chips can go flying.
I put the slab on the sled and stabilized it with a few wedges. Then it was back and forth with the router, inching (literally) closer to the end. Once I felt the slab was flat enough, I flipped it over and did the other side. When I use these slabs for their final project, I’ll do this once more, making a lot of passes to ensure a smooth surface.
Slabs have to have some place to go. I made some steel levelers that allow me to create a flat surface for them to lay upon. They are made from 1/4" square tube and bolts. The bolts allow me to adjust the height of the levelers.
I hope that this video helped you to get an idea for how you can make your own router sled. As an Amazon Associate I earn from qualifying purchases.
•• Tools & Materials ••
Dust Deputy: https://amzn.to/3aXeqe6
Rigid shop vac: https://amzn.to/2U1V6Gz
Makita circular saw: https://amzn.to/2O54epZ
Makita drill: https://amzn.to/2U6DJnP
Bosch Router: https://amzn.to/30Yus2A
Jet table saw: https://amzn.to/2RwQTJa
Spax 2-1/2” screws: https://amzn.to/2OaLm8X
1-1/4” coarse screws: https://amzn.to/2GBt5xn
Slab flattening router bit: https://amzn.to/38S4ssi
CA glue: https://amzn.to/38VSy0V
CA activator spray: https://amzn.to/36AvS4I
Dust mask: https://amzn.to/2O4x3Tx
Eye protection: https://amzn.to/37F5M1N
•• Tech Gear ••
Nikon DSLR Camera: https://amzn.to/2vtIJJ5
HP Omen PC: https://amzn.to/2RxxXtH
Asus 24” Monitors: https://amzn.to/2RVGky9
•• My Links ••
Website: https://genealogistwoodworker.com/
Instagram: https://www.instagram.com/genealogistwoodworker/
Facebook: https://www.facebook.com/genealogistwoodworker/
Esty: https://www.etsy.com/shop/GenWoodworker
Видео Flattening a Chainsaw Milled Slab | DIY Router Sled канала Newton Makes
Показать
Комментарии отсутствуют
Информация о видео
Другие видео канала
 Making A Router Sled And Flattening Small Slabs For My Next Project
 Make the PERFECT Woodworking Gift in ONE DAY!
 This Ribbon is WOOD! Making Wooden Present Box
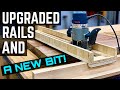 Upgraded router sled rails and a new flattening bit! / How to flatten a slab
 Insider Tips For Slab Flattening Mill PRO | Deep Dive | Woodpeckers Tools
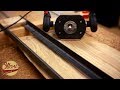 Probably the Easiest Router Sled out there ( Flattening a Live Edge Slab without a Planer)
 5 Ways to Joint Boards Without A Jointer | Woodworking Tip
 The Router Bits - How to Build and Use a Router Planer
 #MWShopTalk How to flatten a slab with a router sled
 Router On Rails! // Leveling and Flattening Surfaces so that They're Smooth as a Baby's Bottom! 🍑
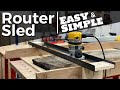 Router Sled — Build Under an Hour!
 Why Accuracy Matters in Woodworking - Common Mistakes to Avoid
 Making a Plaid Cutting Board! BONUS - Crazy Finishing Technique
 Ultimate Assembly Table with Torsion Box Top and VACPAD System
 End Grain Cutting Board - Optical Illusion 4K
 How to flatten wood with router sled/ flatten wood with router/ flatten wood no planer
 Adjustable Router Sled Homemade
 Slab Flattening Mill - Woodpeckers
 How to Flatten a Live Edge Wood Slab
 How to Make A Bowl with a Router