Gluing a 3D Printed TESLA ROADSTER
The first step of building this 1/8th scale model of the Tesla Roadster was bonding all the 3D printed parts together. I 3D printed everything in PLA on my Prusa Mini. Then I used 60-grit sandpaper to prepare the surface and fast-dry epoxy glue with a hardener to join the parts. I cleaned up the excess glue using isopropyl alcohol (IPA) to prepare the car for the next step.
Materials (with affiliate links):
- 60-grit sandpaper: https://amzn.to/33gAEpq
- 2 part epoxy glue: https://amzn.to/3jjeybF
- Isopropyl Alcohol (IPA): https://amzn.to/36pxDoK
- Filament: Prusament PLA in Galaxy Black, Azure Blue, and Lipstick Red: https://amzn.to/3AfFYs8
As an Amazon Associate, I earn from qualifying purchases.
Series:
Part 1: Glue https://youtu.be/zVc5Vs85uWw
Part 2: Sandpaper and Putty https://youtu.be/opyK8X4zyV4
Part 3: Paint https://youtu.be/pg29m_UMMhU
Critique:
This test's primary purpose was to review the constraints of printing a 3d model that was not meant to be printed. Although this is an extremely high-quality and beautiful model, it needs extra work to be 3d printable. For example, all the windows and lights were printed 1% to 5% smaller than the originally intended size because otherwise don't fit. The parts need a gutter between them, and these ones are exact to the millimeter which is not accurate on physical objects. The same with the wheels and brakes: I drilled the holes to be 1mm wider in order to fit everything together.
3D model by Sim3D_ https://cults3d.com/en/3d-model/art/tesla-roadster-2020-3d-model-for-3d-printing-stl-files
Music by Joakim Karud https://youtube.com/joakimkarud
Видео Gluing a 3D Printed TESLA ROADSTER канала Leandro Linares
Показать
Комментарии отсутствуют
Информация о видео
Другие видео канала
 Making the best Arduino Clock for beginners
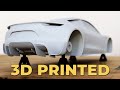 Sanding a 3D Printed TESLA ROADSTER for Months
 Building a Minimalistic MIDI Controller
 Transforming TRASH into a Studio Light
 Designing my own Game Console
 3D Printing an RC Car for the First Time
 Making the Xbox-ish handheld Microsoft won't
 Spray Painting a 3D Printed TESLA ROADSTER
 Building an Exposure Box with 500 UV LEDs
 How they probably made the PlayStation Portal