Create Perfect 3D Resin Prints by Finding the Optimal Layer Exposure Time
Full article with all STL Files - https://core-electronics.com.au/tutorials/perfect-resin-print-exposure-setting.html
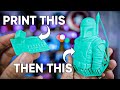
Understanding exposure test models means you can nail the exposure time for your printer-resin combo. This is the secret to producing crispy 3D prints that capture every single detail of the original design. This is the Fourth Episode in our Resin Printing Series.
Related Information
How To Slice Models For Resin 3D Printing With Lychee Slicer (Third Episode) - https://core-electronics.com.au/tutorials/resin-printing-3d-slicing-software.html
How To Complete Your First Resin 3D Print (Second Episode) - https://core-electronics.com.au/tutorials/workflow-of-resin-printers.html
Getting Started with Resin 3D Printing and Tools (First Episode) - https://core-electronics.com.au/tutorials/overview-resin-printing-set-up.html
Multiple Colours on a Single Resin Print - https://core-electronics.com.au/tutorials/multi-coloured-resin-print.html
Hot Trick When Replacing Your FEP Sheet - https://core-electronics.com.au/tutorials/replace-fep-resin-printer.html
Colourise 3D Printer Resin using Alcohol Inks and Pearl Ex Powder - https://core-electronics.com.au/tutorials/alcohol-ink-resin-printers.html
If you have any questions about this content or want to share a project you're working on head over to our maker forum, we are full time makers and here to help - http://coreelec.io/forum
Layer Exposure Time determines the light exposure duration for a single layer of an object that you are trying to print. Unlike filament printing (where it can feel like there is an almost endless amount of settings that you must know about for perfect 3D prints) resin 3D printing has much simpler dials to adjust up and down. And the most crucial dial is Layer Exposure Time and its wrong adjustment is one of the major reasons why resin 3D prints fail. It is all about finding that sweet spot. The best way to test for and find the correct Layer Exposure Time for your set-up is to print a couple of exposure test models with your Resin 3D printer at different exposure amounts. You can adjust the exposure settings directly through your 3D resin printer user interface (UI) or in your slicing software. Under-exposing or over-exposing can really cause havoc with the resin printing experience. Too long exposure will result in light bleeding and scattering deep through the resin material resulting in a loss of intricate details and dimensional inaccuracy. Too short an exposure will create an under-cure result. Under-curing can be identified by several factors such as layer de-laminations in the middle of the part, serious loss or miniaturisation of intricate details, general poor model adhesion to the build plate, or the worst, the entire model falling off the build platform. Bottoms layers are the first few layers that are exposed to UV light in your model and bottom layer exposure times are always longer than normal layers exposure times. They are exposed longer so that the model can adhere more securely to the build platform.
As a general rule for Normal Layer Exposure Time use 0.5-5 seconds for Monochrome Screen Printers and 2-20 seconds for RGB Screen Printers. Another good rule of thumb to follow is to set the Bottom Layer Exposure Time to be 8-12 times longer than the Normal Layer Exposure Time. This is a good generally but make sure to keep the bottom exposure time lower than ~30 seconds.
Core Electronics is located in the heart of Newcastle, Australia. We're powered by makers, for makers. Check us out if you are looking for:
LD-002H UV 3D Printer: https://core-electronics.com.au/catalog/product/view/sku/CE07526
LD-002R UV 3D Printer: https://core-electronics.com.au/catalog/product/view/sku/CE06813
Creality UV Resin: https://core-electronics.com.au/3d-printers-australia/resins/creality-resin.html
Isopropyl Alcohol (IPA): https://core-electronics.com.au/catalog/product/view/sku/CE04601
Creality Wash and Cure Machine (UW-01): https://core-electronics.com.au/catalog/product/view/sku/CE07750
0:00 Intro
0:12 What is Exposure Time
0:31 Results of Bad Exposure Settings
1:02 Validation Matrix Overview
1:30 Decode the Matrix
2:27 Exposure Setting Location in Lychee Slicer
3:36 Setting Location in Chitubox Slicer
3:45 Validation Matrix Spectrum
4:50 View of Perfect Model Result
5:14 Overexposed Model Result
5:39 Underexposed Model Result
6:45 Bottom Layers (Burn in Layers) Settings
7:24 Do some testing!
7:55 Exposure Setting Location through UI
8:12 Make:Rook Calibration Test Piece
8:52 Print Your Dreams!
9:07 When To Run Exposure Tests
9:40 Extra Tips
10:11 Outro
Видео Create Perfect 3D Resin Prints by Finding the Optimal Layer Exposure Time канала Core Electronics
Показать
Комментарии отсутствуют
Информация о видео
Другие видео канала
 Perfect Resin 3D Prints | Exposure Calibration Testing
 Find the Perfect Exposure for Resin 3D Printing With UVTools!
 Why Resin 3D Prints Fail - Improve Your Prints - Tips on Understanding Overhangs and Supports
 Can we use Effect Pigments in Resin Printers?
 Find The Perfect Exposure Time For Resin Printer - Anycubic Photon Mono X
 How to make an OCEAN TABLE – Awesome ideas – Epoxy Resin art
 (HOW) I fixed the Ugly Layers on my 3D Printer
 Speedpaints Review: I'm Never Buying Contrast Paint Again. Army Painter Speedpaint is Good!
 How to find the perfect temperature for your 3D prints!
 BETTER cleaning & curing of 3D resin prints by VOG
 3D print supports EASY GUIDE by VOG (VegOilGuy)
 Texturing 3D Prints for Strength!
 8K, 4K, 2K - What Printer Resolution is Right for YOU?
 Getting CRISPY Resin Prints for Miniatures
 Are you destroying your LCD screen when resin 3d printing?? Learn what settings may be doing it...
 Resin exposure calibration/test - stop exposing yourself...
 How to get the best Clear Resin 3D Prints
 2021 Hands Down Best Printer For The Money - Elegoo Saturn 4k Mono Resin 3D Printer
 The Best Resin 3D Printing Tool You've Never Heard Of
 Resin 3D Printing Safety - Important for Beginners!