ESP32 Generate a PWM wave visualizing the waveform on an OLED display
Steps:
1. Read sound sensor values from an analog pin (GPIO 4 in my case).
2. Map sound sensor input to a PWM duty cycle.
3. Generate a PWM signal using the ESP32 LEDC library.
4. Display the waveform on an OLED (SSD1306) display in real time.
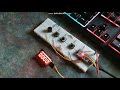
Connections
• Sound sensor:
o ADC (Analog to digital converter) GPIO 4
o VCC 3.3V
o GND GND
• OLED Display:
o VCC 5.v
o SDA GPIO 7
o SCL GPIO 6
• PWM Output:
o PWM Pin Any GPIO that supports PWM (e.g.,in this case GPIO 5)
How the Code Works
This code takes input from a sound sensor, generates a PWM signal, and visualizes it as a scrolling waveform on an OLED display. Here’s how it works:
________________________________________
Reading the Sound Sensor Input
• The analogRead(SOUND_SENSOR_PIN) function reads the sound level.
• The value ranges from 0 to 4095 (since ESP32 uses a 12-bit ADC).
• We map this value to a PWM duty cycle between 0 and 255:
int pwmDuty = map(soundValue, 0, 4095, 0, 255);
________________________________________
Generating the PWM Signal
• ESP32 uses the LEDC API (Low-Energy LED PWM Controller) for PWM output.
• The PWM is generated on GPIO 5 using:
ledc_set_duty(LEDC_LOW_SPEED_MODE, PWM_CHANNEL, pwmDuty);
ledc_update_duty(LEDC_LOW_SPEED_MODE, PWM_CHANNEL);
• This converts sound intensity into a PWM signal, which can drive an LED, speaker, or other devices.
________________________________________
Storing and Shifting Past Sound Values
• To create a smooth scrolling waveform, we store past sound values in an array called waveform[]:
#define WAVEFORM_WIDTH SCREEN_WIDTH // 128 points for OLED width
int waveform[WAVEFORM_WIDTH] = {0}; // Buffer storing past values
• Every loop, we shift all values left and insert the new sound value at the end:
for (int i = 0; i WAVEFORM_WIDTH - 1; i++) {
waveform[i] = waveform[i + 1];
}
waveform[WAVEFORM_WIDTH - 1] = map(pwmDuty, 0, 255, SCREEN_HEIGHT, 0);
________________________________________
4️Drawing the Scrolling Waveform on OLED
• We clear the display to refresh the frame:
display.clearDisplay();
• We draw the PWM value in text:
display.setCursor(0, 0);
display.print("PWM: ");
display.print(pwmDuty);
• We then connect the waveform points using drawLine():
for (int i = 1; i WAVEFORM_WIDTH; i++) {
display.drawLine(i - 1, waveform[i - 1], i, waveform[i], SSD1306_WHITE);
}
• Finally, we update the OLED screen:
display.display();
________________________________________
Adding a Small Delay
• To make the waveform scroll smoothly, we add a 50ms delay:
delay(50);
• This ensures smooth movement while keeping it responsive.
Code:
https://github.com/ukkokalevala/Pulse_Wave_Mudulation_V1.git
Видео ESP32 Generate a PWM wave visualizing the waveform on an OLED display канала Electricum
1. Read sound sensor values from an analog pin (GPIO 4 in my case).
2. Map sound sensor input to a PWM duty cycle.
3. Generate a PWM signal using the ESP32 LEDC library.
4. Display the waveform on an OLED (SSD1306) display in real time.
Connections
• Sound sensor:
o ADC (Analog to digital converter) GPIO 4
o VCC 3.3V
o GND GND
• OLED Display:
o VCC 5.v
o SDA GPIO 7
o SCL GPIO 6
• PWM Output:
o PWM Pin Any GPIO that supports PWM (e.g.,in this case GPIO 5)
How the Code Works
This code takes input from a sound sensor, generates a PWM signal, and visualizes it as a scrolling waveform on an OLED display. Here’s how it works:
________________________________________
Reading the Sound Sensor Input
• The analogRead(SOUND_SENSOR_PIN) function reads the sound level.
• The value ranges from 0 to 4095 (since ESP32 uses a 12-bit ADC).
• We map this value to a PWM duty cycle between 0 and 255:
int pwmDuty = map(soundValue, 0, 4095, 0, 255);
________________________________________
Generating the PWM Signal
• ESP32 uses the LEDC API (Low-Energy LED PWM Controller) for PWM output.
• The PWM is generated on GPIO 5 using:
ledc_set_duty(LEDC_LOW_SPEED_MODE, PWM_CHANNEL, pwmDuty);
ledc_update_duty(LEDC_LOW_SPEED_MODE, PWM_CHANNEL);
• This converts sound intensity into a PWM signal, which can drive an LED, speaker, or other devices.
________________________________________
Storing and Shifting Past Sound Values
• To create a smooth scrolling waveform, we store past sound values in an array called waveform[]:
#define WAVEFORM_WIDTH SCREEN_WIDTH // 128 points for OLED width
int waveform[WAVEFORM_WIDTH] = {0}; // Buffer storing past values
• Every loop, we shift all values left and insert the new sound value at the end:
for (int i = 0; i WAVEFORM_WIDTH - 1; i++) {
waveform[i] = waveform[i + 1];
}
waveform[WAVEFORM_WIDTH - 1] = map(pwmDuty, 0, 255, SCREEN_HEIGHT, 0);
________________________________________
4️Drawing the Scrolling Waveform on OLED
• We clear the display to refresh the frame:
display.clearDisplay();
• We draw the PWM value in text:
display.setCursor(0, 0);
display.print("PWM: ");
display.print(pwmDuty);
• We then connect the waveform points using drawLine():
for (int i = 1; i WAVEFORM_WIDTH; i++) {
display.drawLine(i - 1, waveform[i - 1], i, waveform[i], SSD1306_WHITE);
}
• Finally, we update the OLED screen:
display.display();
________________________________________
Adding a Small Delay
• To make the waveform scroll smoothly, we add a 50ms delay:
delay(50);
• This ensures smooth movement while keeping it responsive.
Code:
https://github.com/ukkokalevala/Pulse_Wave_Mudulation_V1.git
Видео ESP32 Generate a PWM wave visualizing the waveform on an OLED display канала Electricum
Комментарии отсутствуют
Информация о видео
27 марта 2025 г. 18:12:04
00:08:02
Другие видео канала
 Arduino Nano Countdown Timer With 3 set up buttons and a buzzer
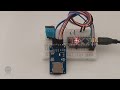 Arduino Nano logs temperature and humidity from a DHT11 sensor to an SD card every 1 minutes.
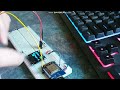 ESP8266 D1 Mini-Pro Potentiometer Calibration on an Oled display
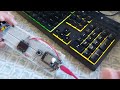 ESP32 WiFi Range Extender
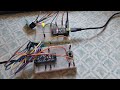 Arduino nano NRF24 LoRa with press button control LED
 ESP8266 D1 Mini-Pro Control Led With Press Button
 ESP-NOW ESP32 AI Thinker with NodeMCU Remotely take a picture.
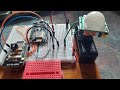 ESP32Cam motion detection will save pictures automatically on the SD card
 Raspberry Pi zero W ds18b20 temperature sensor shows values on an oled screen
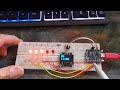 ESP8266 Binary count to 31 with 5 LED synchronized with Oled
 ESP32 A real-time, moving PWM square wave that responds dynamically to sound
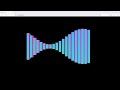 ESP32 with Three.Js WebSocket-Based Bar-Style Equalizer
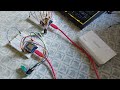 ESP8266 RFN24L01 Receive Signal Strength Index Tester
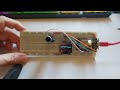 ESP32 simplex noise wave with sound sensor display on an oled screen
 ESP8266 Tracking Moon with an LCD1602 i2c shows Azimuth and Altitude
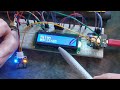 ESP8266 Display multi timezone on various cities with HD44780 LCD
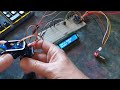 ESP8266 Rotary Encoder move servo motor with LCD displaying angle degrees values
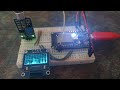 ESP32 Oscilloscope look like dynamic amplitude waves display on OLED
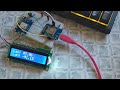 ESP8266 Tracking Dragon CRS 31 SpaceX with GPS NEO6M shows values on i2c LCD
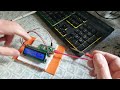 Raspberry Pico weather report via WiFi on a LCD screen
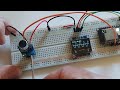 ESP32 Parlin brain wave simulation