- Популярные видео
- Авто
- Видео-блоги
- ДТП, аварии
- Для маленьких
- Еда, напитки
- Животные
- Закон и право
- Знаменитости
- Игры
- Искусство
- Комедии
- Красота, мода
- Кулинария, рецепты
- Люди
- Мото
- Музыка
- Мультфильмы
- Наука, технологии
- Новости
- Образование
- Политика
- Праздники
- Приколы
- Природа
- Происшествия
- Путешествия
- Развлечения
- Ржач
- Семья
- Сериалы
- Спорт
- Стиль жизни
- ТВ передачи
- Танцы
- Технологии
- Товары
- Ужасы
- Фильмы
- Шоу-бизнес
- Юмор
How to Customize Your Forecast View in Fullcast
Learn how to customize your forecast view in Fullcast with this step-by-step tutorial—master metrics, filters, and roles!
Are you ready to customize your forecast view and unlock the full potential of the Fullcast platform? In this comprehensive Fullcast tutorial, we'll walk you through the complete process of creating personalized saved views that help you analyze data more efficiently and take action faster.
When you customize your forecast view, you gain control over three essential components: metrics, data columns and filters, and role details. Let's break down each step so you can build the perfect view for your workflow.
Step 1: Select Your Key Metrics
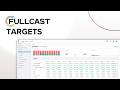
The first step to customize your forecast view is choosing the metrics that matter most to your analysis. Simply click the plus chart button to add metrics to your summary panel. This allows you to see your most important KPIs at a glance every time you open your customized view.
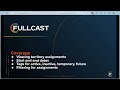
Step 2: Configure Columns and Data Filters
Next, you'll use the Column Chooser to personalize your data table. This powerful tool lets you drag and drop columns into your view and remove any that aren't relevant. You can also create custom data filters by typing search terms into column headers or using the filter builder at the bottom of the data table. These filters save directly to your view, making it easy to customize your forecast view for specific use cases.
Step 3: Add Role Assignments
Complete your customization by adding role assignments to the hierarchy panel. Select "Show Role Details" and input the roles you want to display. You can add multiple roles, and they'll appear in the order you enter them. Pro tip: Select "Hide Inactive Assignments" if you only want to see current role assignments.
Saving and Sharing Your Custom View
Once you've finished setting up your customized forecast view, navigate to the Actions menu and select "Change View." Click the save icon, enter a name for your view, and choose whether to share it with others in your organization. Sharing saved views is a game-changer for bringing key stakeholders into the FullCast platform with consistent data perspectives.
Quick Navigation:
0:00 - Introduction to Saved Views
0:15 - Step 1: Adding Metrics
0:45 - Step 2: Column Chooser & Filters
1:30 - Step 3: Role Assignments
2:15 - Saving & Sharing Views
👍 Found this Fullcast tutorial helpful? Hit the LIKE button and let us know in the comments which feature you're most excited to try!
Don't forget to SUBSCRIBE and turn on notifications so you never miss a new tutorial on how to maximize your Fullcast experience.
💬 Have questions? Drop them in the comments below—we read and respond to every one!
#fullcast Cast #ForecastView #CustomizeView #FullCastTutorial #DataVisualization #SalesForecasting #WorkforcePlanning #SaaSTutorial #BusinessIntelligence #DataFilters #ProductivityTips
Видео How to Customize Your Forecast View in Fullcast канала Fullcast
Are you ready to customize your forecast view and unlock the full potential of the Fullcast platform? In this comprehensive Fullcast tutorial, we'll walk you through the complete process of creating personalized saved views that help you analyze data more efficiently and take action faster.
When you customize your forecast view, you gain control over three essential components: metrics, data columns and filters, and role details. Let's break down each step so you can build the perfect view for your workflow.
Step 1: Select Your Key Metrics
The first step to customize your forecast view is choosing the metrics that matter most to your analysis. Simply click the plus chart button to add metrics to your summary panel. This allows you to see your most important KPIs at a glance every time you open your customized view.
Step 2: Configure Columns and Data Filters
Next, you'll use the Column Chooser to personalize your data table. This powerful tool lets you drag and drop columns into your view and remove any that aren't relevant. You can also create custom data filters by typing search terms into column headers or using the filter builder at the bottom of the data table. These filters save directly to your view, making it easy to customize your forecast view for specific use cases.
Step 3: Add Role Assignments
Complete your customization by adding role assignments to the hierarchy panel. Select "Show Role Details" and input the roles you want to display. You can add multiple roles, and they'll appear in the order you enter them. Pro tip: Select "Hide Inactive Assignments" if you only want to see current role assignments.
Saving and Sharing Your Custom View
Once you've finished setting up your customized forecast view, navigate to the Actions menu and select "Change View." Click the save icon, enter a name for your view, and choose whether to share it with others in your organization. Sharing saved views is a game-changer for bringing key stakeholders into the FullCast platform with consistent data perspectives.
Quick Navigation:
0:00 - Introduction to Saved Views
0:15 - Step 1: Adding Metrics
0:45 - Step 2: Column Chooser & Filters
1:30 - Step 3: Role Assignments
2:15 - Saving & Sharing Views
👍 Found this Fullcast tutorial helpful? Hit the LIKE button and let us know in the comments which feature you're most excited to try!
Don't forget to SUBSCRIBE and turn on notifications so you never miss a new tutorial on how to maximize your Fullcast experience.
💬 Have questions? Drop them in the comments below—we read and respond to every one!
#fullcast Cast #ForecastView #CustomizeView #FullCastTutorial #DataVisualization #SalesForecasting #WorkforcePlanning #SaaSTutorial #BusinessIntelligence #DataFilters #ProductivityTips
Видео How to Customize Your Forecast View in Fullcast канала Fullcast
Комментарии отсутствуют
Информация о видео
14 июня 2024 г. 20:43:15
00:02:15
Другие видео канала