Locating Sewer Camera Sonde | Basic Principles
Learn more how to properly use your camera sonde locator.
www.fiberscope.net is the official dealer of Schonstedt© locators.
The principles of sonde locating. A sonde sometimes referred to as a beacon, the small battery operated transmitter, it typically fits in a palm of your hand, it can be inserted inside PVC pipes and traced or detected with Schonstedt© pipe and cable locator receivers or with dedicated sonde locators.
0:30 In order to work, the sonde requires a battery, it must be attached mechanically to a snake or a long flexible cable to allow an operator to push it to the pipeline. Once the battery is inserted with the proper polarity and the lid is tight the transmitter begins emitting an electromagnetic field of a certain standard frequency that a receiver can detect. The field expands in all directions and once the sonde is inserted inside a PVC pipe and pushed along that field will move with a sonde and reach above the ground surface allowing an operator to trace it with the receiver.
Sondes are often built in to a camera inspection systems (Fiberscope.net) for sewer pipes, water pipes and other underground structures. Therefore these inspection cameras (www.fiberscope.net) can also be located with the same techniques and the same instruments used to locate a sonde as long as the frequency emitted by the cameras is the same frequency at which the receiver is operating.
Because sondes are small and battery operated the signal they emit is limited. In addition the sonde has to be pushed mechanically into the pipe by an operator. Because of this sonde locating is usually done within relatively short distances between 80 to 100 ft or approx. 25 to 30 meters. Sondes are typically used to locate a blockage in a PVC pipe going from a house or building to a street or a main pipe a short distance away. It is necessary to have a general idea of where the sonde might be and in what direction it is being pushed. Otherwise locating it can be extremely difficult.
2:12 As a rule, you must be within 40 to 50 feet from the sonde to be able to pick up a signal. As you can see of the sonde is deeper then the diameter of the proximity area on the surface is smaller!
2:30 There are two steps to locate a sonde.
Step 1. First, you need to approach it or get inside that 40 to 50 feet distance and make sure you are picking up a signal.
Step 2. Then you can fine-tune the process to determine more accurately where the sonde is located.
2:46 In order to understand the techniques for approaching and pinpointing it is important to understand a relationship between the orientation of a receiver sensor array and the sonde. The signal detected by the sensor array is strongest or peak when the axis of the sonde and the axis of the sensors and the receiver are on the same plane. In this case the signal emitted by the sonde flow through the sensors generating a strong signal. By contrast, the signal detected by the sensors is the weakest or null when the axis of the sonde and the axis of the sensors in the receiver are on perpendicular planes. In this case the field lines emitted by the sonde are perpendicular to the sensors generating essentially no signal or minimum signal.
3:37 To approach the sonde from a distance it’s best to work in circles while trying to determine where in the circle the signal is stronger. At that point the sonde axis and the sensor axis are on the same plane. Keeping that orientation, in other words, without rotating the receiver at all, move along that axis to the left and the right to determine in which direction the signal becomes stronger. Then, keep moving in that direction while the signal strength increases. When you move past the sonde location the signal will start dropping again giving you general idea of the sonde’s location. you can move back to the strongest signal and at that point rotate the receiver 90 degrees verifying that the signal drops significantly to a null. At this time you can attempt to measure the depth by the receiver but you must remember to rotate the receiver back to a coplanar position when the signal is strongest before measuring the depth!
4:42 It is important to select the right size sonde for your particular project or application. A bigger sonde with bigger batteries can be detected deeper and farther but may be too large to get around elbows in the desired pipes. All those sondes come in various frequencies. There are two fairly standard operating frequencies that are commonly used and work for most applications. Those frequencies are 512Hz in the US and 640 Hz in the EU.
Buy a sewer camera now: http://www.fiberscope.net/sewer-cameras.html
Buy a 512Hz locator now: http://www.fiberscope.net/detection-wand-xt512-portable-locator.html
Видео Locating Sewer Camera Sonde | Basic Principles канала Borescopes and Sewer Cameras
Показать
Комментарии отсутствуют
Информация о видео
21 апреля 2017 г. 22:06:58
00:06:01
Другие видео канала
 Radiodetection RD7100 Tutorial
 Easily Trace Find Buried Water Sewer Lines & Electrical Pipes
 Diagnosing recurring sewer clogs (sewer camera inspection)
 SECON Extreme Sewer Camera Review VS Ridgid Seesnake
 Kyrie Cam 1500S - 150 ft sewer camera with 512 hz sonde
 Autel Evo 2 App Functions, Camera & Controller Setup! 😲
 Sewer inspection camera demonstration
 RIDGID Navitrack Scout Sonde Locating Tutorial
 How Plumbers Should Use a Sewer Camera - Plumbing Basics
 Locating underground utilities - Avoiding Utilities Strikes series
 Pipe Crawler TROGLOTREK Intro
 Making Awesome Long Slingshot | Wooden DIY
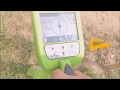 Why locators mislocate? Utility Locators
 Safety Toolbox Talks: Trenching and Excavation Safety
 Do it yourself sewer pipe video Inspection Camera
 Precision Nutrition Level 1 Review | Is It Worth It?
 Story of the Utility Locator | Underground Construction
 Crawl Spaces : Good vs Bad
 2500 Basic Locating
 how to reapir the pipe camera cable?