Carbon Vanes Replacement|SlavicBeauty Milker
This video is copyrighted. The video is property of www.slavicbeauty.net
You are welcome to share it on your site or blog only with a link to www.slavicbeauty.net
MUSIC BY: Kevin MacLeod
VIDEO BY: Vasilisa Vasileva
Available from: www.slavicbeauty.net
How to replace carbon vanes on SlavicBeauty milker pump
If the carbon vanes are damaged or worn out, the pump will halt (stop working)
It is important to replace the vanes every 6-12 months depending on how often you use the unit.
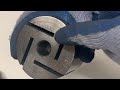
Open the pump cover using the screw driver.
Take the vanes out
Put the new vanes in paying attention to the right side. The video shows the WRONG SIDE and the RIGHT SIDE
Now you will have to make sure that the vanes are fitted perfectly. You will need a sheet of sand paper.
Open the bucket lid, so the vacuum does not collect in the unit
Put sandpaper against the vanes and hold it with the lid
Turn the unit on, let the sand paper polish the vanes a bit and turn the unit off
Check if the vanes are leveled with the pump surface. They should not stick out , otherwise the pump will not work
If the vanes are fitted perfectly, close the pump lid the same way as before
You can now use the milker again
Видео Carbon Vanes Replacement|SlavicBeauty Milker канала SlavicBeautyNet
You are welcome to share it on your site or blog only with a link to www.slavicbeauty.net
MUSIC BY: Kevin MacLeod
VIDEO BY: Vasilisa Vasileva
Available from: www.slavicbeauty.net
How to replace carbon vanes on SlavicBeauty milker pump
If the carbon vanes are damaged or worn out, the pump will halt (stop working)
It is important to replace the vanes every 6-12 months depending on how often you use the unit.
Open the pump cover using the screw driver.
Take the vanes out
Put the new vanes in paying attention to the right side. The video shows the WRONG SIDE and the RIGHT SIDE
Now you will have to make sure that the vanes are fitted perfectly. You will need a sheet of sand paper.
Open the bucket lid, so the vacuum does not collect in the unit
Put sandpaper against the vanes and hold it with the lid
Turn the unit on, let the sand paper polish the vanes a bit and turn the unit off
Check if the vanes are leveled with the pump surface. They should not stick out , otherwise the pump will not work
If the vanes are fitted perfectly, close the pump lid the same way as before
You can now use the milker again
Видео Carbon Vanes Replacement|SlavicBeauty Milker канала SlavicBeautyNet
Показать
Комментарии отсутствуют
Информация о видео
Другие видео канала
 Service vacuum pump
 Como funciona bomba de vácuo de ordenhadeira
 NVE Challenger 607 Pump Maintenance and Vane Replacement
 NEW HWT series | High Water Tolerance | PVR srl
 Making air vane motor
 Bereket Süt Sağma Makinaları Vakum Pompası Palet Değişimi
 Controlling Cavitation in Sliding Vane Pumps
 Rotary Vane Operating Principles Technical Animation
 Oil sealed vacuum pump
 KP 208 Milking Machine Vacuum Pump Vanes/ Blades Changing | Falcon Vacuum Pumps & Systems | Video 4
 How to make free energy auto water pump - free energy water pump | free energy pump to water plant
 ROTARY VANE AIR COMPRESSOR PRINCIPLE BY WWW.AIRLINKCOMPRESSORS.CO.UK
 Vacumm Pump Part 1
 How To Repair Compressor Pump
 AKÇAY MAKİNE KURU SİSTEM KÖMÜR DEĞİŞİMİ-MILKING MACHINES GRAFITTE PALETTE CHANGING FOR DRY SYSTEM
 VanePlacement.wmv
 Vacuum Pumps Explained - Basic working principle HVAC
 How Rotary Vane Pumps Work (Engineering)
 How to Change Oil and Oil Filters in R5 Vacuum Pumps
 How to build a RAM PUMP