How to Make Forward Berth Cabin Cushions with Zipper on Bottom
In this video we will be walking you through the steps required to make Forward Berth Cabin Cushions (v-berth cushions) for a power boat. This type of cushion includes sides which are curved, straight and some even have wedge angles. The wedges are required to fit up against the sides of a boat which are at varying angles along the length of the cushion. It looks complicated, but watch closely as this video details the easiest and quickest way to make your own Forward Berth cushions.
Order fabric, supplies and tools at: http://www.sailrite.com
How to Make Forward Berth Cabin Cushions with Zipper on Bottom Side Chapters:
Patterning Opening – 1:06 min
Patterning & Cutting Foam – 7:21 min
Patterning Irregular Boxing – 15:57 min
Cutting Top Plate & Boxing – 20:20 min
Cutting Bottom Plate – 27:38 min
Making Piping / Cording – 28:40 min
Sewing Piping to Top Plate – 34:00 min
Joining Boxing Together & Sewing to Plate – 38:13 min
Installing Zipper to Bottom Plate – 50:59 min
Sewing Assembly to Bottom Plate – 54:15 min
Inserting Foam – 1:04:06 min
Materials List – 1:07:14 min
Materials List:
Dura Skrim Patterning Material - Item # 103134
Dry Fast Open Cell Foam or High Density Polyurethane Foam
Upholstery Fabric from Sailrite we used Geobella Bombay Navy - Item # 3032504
Cushion Underlining Beige 54" - Item # 103934
V-69 Thread from Sailrite we used V-69 Derby Navy Polyester - Item # 103795
Medium 5/32" Welting Cord - Item # 107035
Seamstick 1/4" Basting Tape for Canvas - Item # 104167
YKK® Zipper #5 Vislon® Continuous White - Item # 28218
YKK® Slider #5 Vislon® White Plastic Single Non-Locking Pull - Item # 103178
Tools List:
Sailrite® Canvas Patterning Ruler - Item # 107040
Gingher Scissors Right Handed - Item # 19104
3M General Trim Adhesive - Item # 73211 OR Foam Lock Spray Adhesive 12oz - Item # 120464
Clear Acrylic Ruler 6" x 24" - Item # 102400
EZE Foam Cutter 8" Single Blade 110 Volt - Item # 103968
Tape Measure 120 Inch - Item # 102986
Multi Use Pins 1 1/2" - Item # 102985
Fabric Marking Pencil Yellow - Item # 111002
Sailrite Edge Hotknife Package (110 Volt) - Item # 103800
Comfort Grip Rotary Cutter 60mm - Item # 9655
Cutting Mat 18" x 24" - Item # 102990
Sailrite Ultrafeed® LS-1 PLUS Walking Foot Sewing Machine - Item # 300502
Marker, Tape Measure, Yard Stick
General Cushion Making Checklist (cushion with zipper on bottom plate):
Step 1 - Patterning:
Create a pattern or take your geometric measurements. These should represent what the expected finished size of the cushion is to be.
Step 2 - Cutting Foam:
Use pattern and add 1% to both dimensions. But for soft to medium firm foam, be a bit more generous. Never add less than ½”.
Step 3 - Determine Boxing Width:
Determine boxing width by measuring foam thickness (include batting, if any, under slight compression during measuring). To this measurement add between ¼” and ¾”. Keep in mind that thinner cushions look best with more allowance added and thicker cushions look best with less. Basically adding less of an allowance will allow the seams to roll into the edging of the cushion.
The process for the starboard and port cushions are the same, so we will only sow sewing the assembly of one not both in this video.
Step 4 - Determine Length of Boxing:
Boxing should equal the length of each plate edge. Do not add seam allowance to the boxing length. Why? The seam allowance used for joining each boxing strip together (end to end) should equal the seam allowance that is concurrently used up when sewing the boxing to the plates.
Step 5 - Cutting Plates:
Cut Top and Bottom plates to the pattern, plus ¼” all around.
Step 6 – Make Piping (if desired):
Along the bias of the fabric cut strips that are 1 ½” to 1 ¾” wide. Try to make the tail of the piping equal to the sewn seam allowance that you will use to sew your cushion together.
Step 7 – Sewing Piping to Plates:
If your cushion requires piping sew it to the top plate and if desired onto the bottom plate.
Step 8 – Sewing Boxing:
Sew boxing together (end to end). Then sew it onto top plate.
Step 9 – Install Zipper to Bottom Plate:
Zipper should be sewn to the wrong side of the bottom plate.
Step 10 – Sewing Bottom Plate:
Sew bottom plate onto assembly.
Step 11 – Insert Foam in Cover:
Open cover zipper and turn cover right-side out. Insert the foam. Enjoy your new cushion!
Order fabric, supplies and tools at: http://www.sailrite.com
Watch the Full Playlist of the 2016 Project Boat Here: https://www.youtube.com/playlist?list=PLAbM539i4biUsR1ZO7KNHUy0ZhSZMg4am
Видео How to Make Forward Berth Cabin Cushions with Zipper on Bottom канала Sailrite
Order fabric, supplies and tools at: http://www.sailrite.com
How to Make Forward Berth Cabin Cushions with Zipper on Bottom Side Chapters:
Patterning Opening – 1:06 min
Patterning & Cutting Foam – 7:21 min
Patterning Irregular Boxing – 15:57 min
Cutting Top Plate & Boxing – 20:20 min
Cutting Bottom Plate – 27:38 min
Making Piping / Cording – 28:40 min
Sewing Piping to Top Plate – 34:00 min
Joining Boxing Together & Sewing to Plate – 38:13 min
Installing Zipper to Bottom Plate – 50:59 min
Sewing Assembly to Bottom Plate – 54:15 min
Inserting Foam – 1:04:06 min
Materials List – 1:07:14 min
Materials List:
Dura Skrim Patterning Material - Item # 103134
Dry Fast Open Cell Foam or High Density Polyurethane Foam
Upholstery Fabric from Sailrite we used Geobella Bombay Navy - Item # 3032504
Cushion Underlining Beige 54" - Item # 103934
V-69 Thread from Sailrite we used V-69 Derby Navy Polyester - Item # 103795
Medium 5/32" Welting Cord - Item # 107035
Seamstick 1/4" Basting Tape for Canvas - Item # 104167
YKK® Zipper #5 Vislon® Continuous White - Item # 28218
YKK® Slider #5 Vislon® White Plastic Single Non-Locking Pull - Item # 103178
Tools List:
Sailrite® Canvas Patterning Ruler - Item # 107040
Gingher Scissors Right Handed - Item # 19104
3M General Trim Adhesive - Item # 73211 OR Foam Lock Spray Adhesive 12oz - Item # 120464
Clear Acrylic Ruler 6" x 24" - Item # 102400
EZE Foam Cutter 8" Single Blade 110 Volt - Item # 103968
Tape Measure 120 Inch - Item # 102986
Multi Use Pins 1 1/2" - Item # 102985
Fabric Marking Pencil Yellow - Item # 111002
Sailrite Edge Hotknife Package (110 Volt) - Item # 103800
Comfort Grip Rotary Cutter 60mm - Item # 9655
Cutting Mat 18" x 24" - Item # 102990
Sailrite Ultrafeed® LS-1 PLUS Walking Foot Sewing Machine - Item # 300502
Marker, Tape Measure, Yard Stick
General Cushion Making Checklist (cushion with zipper on bottom plate):
Step 1 - Patterning:
Create a pattern or take your geometric measurements. These should represent what the expected finished size of the cushion is to be.
Step 2 - Cutting Foam:
Use pattern and add 1% to both dimensions. But for soft to medium firm foam, be a bit more generous. Never add less than ½”.
Step 3 - Determine Boxing Width:
Determine boxing width by measuring foam thickness (include batting, if any, under slight compression during measuring). To this measurement add between ¼” and ¾”. Keep in mind that thinner cushions look best with more allowance added and thicker cushions look best with less. Basically adding less of an allowance will allow the seams to roll into the edging of the cushion.
The process for the starboard and port cushions are the same, so we will only sow sewing the assembly of one not both in this video.
Step 4 - Determine Length of Boxing:
Boxing should equal the length of each plate edge. Do not add seam allowance to the boxing length. Why? The seam allowance used for joining each boxing strip together (end to end) should equal the seam allowance that is concurrently used up when sewing the boxing to the plates.
Step 5 - Cutting Plates:
Cut Top and Bottom plates to the pattern, plus ¼” all around.
Step 6 – Make Piping (if desired):
Along the bias of the fabric cut strips that are 1 ½” to 1 ¾” wide. Try to make the tail of the piping equal to the sewn seam allowance that you will use to sew your cushion together.
Step 7 – Sewing Piping to Plates:
If your cushion requires piping sew it to the top plate and if desired onto the bottom plate.
Step 8 – Sewing Boxing:
Sew boxing together (end to end). Then sew it onto top plate.
Step 9 – Install Zipper to Bottom Plate:
Zipper should be sewn to the wrong side of the bottom plate.
Step 10 – Sewing Bottom Plate:
Sew bottom plate onto assembly.
Step 11 – Insert Foam in Cover:
Open cover zipper and turn cover right-side out. Insert the foam. Enjoy your new cushion!
Order fabric, supplies and tools at: http://www.sailrite.com
Watch the Full Playlist of the 2016 Project Boat Here: https://www.youtube.com/playlist?list=PLAbM539i4biUsR1ZO7KNHUy0ZhSZMg4am
Видео How to Make Forward Berth Cabin Cushions with Zipper on Bottom канала Sailrite
Показать
Комментарии отсутствуют
Информация о видео
Другие видео канала
 How To Make a Quick and Easy Box Cushion
 HOW TO REUPHOLSTER VINYL BOAT SEATS CHEAP DIY WITH NO SEWING FOR UNDER $100!! DO IT YOURSELF & SAVE!
 How to Install Carpet Style Headliner
 Demo of Smooth Left Foot Set for LS & Leatherwork® Sewing Machines
 Posi-Pin® Safety Shear Demo
 How to Make a Trailerable Boat Cover
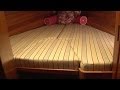 How to Make V-Berth Cushions
 Sewcial Sunday - How to Add a Fully-Enclosed Recessed Zipper to Any Bag
 How to Make an Enclosure Aft Curtain
 How to Make Cockpit Cushions - Box Cushions
 How to Make a Sun Shade For a Power Boat
 How to Sew a 10 Minute Pillow Case with Mister Domestic
 Make Removable Pillow Covers with a Zipper (Invisible)
 How to Make a Contoured Cushion with Foam Ridge
 How to cover staples on your Chair! Pro Tips!!
 How to make a pillowcase with French seams
 How to Sew a Zipper in a Pillow with Piping - Part 3
 How to Reupholster the Seat for a Pontoon Bench
 How to Make a Powerboat Lounge Cushion