- Популярные видео
- Авто
- Видео-блоги
- ДТП, аварии
- Для маленьких
- Еда, напитки
- Животные
- Закон и право
- Знаменитости
- Игры
- Искусство
- Комедии
- Красота, мода
- Кулинария, рецепты
- Люди
- Мото
- Музыка
- Мультфильмы
- Наука, технологии
- Новости
- Образование
- Политика
- Праздники
- Приколы
- Природа
- Происшествия
- Путешествия
- Развлечения
- Ржач
- Семья
- Сериалы
- Спорт
- Стиль жизни
- ТВ передачи
- Танцы
- Технологии
- Товары
- Ужасы
- Фильмы
- Шоу-бизнес
- Юмор
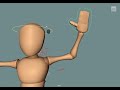
Rigging of a Biped Character: Rigging of the Arm part 3 - FK Fingers
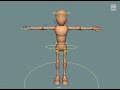
Biped Character Rigging – Part 6: FK Finger Rigging
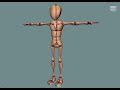
In this episode of the Biped Character Rigging series, we focus on setting up FK controls for the fingers—an essential part of any character rig for expressive hand animation.
✅ In this video, you'll learn how to:
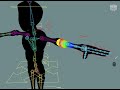
- Create clean FK control chains for each finger
- Organize and group finger controls for efficient animation
- Apply constraints to drive the finger joints accurately
- Keep the hand rig modular and easy to animate
With a solid FK finger setup, animators can create detailed hand poses and gestures with ease.
📌 Tools used: Autodesk Maya
📁Starter file containg the setup from the lessons before:
https://drive.google.com/file/d/1QbrgVIBXaxv60HXszASq_mkMJZu1XUXC/view?usp=sharing
📁Finished file containg the setup from the previous lessons, including the fingers FK setup:
https://drive.google.com/file/d/1-oDE5WTZa0hLIDH6zovv8bshEecoajx3/view?usp=sharing
📺 Catch up on earlier parts of the series:
Part 1 (Joint Placement): https://youtu.be/O2scG1Xnp4o
Part 2 (Torso Rig): https://youtu.be/zmsPLhgIinw
Part 3 (Leg & Foot Rig): https://youtu.be/fPja-3bcvic
Part 4 (Arm FK/IK): https://youtu.be/7L9IF2kapds
Part 5 (Lower Arm Twist): https://youtu.be/H5PK-D440uM
👉 Subscribe to stay updated—next up: skinning and final rig refinements!
#CharacterRigging #MayaRigging #BipedRig #FingerRig #FKControls #3DRigging #MayaTutorial
Видео Rigging of a Biped Character: Rigging of the Arm part 3 - FK Fingers канала Oliver Kirchhoff
In this episode of the Biped Character Rigging series, we focus on setting up FK controls for the fingers—an essential part of any character rig for expressive hand animation.
✅ In this video, you'll learn how to:
- Create clean FK control chains for each finger
- Organize and group finger controls for efficient animation
- Apply constraints to drive the finger joints accurately
- Keep the hand rig modular and easy to animate
With a solid FK finger setup, animators can create detailed hand poses and gestures with ease.
📌 Tools used: Autodesk Maya
📁Starter file containg the setup from the lessons before:
https://drive.google.com/file/d/1QbrgVIBXaxv60HXszASq_mkMJZu1XUXC/view?usp=sharing
📁Finished file containg the setup from the previous lessons, including the fingers FK setup:
https://drive.google.com/file/d/1-oDE5WTZa0hLIDH6zovv8bshEecoajx3/view?usp=sharing
📺 Catch up on earlier parts of the series:
Part 1 (Joint Placement): https://youtu.be/O2scG1Xnp4o
Part 2 (Torso Rig): https://youtu.be/zmsPLhgIinw
Part 3 (Leg & Foot Rig): https://youtu.be/fPja-3bcvic
Part 4 (Arm FK/IK): https://youtu.be/7L9IF2kapds
Part 5 (Lower Arm Twist): https://youtu.be/H5PK-D440uM
👉 Subscribe to stay updated—next up: skinning and final rig refinements!
#CharacterRigging #MayaRigging #BipedRig #FingerRig #FKControls #3DRigging #MayaTutorial
Видео Rigging of a Biped Character: Rigging of the Arm part 3 - FK Fingers канала Oliver Kirchhoff
Комментарии отсутствуют
Информация о видео
28 февраля 2026 г. 12:45:56
00:19:33
Другие видео канала