- Популярные видео
- Авто
- Видео-блоги
- ДТП, аварии
- Для маленьких
- Еда, напитки
- Животные
- Закон и право
- Знаменитости
- Игры
- Искусство
- Комедии
- Красота, мода
- Кулинария, рецепты
- Люди
- Мото
- Музыка
- Мультфильмы
- Наука, технологии
- Новости
- Образование
- Политика
- Праздники
- Приколы
- Природа
- Происшествия
- Путешествия
- Развлечения
- Ржач
- Семья
- Сериалы
- Спорт
- Стиль жизни
- ТВ передачи
- Танцы
- Технологии
- Товары
- Ужасы
- Фильмы
- Шоу-бизнес
- Юмор
Rigging of a Biped Character: The Creation of the Joints
Biped Character Rigging – Part 1: Joint Placement, Orientation & Naming
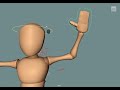
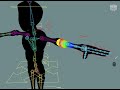
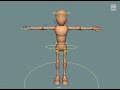
Welcome to the first episode of my Biped Character Rigging series! In this video, we’re starting from scratch and focusing on the essential foundation of every good rig: the joint setup.
Disclaimer: The geometry of this character was extracted from the Ultimate-Bony training character setup from https://www.behance.net/gallery/17774421/Ultimate-Rigs-for-FREE
✅ You'll learn:
- How to properly place joints for a humanoid character
- Best practices for orienting joints for clean deformations
- Naming conventions to keep your rig organized and studio-ready
- How to mirror joints from the left side to the right efficiently
Whether you're a student just starting out or an artist brushing up on your rigging workflow, this series will walk you through the process step-by-step.
📌 Tools used: Autodesk Maya
📁Starter file containg the character only: https://drive.google.com/file/d/1HYbKX7WUg7VWVZB1eUUpZEKCHR01jOjR/view?usp=sharing
📁Finished file containg the character and the joints: https://drive.google.com/file/d/1mTDViXUEJWB8XlqwQ0cdu5BKSkBjFhF6/view?usp=sharing
👉 Don’t forget to subscribe for the next episodes where we’ll dive into control setup, constraints, skinning, and more.
#CharacterRigging #MayaRigging #BipedRig #3DRigging #MayaTutorial
Видео Rigging of a Biped Character: The Creation of the Joints канала Oliver Kirchhoff
Комментарии отсутствуют
Информация о видео
28 февраля 2026 г. 12:45:40
00:24:50
Другие видео канала