Art Resin Ideas Series 3 Coat a Mounted Photo
Here's how to mount and resin a photo using Art Resin!
First, you need a wooden panel (as opposed to a canvas). Clamp your print down on one side and lift up the other side so you can use spray adhesive on the panel. Use PLENTY of spray adhesive! Then let go of the print, letting it fall in place, and cover it with a clean sheet of paper. This is to protect the print from having any glue transfer during the next step, which is rolling over the print to really stick it down. I use a brayer (the thing that looks like a roller) to roll everything flat, get out any air bubbles, and stick the print down well. Once that's done, unclamp the one end and repeat so everything is glued in place.
Because the print is usually a tiny bit larger than the panel, you'll want to flip the piece over and cut off the extra bit with an X-acto knife.
Your piece is now mounted and you're ready to resin!
To use Art Resin, simply pour equal parts from each bottle into a mixing container and mix well (i.e. at least 3 solid minutes). Then pour it over your mounted photo and spread it out with a spreader. Art Resin will self-level, but it's always good to spread by hand and help it out a bit.
Once everything is covered, use a flambé torch quickly over the surface to help eliminate any bubbles. Then just let it sit overnight and your piece will cure to a firm finish by morning. It's full cure takes approximately 72 hours.
There you go—an easy way to get a professional finish on a photo. Give it a try!
Видео Art Resin Ideas Series 3 Coat a Mounted Photo канала Raising Creativity
Показать
Комментарии отсутствуют
Информация о видео
Другие видео канала
 WBTL - SPINACH! growing eating saving
 #baby #zoe #newlife
 Quote Reel: Hitchhikers Guide
 facelessbook.com - our mission
 What about longevity and yellowing with Epoxy Resins?
 Cutest Face now in French
 A Simple MOMENT with Cats and Catnip
 Hang a Heavy Painting
 start a garden - step one: grow lights in winter
 Quote Reel: The Things I Wish I Could Say
 WIN $1000.00 WORTH OF ARTRESIN GOODIES!!!
 Nathan Zak's Bachelor Party
 10-Day Video Challenge: DAY 9: Top 10
 How do you know when a painting is finished?
 David Zak 2015 Motion Design Demo Reel
 Using YouTube as an Editing Tool and Visual Motif
 A vegetable garden message to myself!
 Joico Artist Short - Kim Judkins-Bonadio
 How school wounds creativity
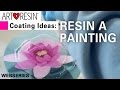 Art Resin Ideas Series 2 Coat a Painting
 Motion Design Demo Reel - dave zak 2010 top 10!