AmScope HD1080 Standalone Setup
This video gives a brief look at setting up the HD1080 camera for standalone use.
Find our HD1080 Camera on Amazon: https://goo.gl/8yJdEQ
“This video will give a brief explanation on how to set up and use the HD 1080 camera. The HD 1080 can be used as a standalone imaging system or connected to a computer. This video will focus on using it in standalone mode. We'll start by removing the cap from the seamount port if there is a peel off sticker or film go ahead and remove it. I'm going to use the camera with stereo microscope which has a 23 millimeter drop in photo port to connect the camera and optimize the field of view. I'm going to use a 0.5 reduction lens simply screw it into the camera's email port then slide it into the microscopes photo port. Next I'll attach an HDMI cable, this will give me a live view on a monitor or television. The camera includes a USB mouse which is used to control the internal software. I'll plug this into the USB port. Next I'll attach the power adapter once power is connected this LED will light up I'll insert a secure digital card this is where all the images and video will be stored and then I will press the power button. A blue LED will light up indicating that the camera is on. When using the camera on stand-alone mode all of the functions will be controlled using the mouse. Start by moving the cursor to the top left corner of the screen, this will activate the onscreen controls. The camera button will take a picture a gear button will display the main control panel. At the very bottom you can select an electrical line frequency to control flickering, at the very top you can enable or disable the auto exposure and white balance disabling these will give you full manual control over the other settings such as exposure, contrast, and color. Near the bottom are two very important buttons, the left camera button is for taking still images the right video camera button as you might expect is for recording videos. There is a second menu on the right side of the screen this gives you certain controls like flipping the image horizontally and vertically digital zoom masking and an image browser.”
Find the HD1080 here: https://amscope.com/products/hd1080?variant=40347645378735
Follow our socials:
Instagram: https://www.instagram.com/amscope_/
Twitter: https://twitter.com/am_scope?lang=en
Linkedin: https://www.linkedin.com/showcase/amscope
Facebook: https://www.facebook.com/pages/category/Product-Service/AmScope- 207239799914382/
Видео AmScope HD1080 Standalone Setup канала AmScope Videos
Показать
Комментарии отсутствуют
Информация о видео
Другие видео канала
 AmScope's USB-C Rechargeable Student Binocular Compound Microscope
 IQCREW by AmScope - 52 Piece All-in-One Kid's Starter Compound Microscope Kit
 AmScope's 52 Piece Kid's Microscope Kit
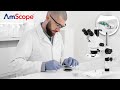 AmScope Trinocular Stereo Zoom Microscope with 144 LED Ring Light and Camera
 AmScope Advanced Student and Professional Compound Microscope
 AmScope Compact Fixed-Lens Stereo Boom-Arm Microscope with Gooseneck LED Light
 AmScope's Exclusive All-In-One 3D Digital Inspection Microscope
 AmScope - Best Selling Student Compound Microscope - B120C
 AmScope's Exclusive Middle and High School Software
 AmScope's Exclusive Kids Friendly Software
 AmScope's Exclusive Kid Friendly Software
 IQCREW by AmScope Kid's Portable LCD Color Digital Microscope with Look and Learn™ Activity Kits
 IQCREW by Amscope - 85+ piece Premium Microscope, Color Camera and Kid’s Friendly Software Kit
 AmScope-M162C-2L-WM-SP14-50P100S Best Student Microscope-40X-1000X Dual Light Glass Lens Metal Frame
 AmScope M158C-2L Cordless Compound Monocular Microscope, WF10x and WF25x Eyepieces
 IQCrew STEM Science Discovery 40X-500X Inverted Microscope
 AmScope Student Biological Compound Microscope M150C
 AmScope Kids Beginner Microscope
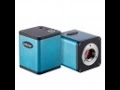 AF100 Auto Focus C-mount Camera with HDMI 1080p
 AmScope IN480T-FL Lamp Centering
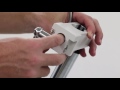 AmScope Dual-Arm Boom-stand Assembly