Learn Adobe Photoshop - Image Size Options
SALE TODAY: Learn Piano on iOS http://bit.ly/PianoAppSale
In this video, Mahalo expert Justin Z. briefly explains how to adjust the Image Size options in Photoshop.
About Image Size Options
---------------------------------------------------------------------
The size of your image will determine how large it is. It may sound obvious, but it's important to understand how image sizing works and how to make changes. For instance, you may be working with a picture that is too big for internet use, and the file size itself is too large to email. You can make it both smaller in size and shape without losing noticeable quality.
Using Image Size Options
---------------------------------------------------------------------
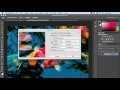
1. Go to Image -- Image Size in the top menu bar. This will open a new dialogue box showing you the dimensions and size of your image.
2. At the very top of this box is the size of the file (34.8M in the picture below).
3. Pixel Dimensions allows you to change the size of the image by pixel count or by percentage. Percentage is the easiest, but Pixels is more precise.
4. You will notice to the right of these choices is a small Chain Link. This keeps the proportions of your image intact. You can turn this off, but you run the risk of warping it.
5. Document Size refers to the physical width and height of your image. You have multiple choices regarding how to change this, which include inches, centimeters, picas, points and columns.
6. Resolution will determine the picture quality of your image. You can switch between pixels per inch or pixels per centimeter.
7. The check boxes below make it so you have less to worry about when it comes to image changes.
1. 8. Scale Styles will keep the effect constrained.
2. 9. Constrain Proportions will keep the image itself scaled properly.
3. 10. Resample Image will make changes to your image quality.
11. On the right is the Auto button, which allows for quick image quality changes.
12. When you are done you can press OK or Cancel and the changes you made will either take effect or not.
Read more by visiting our page at:
http://www.mahalo.com/learn-adobe-photoshop-image-size-options/
Видео Learn Adobe Photoshop - Image Size Options канала mahalodotcom
In this video, Mahalo expert Justin Z. briefly explains how to adjust the Image Size options in Photoshop.
About Image Size Options
---------------------------------------------------------------------
The size of your image will determine how large it is. It may sound obvious, but it's important to understand how image sizing works and how to make changes. For instance, you may be working with a picture that is too big for internet use, and the file size itself is too large to email. You can make it both smaller in size and shape without losing noticeable quality.
Using Image Size Options
---------------------------------------------------------------------
1. Go to Image -- Image Size in the top menu bar. This will open a new dialogue box showing you the dimensions and size of your image.
2. At the very top of this box is the size of the file (34.8M in the picture below).
3. Pixel Dimensions allows you to change the size of the image by pixel count or by percentage. Percentage is the easiest, but Pixels is more precise.
4. You will notice to the right of these choices is a small Chain Link. This keeps the proportions of your image intact. You can turn this off, but you run the risk of warping it.
5. Document Size refers to the physical width and height of your image. You have multiple choices regarding how to change this, which include inches, centimeters, picas, points and columns.
6. Resolution will determine the picture quality of your image. You can switch between pixels per inch or pixels per centimeter.
7. The check boxes below make it so you have less to worry about when it comes to image changes.
1. 8. Scale Styles will keep the effect constrained.
2. 9. Constrain Proportions will keep the image itself scaled properly.
3. 10. Resample Image will make changes to your image quality.
11. On the right is the Auto button, which allows for quick image quality changes.
12. When you are done you can press OK or Cancel and the changes you made will either take effect or not.
Read more by visiting our page at:
http://www.mahalo.com/learn-adobe-photoshop-image-size-options/
Видео Learn Adobe Photoshop - Image Size Options канала mahalodotcom
Показать
Комментарии отсутствуют
Информация о видео
Другие видео канала
 create Passport size Photo in adobe Photoshop 7.0
 Resize Images without Losing Quality with Photoshop Smart Objects
![Image size, Dimension, & Resolution in Adobe Photoshop Ep4/33 [Adobe Photoshop for Beginners]](https://i.ytimg.com/vi/ekaCauQFeQw/default.jpg) Image size, Dimension, & Resolution in Adobe Photoshop Ep4/33 [Adobe Photoshop for Beginners]
Image size, Dimension, & Resolution in Adobe Photoshop Ep4/33 [Adobe Photoshop for Beginners] How to make a template for a custom size Vinyl or Fabric Banner with Grommets
 Photoshop Image Size and Resolution
 Photoshop: How To Cut Out an Image - Remove & Delete a Background
 Adobe photoshop 7.0//how to resize photo(40Kb,50kb) and signature(10-20)kb for online application
 5 most common attacks and how to stop them
 How to make passport size photo in Photoshop in hindi/urdu | Adobe Photoshop 7.0
 How To Make Passport Size Photo in Photoshop in Hindi
 Learn Photoshop - How to Fully Understand Image Size
 Adobe Photoshop Tutorial : The Basics for Beginners
 Resize Images Without Losing Quality | Photoshop Tutorial
 Learn Adobe Photoshop - Image Mode
 How To Resize Photo,Signature, and other document For SSC,vyapam and railway Online Application
 image size and resolution in Photoshop CC 2020
 Basic Selections - Adobe Photoshop for Beginners - Class 1
 Adobe Photoshop : Basic Editing Tutorial for beginners TAGALOG
 Fit Image to Canvas Automatically in Photoshop