iPhone 7 Plus Display Assembly (LCD & Touch Screen) Repair Guide - Fixez.com
Get a high-quality iPhone 7 Plus LCD & Screen:
Black: http://bit.ly/2Dy6h1N
White: http://bit.ly/2DQxv19
New iPhone 7 Plus Parts: http://bit.ly/2mXwCN8
https://www.fixez.com presents the Official iPhone 7 Plus Screen Replacement Guide. Life is full of obstacles, dealing with a cracked Apple iPhone 7 Plus display assembly does not have to be one of them! Following the step-by-step iPhone 7 Plus screen repair instructions we have provided will help you safely replace a damaged or faulty iPhone 7 Plus display assembly (LCD and touchscreen). Visit Fixez.com for all of the DIY iPhone 7 Plus replacement screens, parts and tools you need to fix your cell phone quickly, and affordably. https://www.fixez.com/store/iphone/iphone-7-plus
If you need your iPhone 7 Plus repaired ASAP instead- we have you covered there too. Contact one of our skilled technicians at 866-233-6460 or support@fixez.com and they will fix your device for you. They are available Monday – Friday, 9am to 5pm PST.
Subscribe to our YouTube Channel for additional DIY smartphone and tablet teardown and repair videos! https://www.youtube.com/channel/UCDJrZCUtdJQaJq0akRCt3Ng
Like us on Facebook: https://www.facebook.com/fixez.com
Follow us on Twitter: https://twitter.com/fixezdotcom
iPhone 7 Plus Display Assembly Repair Video Transcription:
Warning:
You are performing this repair at your own risk
We claim no responsibility for any damages that might occur
Step 1
Power down your Apple iPhone 7 Plus smartphone.
Step 2
Eject the Nano-SIM Card Tray.
Step 3 (iPhone 7 Plus Display Assembly)
Remove the two bottom 3.4 mm Pentalobe screws located next to the lightning connector.
Step 4
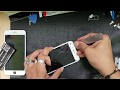
Use the precision knife to create enough space to insert a triangle opening tool.
With the opening tool slice through the intense adhesive and help carefully decouple the iPhone 7 Plus display assembly from the rear case.
Unlike previous iPhone models the 7 Plus bizarrely opens to the side.
The display assembly is still connected to the iPhone by cables along the middle-right side, so don’t try to remove it entirely just yet.
Remove the following 4 Tri-Point screws securing the bracket that covers the battery connector and two of the display cables. These screws are different sizes, so be sure to remember where they go.
With the bracket out of the way spudge up the cables from the logic board.
Remove the following 3 Tri-Point screws that secure the bracket covering the upper component display cable.
Disconnect the cable and free the iPhone 7 Plus display assembly from the phone.
Step 5 (iPhone 7 Plus Front-Facing Camera Cable Assembly)
Remove the following 5 Phillips screws, followed by the metal clip they secure in place.
Easily extract the stereo-enabling speaker.
Use the tweezers to help remove the tangled up iPhone 7 Plus Front-Facing Camera Cable Assembly. It includes the front-facing camera, microphone, proximity sensor and ambient light sensor.
Step 6 (iPhone 7 Plus Solid State Home Button)
Remove the following 4 Tri-Point screws and then the metal bracket.
Separating the solid state iPhone 7 Plus home button is simple, with only light adhesive on the cable and no delicate gasket.
Step 7 (iPhone 7 Plus LCD Shield Plate)
Remove the following Phillips screw, and then the 5 Tri-Point screws.
With no adhesive on the iPhone 7 Plus LCD shield plate, and the cables nicely managed, simply lift it away from the display assembly.
* To reassemble your device, follow the steps in reverse order.
Видео iPhone 7 Plus Display Assembly (LCD & Touch Screen) Repair Guide - Fixez.com канала Fixez.com
Black: http://bit.ly/2Dy6h1N
White: http://bit.ly/2DQxv19
New iPhone 7 Plus Parts: http://bit.ly/2mXwCN8
https://www.fixez.com presents the Official iPhone 7 Plus Screen Replacement Guide. Life is full of obstacles, dealing with a cracked Apple iPhone 7 Plus display assembly does not have to be one of them! Following the step-by-step iPhone 7 Plus screen repair instructions we have provided will help you safely replace a damaged or faulty iPhone 7 Plus display assembly (LCD and touchscreen). Visit Fixez.com for all of the DIY iPhone 7 Plus replacement screens, parts and tools you need to fix your cell phone quickly, and affordably. https://www.fixez.com/store/iphone/iphone-7-plus
If you need your iPhone 7 Plus repaired ASAP instead- we have you covered there too. Contact one of our skilled technicians at 866-233-6460 or support@fixez.com and they will fix your device for you. They are available Monday – Friday, 9am to 5pm PST.
Subscribe to our YouTube Channel for additional DIY smartphone and tablet teardown and repair videos! https://www.youtube.com/channel/UCDJrZCUtdJQaJq0akRCt3Ng
Like us on Facebook: https://www.facebook.com/fixez.com
Follow us on Twitter: https://twitter.com/fixezdotcom
iPhone 7 Plus Display Assembly Repair Video Transcription:
Warning:
You are performing this repair at your own risk
We claim no responsibility for any damages that might occur
Step 1
Power down your Apple iPhone 7 Plus smartphone.
Step 2
Eject the Nano-SIM Card Tray.
Step 3 (iPhone 7 Plus Display Assembly)
Remove the two bottom 3.4 mm Pentalobe screws located next to the lightning connector.
Step 4
Use the precision knife to create enough space to insert a triangle opening tool.
With the opening tool slice through the intense adhesive and help carefully decouple the iPhone 7 Plus display assembly from the rear case.
Unlike previous iPhone models the 7 Plus bizarrely opens to the side.
The display assembly is still connected to the iPhone by cables along the middle-right side, so don’t try to remove it entirely just yet.
Remove the following 4 Tri-Point screws securing the bracket that covers the battery connector and two of the display cables. These screws are different sizes, so be sure to remember where they go.
With the bracket out of the way spudge up the cables from the logic board.
Remove the following 3 Tri-Point screws that secure the bracket covering the upper component display cable.
Disconnect the cable and free the iPhone 7 Plus display assembly from the phone.
Step 5 (iPhone 7 Plus Front-Facing Camera Cable Assembly)
Remove the following 5 Phillips screws, followed by the metal clip they secure in place.
Easily extract the stereo-enabling speaker.
Use the tweezers to help remove the tangled up iPhone 7 Plus Front-Facing Camera Cable Assembly. It includes the front-facing camera, microphone, proximity sensor and ambient light sensor.
Step 6 (iPhone 7 Plus Solid State Home Button)
Remove the following 4 Tri-Point screws and then the metal bracket.
Separating the solid state iPhone 7 Plus home button is simple, with only light adhesive on the cable and no delicate gasket.
Step 7 (iPhone 7 Plus LCD Shield Plate)
Remove the following Phillips screw, and then the 5 Tri-Point screws.
With no adhesive on the iPhone 7 Plus LCD shield plate, and the cables nicely managed, simply lift it away from the display assembly.
* To reassemble your device, follow the steps in reverse order.
Видео iPhone 7 Plus Display Assembly (LCD & Touch Screen) Repair Guide - Fixez.com канала Fixez.com
Показать
Комментарии отсутствуют
Информация о видео
Другие видео канала
 iPhone 7 Plus Screen LCD Replacement Step By Step
 iPad 5 (9.7") Headphone Jack Repair Guide - Fixez.com
 iPhone 7 Plus Screen Replacement done in 6 minutes
 iPhone 7 Teardown and Reassemble Guide - Fixez.com
 Iphone 7 Plus - Logic board repair - no power, not charging
 Start to Finish - iPhone 7 Plus Screen Replacement
 Repair - Apple iPhone 5C screen replacement
 iPhone 7 Screen Replacement Glass Only Repair - DIY 15 min tutorial
 iPad 5 (9.7") Left/Right Antenna Repair Guide - Fixez.com
 iPhone 7 Plus Screen Replacement
 iPhone 7 Plus Front Camera Replacement
 Moto E7 LCD Display Replacement XT2095 1 XT2095 2
 Touch ID not working after iPhone screen replacement - Fix
 iPhone 7 Battery Repair Guide - Fixez.com
 iPhone 7 NO SIGNAL - NO SIM - NO IMEI - NO ACTIVATION - English Video
 iPhone 7 Plus Teardown and Reassemble Guide - Fixez.com
 iPhone 7 Display Back Light not working
 What Parts do You Need to Make Your Own iPhone?
 iPhone 8 plus lcd screen replacement full video