INSULATING The Van | Ep 2 | Nissan NV200 Camper Van Build
In this video, I will be sharing how I insulated the rest of my Nissan NV200 panel, as I convert it into a camper and day van. Despite being a lot of work, insulating a van is incredibly important as a way of keeping heat in and stopping the build up of condensation which can cause rust and just be a general nuisance in metal vans.
0:00 - Emptying the van
0:14 - Insulating the wheel arches
0:38 - Insulating the van cavities with recycled plastic bottle insulation
2:00 - Prepping the van walls
3:07 - Removing the van door panels
4:00 - Insulating the van doors and walls
5:50 - Insulating the van ceiling
6:29 - Insulating the upper wall panels
Please SUBSCRIBE to my channel, thanks!
Song 1: 'Subterfuge' by Architct - https://soundcloud.com/architct/subterfuge
Song 2: 'Broken Piano' Architct - https://soundcloud.com/architct/broken-piano
SoundCloud: https://soundcloud.com/architct
Spotify: https://open.spotify.com/artist/6pUUe9rQQgBpRRtC3mm99j
Apple Music: https://music.apple.com/us/artist/architct/1537389987
---
Check out the full written version of this video, with photos, on my blog: https://nv200vanconversion.wordpress.com/2020/01/20/insulating-the-van/
---
Diall recycled plastic bottle loft insulation: https://www.diy.com/departments/diall-insulation-roll-l-6m-w-0-37m-t-100mm/3663602481812_BQ.prd
Thermawrap bubblewrap insulation: https://www.toolstation.com/ybs-general-purpose-thermawrap-insulation/p16779?
Aluminium foil tape: https://www.toolstation.com/aluminium-foil-tape/p97723
Trimfix high temperature contact adhesive: https://www.vanliningcarpet.co.uk/shop/trimfix-high-temperature-adhesive/
---
After emptying the van, I started by removing the 6 black panels that came around the sides. Behind these are cavities which I lined with Thermawrap Foil Bubble Wrap Insulation, glued on with trimfix High Temperature Contact Adhesive, then filled them with loft insulation - I used Diall Recycled Plastic Bottle Insulation. This is similar, but a better alternative (in my case) to standard fibreglass loft insulation. Being non-toxic and safe to handle, it was really easy cutting pieces of insulation to size and stuffing them into the van walls. After that, I taped a large piece of foil insulation over the top of the panel with aluminium foil tape.
I did this for all 6 panels, and then went on to insulate the van ceiling. Again, I used Thermawrap Foil Insulation, glued on with Trimfix Contact Adhesive and laid this in between the beams. I filled the beams with spray foam insulation. Keep an eye out for my next video which shows the ceiling insulation, carpeting and ply-lining in much more detail.
I also glued thermawrap around the 6 metal panels around the sides of the van. Eventually I will carpet the van and the foil insulation will all be hidden, however having slept in the van in different conditions and temperatures last year I knew that condensation regularly forms on these panels as they have no cavity between them and the outside. Now they have a layer of insulation, they shouldn’t condensate.
Having done all of this, I ended up with a very silver inside to the NV200, but it’s only temporary. The important groundwork has been done, and now I can proceed with carpeting the van.
Thanks for watching and please SUBSCRIBE to my channel to keep up-to-date and see more of my van conversion videos, thanks!
#Vanlife #NissanNV200 #LensOfJames
DISCLAIMER: In this video, I am in no way stating that this is the proper way to undertake the conversion of a van, however after research and experience using the van, I believe this to be the way that is best suited to my van and the way I intend to use it.
Видео INSULATING The Van | Ep 2 | Nissan NV200 Camper Van Build канала Lens Of James
Показать
Комментарии отсутствуют
Информация о видео
Другие видео канала
 Insulating And Carpeting The Van Ceiling | Ep 3 | Nissan NV200 Camper Van Build
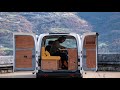 Aménagement Nissan NV 200
 VAN INSULATION PREPARATION | TRC Van Conversion 12.0
 #Microcamper vs #VANLIFE Nissan NV200 VS Ford Transit Argument (Mercedes Sprinter Conversion Connect
 HOW TO PROFESSIONALLY FIT SOUND DEADENING AND INSULATION TO YOUR CAMPER VAN - You CAN do it at home!
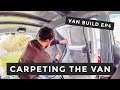 CARPETING The Van | 4-Way Stretch Carpet Lining | Ep 4 | Nissan NV200 Camper Van Build
 Nissan NV200-Removable Campervan Module System
 Installing A Vinyl Van Floor | Ep 7 | Nissan NV200 Camper Van Build
 NV200 Van Insulation and Interior Panels March 2020
 Full Measurements & Dimensions For Converting A Nissan NV200 Van
 Stealth Nissan NV200 Camper Van Build on a Budget
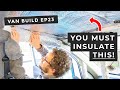 INSULATING The Cab CEILING And Cleaning The Van HEADLINER | Ep 23 | Nissan NV200 Camper Van Build
 HOW TO Stop Van Doors SLAMMING In The Wind | DIY Door Bar | Ep 25 | Nissan NV200 Camper Van Build
 Nv200 insulated liner installation IRTech
 Nissan NV200 Camper Van Build // START TO FINISH
 FULLY ELECTRIC CAMPERVAN 🚐🔌 ⚡ - Nissan e-NV200 DIY conversion van tour 2021
 VAN BUILD Time Lapse From START TO FINISH | Tiny Camper Van Conversion
 Nissan NV 200 cargo van/mini-camper
 Nissan NV200 Camper Conversion | Part 1 | Removing Carpet / Cutting Floor Insulation
 The **ALL ELECTRIC** Camper Van - Sussex Campervans Nissan E-NV200