How To Make A Clock In The Home Machine Shop - Part 8 - Making The Barrel Arbor
How To Make A Clock In The Home Machine Shop, Part 8, by Clickspring.
In this episode, I make the barrel arbor for the Large Wheel Skeleton Clock project.
Forming a clock barrel arbor is a great 'between centers' lathe turning exercise, and also requires some interesting metal working techniques unique to clockmaking, like pivot burnishing and broaching.
Thanks for watching. If you enjoyed the video please give a thumbs up, and leave me a comment.
If you would like to help support the creation of these videos, then head on over to the Clickspring Patreon page: https://www.patreon.com/clickspring
You can also help me make these videos by purchasing via the following Amazon Affiliate links:
Cameras used in this video:
Panasonic GH5 - https://amzn.to/2rEzhh2
Panasonic X920 - https://amzn.to/2wzxxdT
Tools & Shop Products:
Dykem 80300 Steel Blue Layout Fluid, Brush-in-Cap (4oz): http://amzn.to/2HGPaJJ
"Solidworks 2013 Bible": http://amzn.to/2FObS1D
"Machinery's handbook": http://amzn.to/2pi7XE5
Anytime Tools 5 Lathe Mill CENTER DRILL : https://amzn.to/2IThppO
Digital Calipers: https://amzn.to/2IkFh4O
Saint Gobain (Norton) - 4 Arkansas Stones + case: http://amzn.to/2HCOAMX
Interapid Dial Test Indicator: http://amzn.to/2FPInwH
Generic Dial Indicator 0.001": http://amzn.to/2FOFTyF
Optivisor Headband Magnifier: http://amzn.to/2HFg1FU
For more info on this build, as well as other tool making info and plans, visit http://www.clickspringprojects.com
Abbreviated Transcript:
00:39 Now It looks like a fairly easy piece of turning, but it's surprisingly easy to mess up this part. The arbor has a series of stepped shoulder features that have to dead on for it to work. And some of the key dimensions for those features must be taken directly from the clock, like for example the pivot shoulder distance.
01:02 For the clock to run freely, there must be a small amount of clearance between the arbor shoulders and the plates, to give a little bit of end shake. There's a similar issue regarding the dimension of the inside of the barrel. The cap has to be in place to give the true dimension, but then how can the inside be measured?
01:32 The steel I'm using is silver steel, or drill
rod; I don't intend to harden it, but the arbor will last a lot longer, being made from this tougher steel. And I'll be forming the features between centers, so the next step was to form center holes on each end of the stock.
01:53 Then I set up the lathe for turning between centers. This first line marks out one end of the thickest part of the arbor, and from here I can start turning the shoulders for that end.
03:02 And this is where I get to use the barrel transfer gauge, to pick off the dimension on the inside of the barrel. Its basically just a rod with 2 shoulders, one of which can move relative to the other.
03:48 I used the tool in a similar way, to pick off the inside plate dimension. And at this point the shoulder dimensions are all in place, so I started on cleaning up the pivot surfaces, using this combination pivot file/burnisher. First by using the fine cut file, to remove the tool marks.
04:46 Followed by a hard slip stone to remove the file marks, and to square up the surface. and finally I prepared the burnisher with this coarse grit emery paper, and burnished the pivot surfaces. I reversed the work, and did the same 3 step operation on the other end.
05:52 A small shim under the collet block gives a taper of about 4 thou per inch, which will do nicely. At this point the bulk of the metal is gone, but the surface finish needs to be much better, so I took care of that by hand with some needle files, and emery paper.
06:52 But I didn't like my chances of making that look good any time soon, so I went for a fabricated hook like this, which can be screwed into the barrel.
08:39 So with the arbor almost complete, now is
a good time to fit it into the barrel caps, and I'm going to do it using this 5 sided clockmakers broach. If you're accustomed to the usual engineering practices, then you're probably thinking this is a pretty relaxed way to make a precision hole.
08:57 But in fact the taper broaching of holes is clockmaking best practice, and its a technique that's been used for centuries. The 5 sided broach cuts the brass very easily, and opens up the hole until it's very close to letting in the arbor.
09:08 The slight taper on the broach means that the hole is tapered too. Once the hole is big enough to just let in the arbor, it's followed with this smoothing broach to work harden and smooth the surface.
10:19 The arbor has a nice amount of end play inside the barrel, so I'm calling that done. All it needs is a decent chamfer on the edges to reduce the surface contact with the caps.
References:
John Wilding "Large Wheel Skeleton Clock" construction book:
http://www.ritetimepublishing.com/
How To Make A Clock In The Home Machine Shop, Part 8, by Clickspring.
Видео How To Make A Clock In The Home Machine Shop - Part 8 - Making The Barrel Arbor канала Clickspring
Показать
Комментарии отсутствуют
Информация о видео
Другие видео канала
 How To Make A Clock In The Home Machine Shop - Part 9 - Etching, Waxing And Silvering A Chapter Ring
 How To Make A Clock In The Home Machine Shop - Part 7 - Making The Barrel
 How To Make A Clock In The Home Machine Shop - Part 10 - Machining A Bezel For The Chapter Ring
 Turning large steel tube into Hydraulic cylinder barrel | Lathe machining & welding
 Byzantine Sundial-Calendar '1000 Hrs' Mega Edit
 Making a Gear Cutter Arbor for a Proxxon Milling Machine
 Spare Parts #12 - Heat Bluing A Set Of Steel Clock Hands
 Milling a Metal Scriber
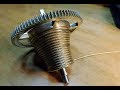 Cutting the Fusee
 How To Make A Clock In The Home Machine Shop - Part 11 - Making Polishing And Bluing Bezel Screws
 Home Machine Shop Tool Making - Machining A Tailstock Die Holder For The Sherline Lathe - Part 1
 How To Make A Clock In The Home Machine Shop - Part 14 - Making The Barrel Click And Clickspring
 Spare Parts #3 - Making A Simple Reamer From Blued Pivot Steel
 How To Make A Clock In The Home Machine Shop - Part 21 - The Mainspring And Escapement Pallets
 Spare Parts #13 - Making A Square Broach
 Antikythera Fragment #7 - Precision Soft Soldering
 Machining a Ring out of Stainless?
 How To Make A Clock In The Home Machine Shop - Part 5 - Cutting The Pinions
 Spare parts #7 - Modifying A Twist Drill For Drilling Brass