How To Make A Clock In The Home Machine Shop - Part 14 - Making The Barrel Click And Clickspring
Making The Barrel Click And Clickspring, by Clickspring.
In this video I make the ratchet mechanism for the clock.
The parts for the mechanism were roughed out with the belt sander, and then hand finished with needle and escapement files. After test fitting to the clock, each part was then hardened, tempered, polished and flame blued.
Thanks for watching. If you enjoyed the video please give a thumbs up, and leave me a comment.
If you would like to help support the creation of these videos, then head on over to the Clickspring Patreon page: https://www.patreon.com/clickspring
You can also help me make these videos by purchasing via the following Amazon Affiliate links:
Cameras used in this video:
Panasonic GH5 - https://amzn.to/2rEzhh2
Panasonic X920 - https://amzn.to/2wzxxdT
Tools & Shop Products:
Dykem 80300 Steel Blue Layout Fluid, Brush-in-Cap (4oz): http://amzn.to/2HGPaJJ
"Solidworks 2013 Bible": http://amzn.to/2FObS1D
Dormer A190202 Jobber Drill Set, 1.0 mm - 6.0 mm x 0.1 mm Size: https://amzn.to/2DR5fdb
Dormer A190203 Jobber Drill Set, 6.0 mm - 10.0 mm x 0.1 mm Size: https://amzn.to/2ITfeTa
YG1 NC Spotting Drill 8% Cobalt HSS 1/8 to 1/2" 120 Degree 5 Pc Set CNC Machine: https://amzn.to/2G7ylv6
Hegner Scroll Saw: https://amzn.to/2IhteVW
Super Pike Saw Blades Size 4/0 pkg of 144: http://amzn.to/2IO6aPw
Norton 1-by-2-by-8-Inch Fine/Coarse India Combination Oilstone, Red: http://amzn.to/2tTEPb0
Kaowool 24" X 12" X 1" 2400 F Ceramic Fiber Insulation: http://amzn.to/2pfsM3d
For more info on this build, as well as other tool making info and plans, visit http://www.clickspringprojects.com
Ask Me A Question:
http://www.clickspringprojects.com/contact.html
Abbreviated Transcript:
00:15 The purpose of the ratchet mechanism is to hold the barrel arbor stationary after the clock has been wound.
00:36 At the completion of each winding turn, the pressure is released from the winding square, and the click locks into the base of the last tooth to pass. This immobilises the ratchet wheel, and by connection the barrel arbor.
00:49 The energy that's been put into the spring is now stored in the mechanism, and there's only one way for it to be released - by the barrel assembly moving forward as the escapement ticks off the intervals of time.
03:29 I used this little shop made deburring tool to take care of the small burr thrown up by the drilling. In classic clockmaking, tapered clock pins are a common method of fixing components into position.
04:12 So with the ratchet in position, it's time to move onto the click, which has this beautiful curved shape that I'll be forming from precision ground tool steel. A simple paper template is a great way to mark out the part on the raw stock, and while it was still attached, I marked out, and then drilled the center hole.
05:54 And speaking of filing, that circular part in the center really needs to be spot on, so off camera, I turned up a simple filing button to help me get a good result.
07:08 Next up is the clickspring, which was made in a similar way, starting with marking it out on the raw stock. There are 2 holes to be drilled. One is for the screw that holds it in position, and the other is for a tapered steady pin to locate the clickspring precisely on the front plate.
07:58 The rest of the profile work was done with needle and escapement files. And at this point of the process, the tail of the clickspring was getting quite thin and difficult to hold, so I found it easiest to bring it to final dimension by lapping it on the india stone.
08:12 This teardrop section needs to be thinned down too, which is another great job for the belt sander. Some final finishing with needle files, and that's the clickspring done for the moment too.
10:13 I can fit them to the clock frames, and have a look at how they perform together. A light tension can be manually placed on the clickspring, but the final position is best determined with the help of a toolmakers clamp.
10:32 With the clamp holding the clickspring in place, the position of the steady pin hole can be marked, and then drilled. The pin hole was taper broached, and the steady pin temporarily inserted to confirm the operation of the ratchet mechanism.
11:02 The ratchet has a firm clean action, and everything is fitting together well, without binding or interference. So the parts can now be quench hardened, after coating them in powdered boric acid, to reduce oxidation scale.
11:31 After quenching in oil, each part was tempered to blue in preparation for polishing. I polished the screws as you've seen me do in previous videos. For the click and clickspring I used the india stone, followed by diamantine on a tin lap, and then gave them all a final cosmetic blue prior to assembly.
References:
John Wilding "Large Wheel Skeleton Clock" construction book can be purchased online from Ian T Cobb:
http://www.clockmaking-brass.co.uk/clock_construction_books.html
Making The Barrel Click And Clickspring, by Clickspring.
Видео How To Make A Clock In The Home Machine Shop - Part 14 - Making The Barrel Click And Clickspring канала Clickspring
Показать
Комментарии отсутствуют
Информация о видео
Другие видео канала
 How To Make A Clock In The Home Machine Shop - Part 15 - Fitting The Dial Assembly To The Frames
 Introducing The Rose Engine (Happy Anniversary, Mrs Clickspring.)
 Byzantine Sundial-Calendar '1000 Hrs' Mega Edit
 Spare Parts #13 - Making A Square Broach
 How To Make A Clock In The Home Machine Shop - Part 16 - Making The Motion Work And Hands
 Spare Parts #12 - Heat Bluing A Set Of Steel Clock Hands
 Making a Solenoid Boxer 4 Engine
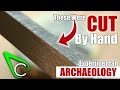 Antikythera Fragment #3 - Ancient Tool Technology - Hand Cut Precision Files
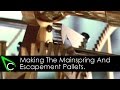 How To Make A Clock In The Home Machine Shop - Part 21 - The Mainspring And Escapement Pallets
 Making a Clock Wheel for an Antique Clock - Start to Finish!
 How To Make A Clock In The Home Machine Shop - Part 23 - Making The Key, Polishing And Assembly
 Antikythera Fragment #5 - Ancient Tool Technology - The First Precision Drill Bit
 How To Make A Clock In The Home Machine Shop - Part 4 - Cutting The Wheels
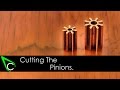 How To Make A Clock In The Home Machine Shop - Part 5 - Cutting The Pinions
 How To Make A Clock In The Home Machine Shop - Part 9 - Etching, Waxing And Silvering A Chapter Ring
 Как проверить любой якорь дрели
![[BONUS VIDEO] Chill Out Edit - 1000 Hours in 12 Minutes](https://i.ytimg.com/vi/dU7iKNmQBIs/default.jpg) [BONUS VIDEO] Chill Out Edit - 1000 Hours in 12 Minutes
[BONUS VIDEO] Chill Out Edit - 1000 Hours in 12 Minutes Antikythera Fragment #1 - Ancient Tool Technology - Making A Small Parts Vise
 The Good, The Bad and The Oiler