DIY Macrame Tutorial - Geometric Pattern #1
DIY Macrame Tutorial - Geometric Pattern #1! Please see below for materials and written instructions.
Shop my book, Mixed Fiber Macrame, and Fiber Art Supplies (string, rope roving, ribbons, velvet and more) on my website or in my Etsy Shop:
Website: https://www.lotsofknots.ca
Etsy Shop: https://www.etsy.com/ca/shop/LotsofKnotsCanada
Support me directly: https://ko-fi.com/lotsofknotscanada
Material:
- 5mm Braided Cord (Colour: Taupe)
*Please note: This tutorial focuses on the pattern not the knots. If you’d like a slower, more in-depth tutorial on the knots used in this tutorial please see below:
Double Half Hitch Knot: https://www.youtube.com/watch?v=E2GapyAEVIk
Square Knot: https://www.youtube.com/watch?v=MXvKWY7jjfk&t=5s
This tutorial will teach you how to create a geometric pattern using double half hitch knots and square knots. Let’s get started!
Using another piece of rope as your filler cord, tie a double half hitch knot on the left side of your work. Continue tying double half hitch knots working from the left to the right.
Find the middle of your work and tie a square knot with the four cords in the middle.
Continue tying square knots around the two filler cords in the middle. Pick up one new cord from each side to create your new square knot.
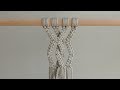
I did not create a square knot with the filler cord. If I were to create a wall hanging using this pattern I would likely create a row with a few of these geometric shapes and then take the filler cord and tuck it into the back of my work on both sides. I’ll show you how to do this at the end of the video.
Using another piece of rope as your filler cord, tie a double half hitch knot on the left side of your work. Continue tying double half hitch knots working from the left to the right.
Tuck your filler cords into the back of your double half hitch knots on both sides of your work.
Thanks for watching! Please check out the description as I have listed a few extra resources for you there such as links to more in-depth tutorials on how to tie the two knots used in this video.
Видео DIY Macrame Tutorial - Geometric Pattern #1 канала Lots of Knots Canada
Shop my book, Mixed Fiber Macrame, and Fiber Art Supplies (string, rope roving, ribbons, velvet and more) on my website or in my Etsy Shop:
Website: https://www.lotsofknots.ca
Etsy Shop: https://www.etsy.com/ca/shop/LotsofKnotsCanada
Support me directly: https://ko-fi.com/lotsofknotscanada
Material:
- 5mm Braided Cord (Colour: Taupe)
*Please note: This tutorial focuses on the pattern not the knots. If you’d like a slower, more in-depth tutorial on the knots used in this tutorial please see below:
Double Half Hitch Knot: https://www.youtube.com/watch?v=E2GapyAEVIk
Square Knot: https://www.youtube.com/watch?v=MXvKWY7jjfk&t=5s
This tutorial will teach you how to create a geometric pattern using double half hitch knots and square knots. Let’s get started!
Using another piece of rope as your filler cord, tie a double half hitch knot on the left side of your work. Continue tying double half hitch knots working from the left to the right.
Find the middle of your work and tie a square knot with the four cords in the middle.
Continue tying square knots around the two filler cords in the middle. Pick up one new cord from each side to create your new square knot.
I did not create a square knot with the filler cord. If I were to create a wall hanging using this pattern I would likely create a row with a few of these geometric shapes and then take the filler cord and tuck it into the back of my work on both sides. I’ll show you how to do this at the end of the video.
Using another piece of rope as your filler cord, tie a double half hitch knot on the left side of your work. Continue tying double half hitch knots working from the left to the right.
Tuck your filler cords into the back of your double half hitch knots on both sides of your work.
Thanks for watching! Please check out the description as I have listed a few extra resources for you there such as links to more in-depth tutorials on how to tie the two knots used in this video.
Видео DIY Macrame Tutorial - Geometric Pattern #1 канала Lots of Knots Canada
Показать
Комментарии отсутствуют
Информация о видео
Другие видео канала
 MACRAMÉ - Dois modelinhos / Espinha de peixe conhecido também como escama de peixe...
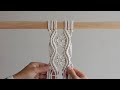 DIY Beginner Macrame Tutorial: Diamond Pattern with a Twist!
 DIY Macrame Tutorial - Another Geometric Pattern Using Square Knots!
 DIY Macrame Curtain -Super easy, fast /Hướng dẫn thắt rèm macrame cực xinh, siêu nhanh
 DIY Macrame Tutorial - Geometric Pattern #2
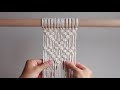 DIY Macrame Tutorial: MACRAME SHAPES SERIES - Triangle Pattern #2 Using Square Knots!
 DIY Macrame Tutorial - Zig Zag Patterns
 DIY Macrame Vine and Leaf Pattern
 10 Easy MACRAME KNOTS and PATTERNS | Tutorial
 6 nuevos NUDOS en MACRAMÉ (paso a paso) | 6 New Macrame Knots
 DIY | macrame net bag | 마크라메 네트 백
 Macrame 101: Chinese Crown Knot
 DIY | macrame layered wall hanging | 마크라메 레이어드 월 행잉
 Macrame curtain #3 / How to make a Macrame curtain / step by step / easy even if you are a beginner
 DIY Macrame Wall hanging #12 / 마크라메 월행잉 #12
 20 Pattern Elements for your macrame projects (PART 1) / How to weave it
 HOW TO ADD MACRAME CORD WHEN RUNNING OUT // Square Knot Addition
 5 nuevos NUDOS en MACRAMÉ (paso a paso) | 5 New Knots in Macrame
 10 Advanced Macrame Knots | Macrame Knotting Techniques