How to Repair an Old Torn Photo in Photoshop
I Guarantee I Can Teach You to Master Photoshop. Learn How: https://phlearn.com/aaronwillteachyou
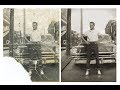
The results of this episode will absolutely astound you! Learn how to completely repair an old torn photo in Photoshop!
Reassembling the Photo
If you want to put together an old torn photo, you’ll need to start by scanning it in to a computer. Don’t worry if it’s in multiple pieces- we can fix that! Just be sure to Begin by selecting the pieces of the photo. Duplicate the background layer while they are selected so that you don’t work on the background layer. Then, cut and paste the pieces to be on their own individual layers. You can now use the move tool to bring them back to their original positions. Be sure to align all of the elements of the photo.
Dust and Scratches Begone!
Here are the tools to use for editing out tears, scratches, and any other blemish that can be found on your old photo:
Spot healing brush tool:
-Samples from a source automatically
-Best used for small, isolated blemishes
-Be sure to select “content aware” at the top of Photoshop
Clone stamp tool:
-You choose the source sample, which allows for much more control
-Be cautious of duplicating obvious spots
Brush tool:
-Only use if there are next to no options for sampling
-Takes a good eye and and a steady hand (this is essentially hand painting)
-Might require added noise to look realistic
-Much easier with a tablet than with a mouse
Fixing Discoloration
If you are working with an old aged photo, often times there will be a lot of discoloration in the image. To balance the colors we use a selective color adjustment layer, because it make it very easy to target specific colors (as well as whites, blacks, and neutrals) and then alter them.
Website: http://phlearn.com
Facebook: https://www.facebook.com/Phlearn
Google+: https://plus.google.com/u/0/116791098...
Видео How to Repair an Old Torn Photo in Photoshop канала PHLEARN
Показать
Комментарии отсутствуют
Информация о видео
Другие видео канала
 A Severely Damaged Photo Restoration (enlarged from 2"x3" to 5"x7")
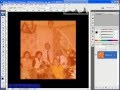 Removing a Colour Cast Using Levels
 Restore an Old Photo Ep 106: Take & Make Great Photography with Gavin Hoey: Adorama Photography TV
 How to Fix an Aged Photo in Photoshop
 Repair damaged & bleached photo in photoshop
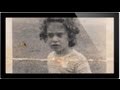 How To Repair An Old Photo In Photoshop Pt 2 - A Phlearn Video Tutorial
 How To Repair a Damaged Photo in Photoshop
 Remove Stains in Photoshop Using Multiple Hue & Saturation Adjustment Layers
 How to Colorize Black and White Images in Photoshop
 How You Can Repair A Vintage Cardboard Toy Box | Creases, Tears, Marker Ink
 Photoshop Tutorial, Remove a Color Cast with Auto Color correction
 Timelapse of the Colorization and Restoration of a Damaged Photo
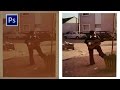 Colour Correct Old Photograph in Photoshop
 Easy ONE-CLICK Color Correction in Photoshop | Quickest Way To White Balance a Photo
 How To: Color An Old Black & White Photo
 Strong Color Cast Removal
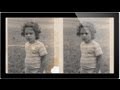 How To Repair An Old Photo In Photoshop Pt 1 - A Phlearn Video Tutorial
 Heartwarming photo RESTORATION!
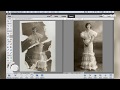 How to restore old photographs in Photoshop Elements