Photoshop Tutorial, Remove a Color Cast with Auto Color correction
In this color correction tutorial I will teach you the way how to color correct a vintage photo and explore using the Auto Color Correction in Adobe Photoshop.
Adobe Photoshop Adjustment layer ▶
A layer that lets you apply color and tonal adjustments to your image without permanently changing pixel values. Use adjustment layers to experiment with color and color tones. You can think of an adjustment layer as a veil through which the underlying layers are seen.
Remove a color cast using Auto Color ▶
Auto Color adjusts the contrast and color of an image by searching the image to identify shadows, midtones, and highlights. By default, Auto Color neutralizes the midtones using a target color of RGB 128 gray and clips the shadows and highlight pixels by 0.5%. You can change these defaults in the Auto Color Correction Options dialog box.
Do one of the following:
▶ Click the Levels or Curves icon in the Adjustments panel.
▶ Choose Layer - New Adjustment Layer and choose either Levels or Curves. Click OK in the New Layer dialog box.
You can also choose Image - Auto Color to apply the adjustment directly to the image layer. Keep in mind that this method discards image information and is automatic. You cannot adjust any of the options in the following steps.
▶ In the Properties panel, Alt-click (Windows) or Option-click (Mac OS) the Auto button.
▶ Under Algorithms in the Auto Color Correction Options dialog box, select the Find Dark & Light colors option.
▶ Select the Snap Neutral Midtones option.
▶ Specify the shadows and highlights that are clipped, and adjust the target color for the midtones.
▶ Click OK to apply Auto Color.
More from Elias Sarantopoulos ❤
Creative tutorials from Elias Sarantopoulos. Helping you develop your skills with Affinity Designer, Adobe Illustrator, After Effects, and Bootstrap tutorials.
Website!
▶ Helping You Develop - http://www.pixelias.com/
Flickr!
▶ http://bit.ly/1xx0bBu
Instagram!
▶ https://instagram.com/pixeliasdotcom/
Twitter!
▶ http://www.twitter.com/pixEliasdotcom
Subscribe!
▶ http://www.youtube.com/channel/UCPq0a0HP6JvculGSNYu-pSQ?sub_confirmation=1
Видео Photoshop Tutorial, Remove a Color Cast with Auto Color correction канала Elias Sarantopoulos
Показать
Комментарии отсутствуют
Информация о видео
Другие видео канала
 How to Fix an Aged Photo in Photoshop
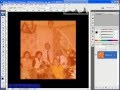 Removing a Colour Cast Using Levels
 EXTREME Color Correction Using 3 Points in Photoshop!
 Strong Color Cast Removal
 How To Match a Subject Into ANY Background In Photoshop! Compositing Tutorial
 Easy ONE-CLICK Color Correction in Photoshop | Quickest Way To White Balance a Photo
 Restoring Faded Portraits and Photos in Photoshop! Use a Step-by-Step Method for Great Results.
 PHOTOSHOP TUTORIAL: How to Remove a Colour Cast - FAST!
 Remove Stains in Photoshop Using Multiple Hue & Saturation Adjustment Layers
 Restore an Old Photo Ep 106: Take & Make Great Photography with Gavin Hoey: Adorama Photography TV
 Removing Color Casts in Photoshop
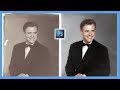 How to Repair and Colorize Old Photos (Adobe Photoshop CC Tutorial)
 Steal the Color Grading from Any Image with Photoshop!
 How do you restore colors? - Affinity Photo Tutorial // Very Easy
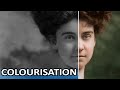 PHOTOSHOP TUTORIAL: Photo Colourisation, How to convert Black and White photography to Color
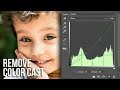 The Curves Trick to Remove Color Cast in Photoshop
 How to Increase Resolution - Affinity Photo Tutorial
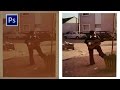 Colour Correct Old Photograph in Photoshop
 EASY FIX for White Balance: Photoshop Tutorial
 How to Remove Any Color Cast In Photoshop | Good Color Correction In Photoshop | Remove Color Tone