Building An Electric Streetfighter Motorcycle Part 2: The Fairing
In this video I make the fiberglass fairing for the electric streetfighter motorcycle. I carved a plug - basically a full scale model of the fairing - from expanded polystyrene foam, then covered it with a couple of layers of 10 oz fiberglass and 2 part epoxy (note that polyester resin will melt polystyrene). I smoothed out the surface with polyester filler after the epoxy was cured, then sanded and primed with acrylic primer.
I made a silicone mold using the plug and 2 part platinum cure RTV mold silicone. I covered the plug in a thin layer of petroleum jelly to serve as a release agent. Nothing usually sticks to silicone, but sometimes things happen with fresh molds so it's better to be safe than sorry. I then poured 2 thin layers of silicone over the plug and allowed it to cure. Then I used a thickening agent in the silicone to make it more viscous so that I could build up the mold to greater than 1/4" thickness, faster.
Once the silicone molds were cured, I covered those with a thin layer of petroleum jelly and then 4 layers of 10 oz fiberglass and polyester resin to make the 'mother' molds - once cured, these fiberglass molds will provide reinforcement for the silicone molds so they retain their shape. I switched to using polyester resin instead of 2 part epoxy because the cure time is much quicker, and it works better in colder temperatures (winter is coming to Canada).
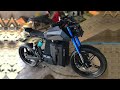
Once the molds were finished, I attempted to cast the fairing in one shot, but failed. The sides of the fairing mold were so steep that the glass kept collapsing, so I had to resort to splitting the molds into four pieces so the glass would lay in them properly. Once cured, I sanded the parts and then connected them with fiberglass 'tape' and more resin. Then the seams were sanded, puttied, sanded again, primed, puttied and sanded again, primed, then sanded AGAIN, then a couple coats of paint were applied....with sanding between each coat. Yeah, there was a LOT of sanding.
So, why did I do it this way? Why not vac injection instead? Simple - not enough time. As mentioned, cold weather is here and it was making it difficult to get this done without having heat in the workshop. I've used vac injection for other projects in the past, but have learned that it takes some time to work out the bugs and to expect a couple of fails in the process before getting it right. I didn't want to mess around. A little extra elbow grease making simple molds and casts helped me avoid this project potentially carrying on into the new year and costing me more than I can afford. If I were going to mass produce these, then I would have certainly spent the extra time making vac injection molds.
Anyway, if you have any questions just post them below. If you have any criticisms, save it. What's done is done and I have a plan to finish what I started. The best way to put your criticism to practice is to build your own bike.
Brakes, wiring, and seat left to do. Not sure if there will be a part 3 or if I'll just put the rest of the build in the complete build video instead. Either way, this project will be wrapped up in a roughly a week, so keep an eye out for the finished product.
Get the plans for this project here: https://renewablesystemstechnology.com/electric-streetfighter.html
Support RST to ditch the ads and get access to dozens of project plans at no extra cost:
http://www.patreon.com/resystech
https://www.youtube.com/channel/UCtrf6ZiE6hw3k77hGpnuQWg/join
Follow RST on Facebook:
https://www.facebook.com/RenewableSystemsTechnology
Видео Building An Electric Streetfighter Motorcycle Part 2: The Fairing канала James Biggar
I made a silicone mold using the plug and 2 part platinum cure RTV mold silicone. I covered the plug in a thin layer of petroleum jelly to serve as a release agent. Nothing usually sticks to silicone, but sometimes things happen with fresh molds so it's better to be safe than sorry. I then poured 2 thin layers of silicone over the plug and allowed it to cure. Then I used a thickening agent in the silicone to make it more viscous so that I could build up the mold to greater than 1/4" thickness, faster.
Once the silicone molds were cured, I covered those with a thin layer of petroleum jelly and then 4 layers of 10 oz fiberglass and polyester resin to make the 'mother' molds - once cured, these fiberglass molds will provide reinforcement for the silicone molds so they retain their shape. I switched to using polyester resin instead of 2 part epoxy because the cure time is much quicker, and it works better in colder temperatures (winter is coming to Canada).
Once the molds were finished, I attempted to cast the fairing in one shot, but failed. The sides of the fairing mold were so steep that the glass kept collapsing, so I had to resort to splitting the molds into four pieces so the glass would lay in them properly. Once cured, I sanded the parts and then connected them with fiberglass 'tape' and more resin. Then the seams were sanded, puttied, sanded again, primed, puttied and sanded again, primed, then sanded AGAIN, then a couple coats of paint were applied....with sanding between each coat. Yeah, there was a LOT of sanding.
So, why did I do it this way? Why not vac injection instead? Simple - not enough time. As mentioned, cold weather is here and it was making it difficult to get this done without having heat in the workshop. I've used vac injection for other projects in the past, but have learned that it takes some time to work out the bugs and to expect a couple of fails in the process before getting it right. I didn't want to mess around. A little extra elbow grease making simple molds and casts helped me avoid this project potentially carrying on into the new year and costing me more than I can afford. If I were going to mass produce these, then I would have certainly spent the extra time making vac injection molds.
Anyway, if you have any questions just post them below. If you have any criticisms, save it. What's done is done and I have a plan to finish what I started. The best way to put your criticism to practice is to build your own bike.
Brakes, wiring, and seat left to do. Not sure if there will be a part 3 or if I'll just put the rest of the build in the complete build video instead. Either way, this project will be wrapped up in a roughly a week, so keep an eye out for the finished product.
Get the plans for this project here: https://renewablesystemstechnology.com/electric-streetfighter.html
Support RST to ditch the ads and get access to dozens of project plans at no extra cost:
http://www.patreon.com/resystech
https://www.youtube.com/channel/UCtrf6ZiE6hw3k77hGpnuQWg/join
Follow RST on Facebook:
https://www.facebook.com/RenewableSystemsTechnology
Видео Building An Electric Streetfighter Motorcycle Part 2: The Fairing канала James Biggar
Показать
Комментарии отсутствуют
Информация о видео
Другие видео канала
 Building An Electric Streetfighter Motorcycle Part 3: Wiring, Brakes & Seat
 Building a Pit Bike in 33 Minutes
 Making of CyberBike / Introducing 27kW Electric Motorcycle!
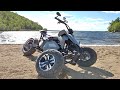 Building The 'Cyber Trike' - Electric Leaning Tadpole (Reverse) Trike
 Building An Electric Motorbike...Out Of Plywood?
 DIY Electric Motorcycle 53 mph / 85 kmh
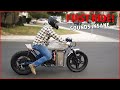 ELECTRIC CAFE RACER for $4,000 – FIRST RIDE
 very good and creative motor modification BMX bikes have 125cc engines how's it going?
 CD125T Benly Full Restoration
 Build a Electric Bike Big Wheel 60v 1500W 55km/h At Home
 How to Make Electric Bike With 2000W Hub Motor 70 Km/h
 These are the cheap parts I used to build a Fast electric motorcycle!!
 Building An Electric Motorcycle
 Electric Supercar First Drive - DIY Electric Car, DIY Supercar, Homemade Supercar
 BMW Scrambler Full Timelapse Build (R80RT)
 I BOUGHT the CHEAPEST ELECTRIC dirt bike on Amazon
 Build a Electric Go Kart at Home - v2 Electric Car - Tutorial
 Broken Deadlocked Vise - Perfect Restoration (I did it again)
 CD90 Benly Full Restoration