Ep.1 - LASER ROTARY ATTACHMENTS - Intro, Motors, Drivers Setup & Wiring. - CNC Rotary Axis
We will be looking at both commonly used rotary attachments: The Chuck & Roller Versions, how to wire connections, software config, and settings Backup.
Most Co2 Laser Manufacturers use either a 2-phase or 3-phase stepper motor and drivers for the X & Y Axis Motion.
Laser Cutting Resources - https://amzn.to/2RNNCUj
I acquired this Rotary axis from Cloudraylaser.com
(Also available on Amazon Links Below)
Roller/Wheel Rotary Axis - https://amzn.to/2RJuyGW
Chuck Rotary Axis - https://amzn.to/2ZRhT7w
http://bit.ly/MW-Cloudray
Looking for some projects to engrave with your rotary axis?
Check out these products
Insulated Tumbler with Splash-Proof Lid - https://amzn.to/31WSdbB
Stainless Steel Leak Proof Sports Water Bottle Powder Coated - https://amzn.to/31XXjUG
Kmizera Beta Inkless Pen Made of Anodized Aluminium - https://amzn.to/31RYAwR
Aluminium Anodized Compact Perfume Aftershave Atomiser - https://amzn.to/31XyqbN
So If purchasing a rotary attachment what phase motor you will need?
2-Phase driver has two terminals: A+, A-, B+, B- while 3-Phase driver has three terminals: U, V, W.
Next question we look at is, how should the motor (rotary) connects to driver?
2-Phase Motor has 4 wires or 8 wires, while 3-phase motor has 3 wires or 6 wires.
For 2-phase, most motors have 4 wires. We have 2 methods to recognise the wires easily.
One method is to connect any 2 wires together. If the two wires are couples, the shaft will be locked. The couples mean the two wires are (A+, A-) or (B+, B-). The order for A+ and A- doesn't matter. It only affects the direction of rotation. And the same for (A+, A-) & (B+, B-).
We can adjust the rotation direction in software by changing the machine origin settings (shown towards end of this video).
Another method to find "pairs" or A & B couples, is to use multi-meter. The resistance between the two wires in each couple = zero.
For 8 wires, you’ll need to check the manual for details definition.
For 3-Phase, you’ll need to check the manual of motor to find U V W terminals.
Cloudray connect the motor’s wires in a fixed order. However if your machine doesn't have matching plug or a plug with wrong wiring order, I explain how to connect it
I demonstrate briefly how to connect to the Y-axis driver and use the software to reverse the rotary rotation.
In future episodes we will look at these 2 types of rotary attachments in more detail and their configuration for use with RDWorks and Lightburn Software.
Cloudray Laser https://www.cloudraylaser.com/collections/rotary-axis
Thanks for Visiting.
Until next time, take care
Cheers Matthew
Visit Matt's Workshop at MW Laser https://www.mwlaser.com.au
Instagram https://www.instagram.com/mattsworkshop/
Facebook https://www.facebook.com/mattsworkshopau
== If you'd like to support my channel financially so I can continue to produce content you can do via PayPal here --- https://www.paypal.me/mattsworkshop --- Thank You ====
Any questions please feel free to email me matt@mwlaser.com.au or leave a comment below.
NOTE: This is not a paid production or advertisement. The featured product was provided by Cloudray to allow me to provide viewers with an installation / how-to video.
Видео Ep.1 - LASER ROTARY ATTACHMENTS - Intro, Motors, Drivers Setup & Wiring. - CNC Rotary Axis канала MW Laser
Показать
Комментарии отсутствуют
Информация о видео
Другие видео канала
 Ep. 2 - LASER ROTARY ATTACHMENTS - Chuck Rotary Axis - Configuration, Settings - CNC Rotary Axis
![[07] RuiDa Controller - RD Works - Cut Optimization](https://i.ytimg.com/vi/2NY8O-lrSNc/default.jpg) [07] RuiDa Controller - RD Works - Cut Optimization
[07] RuiDa Controller - RD Works - Cut Optimization Atomstack Y-axis rotary roller for laser engraving of cylindrical objects
 Laser Rotary Setup and Calibrating Steps per Rotation Using Lightburn
 xTool RA2 Pro Review | 4-in-1 Rotary | xTool D1 attachment
 100W laser *HOW TO* make $2500 per day of art-decor window panels
 Setting Up A Chinese Laser Rotary
 Onefinity Woodworker vs X carve 1000mm // Best CNC machine to buy?
 Laser Rotary Upgrade Setup Cheapest I Could Find
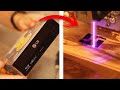 MODIFIQUE esta GRABADORA para QUEMAR MADERA! - CNC LASER con poco dinero
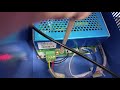 K40 Laser not firing / water sensor issue
 DIY CNC 4th Axis Follow Up and Details
 Co2 Laser Lens Selection & Ramp Test
 The 80mm Rotary Axis Installation of HL CO2 laser Engraver Machine
![03 Build Your Own Laser - Axis Rail Kit Assembly. [Inc. Mirror, Laser Tube & Motor Mounts]](https://i.ytimg.com/vi/HdOF4l3ZnL4/default.jpg) 03 Build Your Own Laser - Axis Rail Kit Assembly. [Inc. Mirror, Laser Tube & Motor Mounts]
03 Build Your Own Laser - Axis Rail Kit Assembly. [Inc. Mirror, Laser Tube & Motor Mounts] Ortur Laser Master 2 15 Watt looking for the "Sweet Spot" Using colors on Canvas
 Rotary Attachment Set Up for Your CO2 Laser Engraver - Training Video - OMTech Laser
 10 tips & tricks PLEXIGLASS working HOMEMADE
 Reduce your engraving time by 50% in LightBurn. Speed and LPI tips and tricks