The CANON Pixma PRO 1 Setup video
So here we go!
In this long video I show you what comes with the CANON Pixma PRO-1 Package.
I then proceed with the preparation of the printer body by removing all of the shipping securing tape than most printers come with.
Once I am 100% sure there are no further hidden pieces of tape, I proceed with the installation of the 12 Ink Cartridges.
I weighed a Brand New OEM cart and it came up to 84.30 grams with the wrapper still attached so I assume it weighs the predicted 84 grams.
An empty weighs in at around 44 grams. meaning the full OEM carts comes with 40ml or GRAMS of ink.
All the carts were loaded onto each corresponding color location and the red LEDs confirmed recognition by the printer.
Then came the print head installation which went easy.
You first remove a compartment cover, open up the lid and the print head assembly will then move to the central position.
There are two print head locking latches to be oppened up.
The print head slides into position and the two latches are closed by reversing the process, until you hear a solid click, meaning the print head is now securely locked in position.
You then close the lid and wait for the ink loading system to begin.
I had a problem immediately! The dreaded 10 flashing alternating lights came.
I called CANON Support but they could not help as the printer had been purchased more than a year ago.
They did diagnose the 10 blinking light sequence as a Main Board Not Comunicating with the Print Head! OUCH!!!!
The diagnosis was NOT GOOD and I was given the addresses of three local CANON repair centers!
I had nothing to loose at this point so I removed the head and re started the process once again.
Luckily this time all went well! PHEW!!!!!
The ink loading took about 15-20 minutes and once the main white flashing light was steady, I powered off the printer as directed.
Driver installation went without a hitch.
I was then directed to power up the printer and connect the USB cable to my PC.
The printer was recognized and the installer downloaded the newest driver and installed it.
Next followed the Automatic Print Head Alignment which takes two sheets of letter size paper.
I then did a manual nozzle check and it was perfect.
In the next video will be using QIMAGE Ultimate to print a full 13 x19 bordered print of my favorite "Test" image on CANON PRO Luster paper.
I will take you through the complete Prepping and Printing process and show you the resulting print.
-~-~~-~~~-~~-~-
Please watch: "EPSON P800 Chip Decoder unfortunately DID NOT WORK!"
https://www.youtube.com/watch?v=RWZiqDMwqv8
-~-~~-~~~-~~-~-
Видео The CANON Pixma PRO 1 Setup video канала Jose Rodriguez
Показать
Комментарии отсутствуют
Информация о видео
Другие видео канала
 The CANON PIXMA PRO 1 Printing a 13x19 from Qimage Ultimate
 How to set up The NEW CANON Pixma PRO-100! Setup and Basic Use
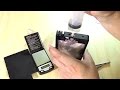 Here is what a CANON PRO 1 PGI 29 Cart looks like Inside and how to properly refill them
 Top Ten Best Home Photo Printers - 2020
 Canon Pro 1000 transporting setup and re install 15 months after sitting.
 CANON Pixma PRO 1 Ignore it and this will happen!
 Do I really want to Print Photos at home? If yes? What type printer should I get?
 Wax Paper Transfer Tutorial
 Best Printer for Art prints and Artists in 2020 (Print your art at Home)
 Canon Pixma Pro-1 Printer: Product Reviews: Adorama Photography TV
 I found out something about the CANON PRO 1 that shocked me!
 Canon Pro 2000 Unboxing
 My very Opinionated List of Top Epson and CANON 13-17 inch Photo Printers
 Setup of Canon G7020 MegaTank inkjet All-In-One printer
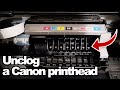 How to unclog a Canon Pro 100 Printhead
 Canon imagePROGRAF PRO-1000 "Real World Review": Worth $1300?
 Keith Cooper's Canon PRO-300 printer overview accompanies a detailed review of the A3+ (13") printer
 Please! Don't ever consider doing this with your CANON PRO 100 photo printer!
 Part #2 The CANON PRO 10 The Initial Setup