HOW TO SET UP AUTOMATIC WATERING POT |INDEPENDENT PLANT IRRIGATION BLUMAT PLANTER+SOLAR LED
BLUMAT LINK: http://amzn.to/2pRkdKS
PLANTERS LINK: http://amzn.to/2qanMit
4k Gopro: https://amzn.to/3878qAx
Gopro head strap: https://amzn.to/2XzhR7A
Gopro bicycle mount: https://amzn.to/2xDfK3l
Tripod: https://amzn.to/34NcAvm
The links above are affiliate links that belong to Amazon or Ebay partner programs. If you buy something through these links, I will receive a commission, of course without you having to pay anything more. Thanks for your support!
For contact options and links check my channel info,
Thank you for your interest in my videos!
First, I will now install an automatic irrigation system. For this I use 4 pieces of this watering cones made of clay named Blumat XL. For this pot size I use four of them. With this system, the potting soil is supposed to absorb the water by capillary through the fine holes of the clay cone. Through a small hose the cone sucks more water out of a nearby water reservoir ensuring a continuous humidification of the soil. For a water reservoir I use this eight gallon canister which I place behind the pot. It is important that the canister is at approximately the same height as the pot. For this I m putting the canister on a stable box. I think I have found a good and safe place for the canister and will now fill it with tap water. This is a used canister that's why I rinse it out a couple times to make sure there are no harmful remains in it. Now the clay cone must be completely filled with water. For this I take the cap off and dip the cone and the tube in a bowl of water until everything is completely filled. The system works the best if you close the cone under water to have no air in it. This procedure I perform in all four irrigation cones. With a spike I lose the Palm Earth a little at the intended location and insert the first cone. I am hanging the hose into the canister. Now it's important that the loose soil is soaked around and onto the cone so that the clay surface sort of connects to the ground. The other three cones are now put in the same manner evenly throughout the pan. I pay attention that the cones sit in deep enough and are watered well. I connect the four hose ends to a small metal ring to have them lay at the bottom of the canister and not draw any air. This completes the installation of the irrigation system for now.
As announced, I would now like to install a discreet lighting. For that I use a solar light chain with 12 warm white LEDs. During the day a small battery is charged by solar power which then automatically supplies the LEDs at dusk. I position the mini solar panel in the main direction of the sun and spread the LEDs uniformly around the palm. Now I spread one to two inch natural gravel which combines multiple functions. It covers the wires, hoses and cone caps. It also holds the LEDs in place and provides a visual enhancement. For this you can use all kinds of grits or gravels. Using the stones I position the LEDs facing towards the palm that way it's going to be illuminated indirectly later. The stone layer additionally ensures that the soil is protected against drying out by the sun and wind and the birds can't dig in the pot. Now the solar battery is being charged by the sun while the palm is being watered invisibly. I put a mark on the canister and observed the water level a few days. I can confirm the function of this irrigation system. A full container lasts about one month for this plant. Through the small opening only little water can evaporate and the canisters can be refilled at any time easily.
At night the LEDs provide a pleasant soft lighting. The lamp radiate both the Palm from below, as well as gravel which creates a pleasant mediterranean atmosphere.
Overall, I hope my video could provide good practical, and creative ideas. On my channel there are many landscaping videos and I appreciate every like, every comment and every subscriber. Thanks for watching and until next time, I'm Carl the landscape guy. #planter #palmtree #ledlighting
Видео HOW TO SET UP AUTOMATIC WATERING POT |INDEPENDENT PLANT IRRIGATION BLUMAT PLANTER+SOLAR LED канала CarlTheLandscapeGuy
Показать
Комментарии отсутствуют
Информация о видео
Другие видео канала
 INSTALLING GPS SENSORS ON EXCAVATOR | TOPCON X-22 KOMATSU PC-88 | X-63 HOW TO SET UP VDC 2d SYSTEM
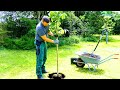 PROPER TREE PLANTING | PLANTING HOLE,STAKE SUPPORT,TRUNK PROTECTION, HOW TO PLANT WALNUT DETAIL DIY
 HOW TO DRIVE EXCAVATOR IN DETAIL |MONITOR/BUTTON TUTORIAL,OPERATE DIGGER DRIVING CONTROLS MACHINE
 400gal KOI POND BUILD, INDOOR FOLDABLE FISH KEEPING, HOW TO PUT UP PUMPED BRUSH BIOFILTER DIY SETUP
 BUILDING WATER STREAM REVIEW+TIPS | BACKYARD BROOK RUNNING | GARDEN CREEK NATURAL INSTALL UPDATE DIY
 HOW TO PLANT YOUR OWN ORGANIC PARSLEY - INDOOR HERB BOX FOR COOKING/KITCHEN/WINDOW/BALCONY/URBAN
 FULL BACKYARD TRANSFORMATION: WASTELAND TO PARK + saving Thousands $$$: before & after DIY MAKEOVER
 NATURAL POND WATER PLANTS & DECORATION | KOI FISH RELEASE,HERON FENCE,LAKE, RAIN,REFILL,HOW TO DIY
 BUILDING FIREWOOD STORAGE IN DETAIL |SIMPLE+QUICK SHED RACK+ROOF |DIY OUTDOOR COVERED WOODSTORE IDEA
 DRY STONE WALL BUILD, NATURAL STONE GARDEN WALL, PROFESSIONAL INSTRUCTION TIP, SET PORPHYRY YOURSELF
 STREAM DETAIL BUILD,START TO FINISH,COMPLETE WATER FEATURE GARDEN TUTORIAL,HOW TO DIY PONDLESS FALLS
 HOW PRECAST CONCRETE ROOF SLABS ARE MADE|FACTORY TOUR|STEPS STAIRS BALCONIES CEILING FORMWORK
 HOW TO INSTALL HOME SOLAR SYSTEM IN DETAIL |MOUNT STANDS+CELLS+HOOK UP POWER WIRES ON ROOF PV ARRAY
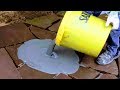 HOW TO LAY+GROUT FLAGSTONE SLABS | PRO GROUTING NATURAL STONE SAND JOINTS |MASONRY PATIO PAVERS WORK
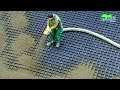 GREEN ROOF CONSTRUCTION EXPLAINED | HOW TO BUILD OPTIGREEN GARDEN LAYER SYSTEM CONCEPT| INSTALLATION
 COMPACTOR EXCAVATOR WITH OILQUICK | QUICK COUPLER ATTACHMENT KOMATSU | NPK C-4C OQ 45-5 PC88 DEMO
 AIR CONDITIONER INSTALLATION UPDATE - SMART HOME ADAPTER - SPLIT AC SET UP INFO, REVIEWS AND REPLY
 HOW TO MAKE CONCRETE FOOTING FOR GARAGE, DECK, POSTS,CAR PORT,CANOPY,PORCH,H-ANCHORS FOUNDATION EASY
 AUTOMATIC FEEDER FISH MATE P21 TEST+REVIEW FOR POND & AQUARIUM KOI FOOD GOLDFISH
 HOW TO REPLACE BELT+REMOVE DECK ON RIDING LAWN MOWER TRACTOR REPAIR YARD PRO ELECTROLUX/HUSQVARNA