How to Create a Spot UV Mask File Using Photoshop | Primoprint
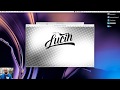
If you are looking for a way to enhance your business card design, adding Spot UV can do the trick. Whether using it to highlight text, image, or a logo, this video tutorial will help you create a Spot UV mask file using Photoshop. Follow the instructions below!
1. Combine all layers into one folder—label folder Front.
2. Pull all layers that you want Spot UV on top of into its own folder and duplicate.
3. Now, label that folder Spot UV. Make sure this folder is outside the Front folder.
4. Double click on the Spot UV folder and do a color overlay at 100% black (c0, m0, y0, k100).
5. Turn your Spot UV folder off and save the file as a pdf or jpg. This is your Front Print File.
6. Turn your Front folder off and save the file as a pdf or jpg. This is your Spot UV Mask File. And you are now ready for print!
Free Sample Packet: http://ow.ly/rmzZ50BrBo7
Shop all Business Cards: http://ow.ly/gZyp50Bq2vW
➜ L E T S C O N N E C T
Get social! Follow our social media accounts for business announcements, product highlights, customer products, design inspiration, new products, resources, and more! Make sure to use the hashtag #Primoprint
Facebook: https://www.facebook.com/PrimoprintUS/
Instagram: https://www.instagram.com/primoprint/
Twitter: https://twitter.com/primoprint
LinkedIn: https://www.linkedin.com/company/primo-print/
#spotuv #businesscards #PhotoshopTutorial
Видео How to Create a Spot UV Mask File Using Photoshop | Primoprint канала Primoprint
Показать
Комментарии отсутствуют
Информация о видео
Другие видео канала
 How to Setup Your Spot UV Mask File for Print | Primoprint
 How To Make UV File In Illustrator CC.
 Using Laser Foil with your Laser
 Glossy UV vs. Matte Business Card Stock | Primoprint
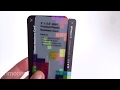 Choosing Your Rounded Corners; The Different Curve Radius | Primoprint
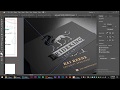 فنيات الطباعة illustrator:عمل اللمعان spot uv
 No competition business with high profit। business ideas in hindi। new business idea
 How to Create a Spot UV Mask Using Adobe Illustrator | Primoprint
 How to add a Spot UV Layer/Channel to Adobe Illustrator for printing
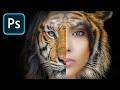 How to use Photoshop layer masks for beginners
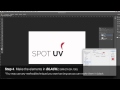 How to set up a file correctly for Spot UV printing in Photoshop
 18PT C1S Card Stock | Primoprint
 Inline Foil Business Card Swatch | Primoprint
 How to add Spot UV in Adobe InDesign
 Separate Line Art from Background - Photoshop Tutorial
 How to Create Gold Foil Business Card Mockup | Metallic Foil Logo Mockup | Adobe Photoshop CC
 What is CMYK Printing | Softtouch Lamination | Spot UV | Die Cut - Product Finishing Process
 Spot UV Tutorial for Business Cards | Primoprint
 Embossed Business Card Design | Tricks For You - 2019
 How To - Textured Prints on UV Printer