Adding Buttons In Excel (2 ways)
This is a very quick tutorial on how to add a button in excel (using shapes & form control) and assign an action to it.
Video companion file referred in this video is available at -
https://drive.google.com/open?id=19SymqEqLHb2g0Oguz-StSPOz0s2IOycB
Note: When you open the companion excel, you may get a Security Warning indicating "Macros have been disabled". Click on "Enable Content".
Macro code (For direct copy paste) - https://gist.github.com/excelcrafters/3ef0fd2d322f9346f32378248eaac1b7
Index for this video is shown below. Feel free to move to the respective sections by clicking on the timestamp!
00:27 - Writing the macro (copy paste the same from above link)
01:13 - Adding a button in excel using shapes
02:06 - Linking the button to the macro
02:25 - Tip on editing the properties of a button once it is linked (Ctrl + Click)
02:48 - Running the button demo
03:03 - Adding a button in excel using Form Controls
03:53 - Reason why you should not use ActiveX buttons in excel
***********
In this video, I walk you through on how to create a button in excel using Shapes/Form control & assign it to a macro.
Step 1:
A Macro defines what action should be triggered once a button is clicked. So, first, we need to define a macro "HelloWorld" (Refer link provided above to directly copy paste the code), then save it and come back to the Excel worksheet.
Step 2:
Creating a button - We will see two ways to create a button in excel. Once is using shapes and other is using Form Controls.
Step 2.1: Button creation using shape in Excel - Go to Insert - Shapes - Rectangle. Next, click on where you want the button to show up, drag the mouse and release when the size of the button is up to your preference. Now you can see a rectangle in the excel body.
Step 2.1.1: Formatting the rectangle
Next task is to format the rectangle that we created to make it look like a button (for aesthetic purposes). Simple way to do it is, select the rectangle, to go-to "Format" - "Shape Effects", then select an effect that you feel fit to make it look like a button.
If you want to change the color, select the rectangle, to go-to "Format" - "Shape Fill" and update the color. Then go-to "Format" - "Shape Outline" and update the outline/border color.
Now, the rectangle is fit to be called a button!
Step 2.1.2: Changing the Text in the button.
Right click on the button, click on "Edit Text". Now type what you want as the label of the button. Note that this text is not aligned properly. In order to make it center aligned, Right click on the button - "Format Shape" - "Shape Options" - "3rd tab under Shape Options" - "Text Box" - "Vertical Alignment". Change the value to "Middle".
You can also choose to increase the font size/color etc of the Button text by selecting the button label and then going to "Home" - "Font" part of the ribbon.
Step 2.2: Button creation using FORM CONTROLS in Excel - Go to Developer - Insert - Click on the button icon under "Form Controls" . Next, click on where you want the button to show up, drag the mouse and release when the size of the button is up to your preference. As soon as you create the form control button, excel asks you to assign the macro that should get triggered. Go ahead and select "HelloWorld" macro that we already created.
Step 3: Changing the Text in the button (Shape or Form Control).
Right click on the button, click on "Edit Text". Now type what you want as the label of the button. In case of a shape button, the text may not be aligned properly. In order to make it center aligned, Right click on the button - "Format Shape" - "Shape Options" - "3rd tab under Shape Options" - "Text Box" - "Vertical Alignment". Change the value to "Middle".
In case of a "Shape" button, you can also choose to increase the font size/color etc of the Button text by selecting the button label and then going to "Home" - "Font" part of the ribbon. In case of a "Form Control" button, right click on the button, select "Format Control" & then you will get the option to change font, font size etc.
Step 4
Linking the button to Macro - For the "Form control" button, we have already assigned the macro by this point. For Shape button, right click on the button and select "Assign Macro". From the window that pops up, select the macro we have just created. Click OK.
You have successfully created a button (via Shapes and Form Control) that executes a macro when clicked!
Excel Button HOT TIP : Editing a button that is already linked
After you link the macro to a button, you will notice that whenever you hover on the button, it shows up as a clickable link and it no longer allows you to select the button or edit the properties... instead it triggers the macro that we have assigned. In order to bypass this behavior temporarily, CTRL + Click on the button and it will select the button so that you can edit the properties of the button.
#buttonsexcel #macrobutton #learn365club
Music: https://www.bensound.com
Видео Adding Buttons In Excel (2 ways) канала Internetter
Показать
Комментарии отсутствуют
Информация о видео
Другие видео канала
 How to make Macro enabled Form in Excel Sheet?
 Using Spin Buttons in Excel
 Excel Visual Basic (VBA) for Beginners - Part 1 of 4: Buttons and Macros
 How to Insert and Use a Radio Button (Option Button) in Excel
 Excel Tips 14 - Links in Excel to Quickly Navigate Between Worksheets with Buttons
 Searchable Drop Down List in Excel (Very Easy with FILTER Function)
 Make Cool Buttons for Excel! (And Professional)
 Excel VBA ActiveX Series #5 SpinButton - Incrementing and decrementing a cells number, Move controls
 How to Create Macros in Excel Tutorial
 Button links to Multiple Google Sheets
 How to Create a Data Entry Form in Excel With Add, Modify, Delete and Reset (Step-by-step Guide)
 How To Add A CLICKABLE Button In Excel 2016
 How To Create A Navigation Menu Pane In Excel - No VBA
 Using Checkboxes in Excel - Part 1
 Excel VBA - Command Button
 Links to quickly Navigate within Excel Work Sheets with Buttons and Hyperlink
 Excel VBA Beginner Tutorial
 Creating Easy Data Entry Forms in Excel
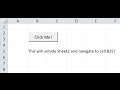 Use Command Button to Navigate Your Workbook Like a Hyperlink
 Fully Automated Data Entry User Form in Excel - Step By Step Tutorial