etrailer | Air Lift Air Helper Springs Installation - 2012 Toyota Sienna
Click for more info and reviews of this Air Lift Vehicle Suspension:
https://www.etrailer.com/Vehicle-Suspension/Air-Lift/AL60732.html
Check out some similar Vehicle Suspension options:
https://www.etrailer.com/suspension-enhancement.htm
Search for other popular Toyota Sienna parts and accessories:
https://www.etrailer.com/vehicle/2012/Toyota/Sienna
https://www.etrailer.com
Don’t forget to subscribe!
https://www.youtube.com/user/etrailertv
Full transcript: https://www.etrailer.com/tv-install-air-lift-helper-springs-for-coil-springs-2012-toyota-sienna-al60732.aspx
Today in our 2012 Toyota Sienna, well be installing the AirLift 1000 Air Helper Springs, part number AL60732. Before we do, were going to go ahead and test the manufacturers suspension system. First, well go ahead and measure the manufacturers right height. This is 29-3/4 inches. Next, well go ahead and install approximately 765 pounds into rear of our vehicle loading it down. Now, our current right height with the weight installed is 27-1/2 inches.
Now, well go ahead and run the vehicle over our test course. As we go through the solemn course, the excessive weight allows for a lot of body roll, and it will have a reduced steering response. As we go over our bumps course, it can be a bit rough with the excessive weight.Along with the body say, we make it a good application for our new airlift system. Now, well go ahead and install the airlift system. Now with our airlift system installed and our 765 pounds weight in the vehicle aired up, brings our new right height to 28 inches.
Now, well go ahead and repeat our same test course. As we go back to the solemn course with the airlift system installed, it really helps control the body roll and sway while bringing back our steering response. As we go over the bumps, it helps control it much better, and its not as shocking with the excessive weight. Now to begin our install, well first go ahead and take the weight off the rear suspension.Now with the rear coil springs extended, well take our airbag and roll it up, flatten it out as much as possible, and reinstall the cap to keep the suction on the bag. Now, we can take the bag, and feed it in to the coil spring.
Quick tech tip, as you put the coil spring in, pick the largest distance between coils to squeeze the bag in position giving you enough room to work the airbag inside of the coil spring. Once we have the airbag in, well then go ahead and remove the plug from the nipple allowing air into the bag and it reforming the shape. Now with the driver side airbag installed, well go ahead and repeat the same process in the passenger side. Now with our airbag in, were ready to start running our airline.Ill start on the driver side. Well feed the airline through the top of the coil spring mount into the coil spring, then well install this spacer which also help protect the airbag nipple.
Next, well install the hose clamp on to the hose. Now, we can simply take the hose and feed it on to the nipple of the airbag; or quick tech tip, to make it easier, we can soak the line in some hot water making it a little more pliable and easier to install. Once we have the hose pushed onto the nipple, well take the clamp and slide it down to the end of the hose which will secure the hose to the airbag. Now, well go ahead and route it towards the passenger side. Keep in mind, when routing your hose, stay as far away from pinch points or excessive heat as possible.Now for this application, well have one inlet and exhaust line. Well use the T supplied with the install kit. Were going to the end the driver side line here near the rear axle on the passenger side. Well be using the AirLift Hose Cutter, part number AL10530 to make sure we get a square clean cut on our hose. Now, once we got the driver side line, well go ahead and route the passenger side. Again, well take our hose, feed it down to the top of the spring, install our spacer block, and install the line clamp. Well go ahead and soak our hose into the hot water. After approximately 3 to 5 minutes, we can go ahead and remove the hose, and install it onto the nipple of the airbag on the passenger side.Well move the spacer down over the top of the passenger side airbag, and then go ahead and continue routing our line. The passenger side hose will now route towards the driver side where we ended the driver side hose. Using our T, well go ahead and hold the lines together, mark the length of our hose, and go ahead and use our tubing cutter, and cut off any excess length. Next, well go ahead and install a hose clamp onto the passenger side hose. Go ahead and take the T-end, warm it with the water, and install it onto the T. Next, well take the driver side hose, and repeat the same process. Now, well take the leftover line, install it into the third port of our T as this will be the inflation and exhaust line that will run to the air valve.Once we have it installe
Видео etrailer | Air Lift Air Helper Springs Installation - 2012 Toyota Sienna канала etrailer.com
Показать
Комментарии отсутствуют
Информация о видео
Другие видео канала
 etrailer | Air Lift Air Helper Springs Installation - 2013 Toyota Sienna
 Air Lift 1000
 Air Lift Retrofit to OE Suspension Kit
 How to Install an LRT 3" to 1" Leveling/Lift Kit on a 2017 Toyota Tundra
 Air Lift vs Firestone: Which One is Better? SD Truck Springs - 1(877)774-6473
 etrailer | Air Lift AirLift 1000 Air Helper Springs Installation - 2012 Honda Odyssey
 How to make an air lift tea brewer for GIANT YIELDS! Designed by MrTimjwilson
 Airbagit Load leveling air spring for Toyota Sienna level the load for any weight.mp4
 Scruffy Safari AWD Van Build // Part 2 - Installing A Journey's Offroad Lift Kit
 Air lifting wells explained
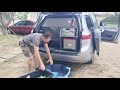 DIY Toyota sienna AWD Adventure minivan Stealth Camper conversion. Easy economic Social Distancing
 Mazda 5 Front Shocks Replaced
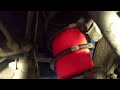 AirLift 1000 Air Bags on Toyota
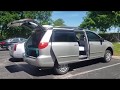 Toyota Sienna 2008 camper van build
 Happy Go Travel's Toyota Fortuner Air Suspension
 What's it like running all-terrain tires on a Subaru?
 RAS Demo on Motorhead Garage | Roadmaster Active Suspension
 Heavy fluid LEAK Diagnose Replace Steering Rack Toyota Sienna√ Fix it angel
 etrailer | Air Lift LoadLifter 7500 XL Air Helper Springs Installation - 2018 Ram 2500
 Install Part 1: 2003 Buick Lesabre 3" Strut Lift By UniversalCarLifts.com 14/18/17