DIY Painted Ceramic Dish | How I Seal the Paint
In this DIY tutorial, I will show you how to create a beautiful painted ceramic dish using acrylic paint and gel medium. With just a few simple materials and creativity, you can make stunning and unique home decor that's sure to impress.
First, we'll paint the base layer using only two colours.
Next, we'll get creative and paint our design onto the dish. Then, I will show you how to create depth by adding more or less white to your colours and generating foliage with just the edge of your brush.
Once the paint has dried, we'll apply a final layer of gel medium to seal the design and add an extra layer of protection. Plus, ensure your painted ceramic dish stays vibrant and beautiful for years.
Whether you're looking to create unique home decor or a thoughtful handmade gift, this tutorial is perfect for anyone who wants to get creative with ceramics and acrylic paint. So grab your paintbrushes, and let's get started!
Products used in the making of this video:
• Kmart DIY Ceramic Dish
• White Paint: https://amzn.to/3kirt39
• Atelier Pthalo Turquoise
✅ Note - As an Amazon Associate, I earn from qualifying purchases at no extra cost to you. Sales from the links go towards funding my YouTube channel.
Thank you for your support.
Handy Links:
Sue Findlay Fine Art
✅ Website: https://suefindlayart.com.au
✅ Facebook: https://www.facebook.com/suefindlayart
✅ Instagram: https://www.instagram.com/suefindlayfineart/
Sue Findlay Designs
✅ Website: https://suefindlaydesigns.com.au
✅ Blog: https://suefindlaydesigns.com.au/blog-2/
✅ Facebook: https://www.facebook.com/suefindlaydesigns/
✅ Instagram: https://www.instagram.com/suefinart/
✅ Pinterest: https://www.pinterest.com.au/Suefinart/
📚 Books
The Essential Beginner’s Guide to Resin Art Techniques.
eBook: http://bit.ly/resinguide
Paperback: https://mybook.to/essentialresinguide
My Goal Setting and Action Planner for Artists.
Paperback: https://mybook.to/plannerforartists
*Sales from my books go towards funding my YouTube resin tutorials.
Thank you for your support.
Видео DIY Painted Ceramic Dish | How I Seal the Paint канала Sue Findlay
Показать
Комментарии отсутствуют
Информация о видео
Другие видео канала
 Future Proofing Your Art Business
 10K Subscriber Giveaway Winners Announced
 Watercolour and Pencil Time-Lapse
 Golden Retriever Speed Paining - Working With Colour
 50K subscribers - A massive thank you!
 How to add texture to your resin waves - time-lapse
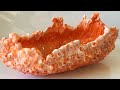 Rope + Cling Wrap + Resin = Trinket Dish
 Quick and Simple Resin Art for Beginners - Using only TWO colours.
 Resin Swipe - Creating Cells
 Resin Tip of the Day - Resin on a Curved Surface
 Experimenting with India Ink in Resin
 Resin Tip of the Day - Manipulating Resin into Shape
 Resin Galaxy - Almost fail!
 Resin Triptych - Creating flow across 3 panels
![10K Subscriber Giveaway - Win one of two resin artworks! [CLOSED]](https://i.ytimg.com/vi/N5ngs1W_DEc/default.jpg) 10K Subscriber Giveaway - Win one of two resin artworks! [CLOSED]
10K Subscriber Giveaway - Win one of two resin artworks! [CLOSED] Ocean-Inspired IKEA Resin Lampshade
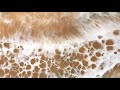 Product Review and Creating Cells in Resin
 EASY Nail Polish Christmas Baubles | DIY Hydro-dipping with Sue Findlay
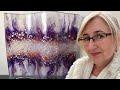 How to bend curing resin into a wave shape.
 Resin Tip of the Day - Adding 3 in 1 Oil to Resin
 Create a Freeform Epoxy Resin Wave using Rope, Plastic and a Cone.