- Популярные видео
- Авто
- Видео-блоги
- ДТП, аварии
- Для маленьких
- Еда, напитки
- Животные
- Закон и право
- Знаменитости
- Игры
- Искусство
- Комедии
- Красота, мода
- Кулинария, рецепты
- Люди
- Мото
- Музыка
- Мультфильмы
- Наука, технологии
- Новости
- Образование
- Политика
- Праздники
- Приколы
- Природа
- Происшествия
- Путешествия
- Развлечения
- Ржач
- Семья
- Сериалы
- Спорт
- Стиль жизни
- ТВ передачи
- Танцы
- Технологии
- Товары
- Ужасы
- Фильмы
- Шоу-бизнес
- Юмор
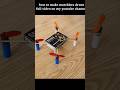
Build Your First Robot Car using #arduinouno | Step-by-Step Guide 🛠️#roboticsengineering #robotics
Build Your First Robot Car using #arduinouno | Step-by-Step Guide 🛠️#roboticsengineering #robotics #diy #Robotics #roboticsengineering #roboticsfuture #digitaltechtutor
In this project, we will create a Bluetooth-controlled robotic car using the following components:
🔹 Arduino Uno R3 🎛️ – The brain of our robot, responsible for processing commands.
🔹 Motor Driver L293D ⚙️ – Controls the speed and direction of the DC motors.
🔹 Bluetooth Module HC-05 📡 – Allows wireless communication between the robot and a smartphone.
🔹 DC Gear Motors (2 or 4) 🚗 – Provides movement for the robot.
🔹 12V Battery / Power Source 🔋 – Supplies power to the circuit.
📜 How It Works:
1️⃣ The HC-05 Bluetooth module connects to a mobile app via Bluetooth. 📲
2️⃣ The Arduino Uno R3 receives commands from the mobile app via serial communication. 🔄
3️⃣ The L293D motor driver processes signals from Arduino and controls the motors' movement. ⚡
4️⃣ The DC motors respond to the commands, allowing the robot to move forward, backward, left, or right. 🚙💨
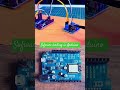
🔗 Circuit Connections:
✅ HC-05 Bluetooth Module
VCC → 5V (Arduino)
GND → GND
TX → RX (Arduino)
RX → TX (Arduino)
✅ L293D Motor Driver
Input 1, Input 2, Input 3, Input 4 → Connected to Arduino Digital Pins
Motor Output Pins → Connected to DC motors
VCC → 5V
GND → Common Ground
Enable Pins → HIGH for activation
✅ DC Motors
Connected to the L293D Motor Driver Outputs
✅ Power Supply
12V Battery → Connects to L293D & Arduino
🛠️ Programming (Arduino Code)
You’ll need the Arduino IDE to upload the code. The program will receive Bluetooth commands (e.g., 'F' for Forward, 'B' for Backward) and control motor movements accordingly.
cpp
Copy
Edit
#include SoftwareSerial.h
SoftwareSerial BT(10, 11); // RX, TX for Bluetooth module
int motor1A = 3;
int motor1B = 4;
int motor2A = 5;
int motor2B = 6;
void setup() {
pinMode(motor1A, OUTPUT);
pinMode(motor1B, OUTPUT);
pinMode(motor2A, OUTPUT);
pinMode(motor2B, OUTPUT);
BT.begin(9600); // Bluetooth HC-05 default baud rate
Serial.begin(9600);
}
void loop() {
if (BT.available()) {
char command = BT.read();
Serial.println(command);
if (command == 'F') { // Forward
digitalWrite(motor1A, HIGH);
digitalWrite(motor1B, LOW);
digitalWrite(motor2A, HIGH);
digitalWrite(motor2B, LOW);
}
else if (command == 'B') { // Backward
digitalWrite(motor1A, LOW);
digitalWrite(motor1B, HIGH);
digitalWrite(motor2A, LOW);
digitalWrite(motor2B, HIGH);
}
else if (command == 'L') { // Left
digitalWrite(motor1A, LOW);
digitalWrite(motor1B, HIGH);
digitalWrite(motor2A, HIGH);
digitalWrite(motor2B, LOW);
}
else if (command == 'R') { // Right
digitalWrite(motor1A, HIGH);
digitalWrite(motor1B, LOW);
digitalWrite(motor2A, LOW);
digitalWrite(motor2B, HIGH);
}
else if (command == 'S') { // Stop
digitalWrite(motor1A, LOW);
digitalWrite(motor1B, LOW);
digitalWrite(motor2A, LOW);
digitalWrite(motor2B, LOW);
}
}
}
📌 Final Steps:
✅ Upload the Arduino code to your Arduino Uno R3.
✅ Use a Bluetooth control app (e.g., Arduino Bluetooth Controller) to send movement commands. 📲
✅ Power up your robot and watch it move wirelessly! 🚀🎮
Let me know if you need any modifications or additional features! 😊
Видео Build Your First Robot Car using #arduinouno | Step-by-Step Guide 🛠️#roboticsengineering #robotics канала NextGen Robotics Academy
In this project, we will create a Bluetooth-controlled robotic car using the following components:
🔹 Arduino Uno R3 🎛️ – The brain of our robot, responsible for processing commands.
🔹 Motor Driver L293D ⚙️ – Controls the speed and direction of the DC motors.
🔹 Bluetooth Module HC-05 📡 – Allows wireless communication between the robot and a smartphone.
🔹 DC Gear Motors (2 or 4) 🚗 – Provides movement for the robot.
🔹 12V Battery / Power Source 🔋 – Supplies power to the circuit.
📜 How It Works:
1️⃣ The HC-05 Bluetooth module connects to a mobile app via Bluetooth. 📲
2️⃣ The Arduino Uno R3 receives commands from the mobile app via serial communication. 🔄
3️⃣ The L293D motor driver processes signals from Arduino and controls the motors' movement. ⚡
4️⃣ The DC motors respond to the commands, allowing the robot to move forward, backward, left, or right. 🚙💨
🔗 Circuit Connections:
✅ HC-05 Bluetooth Module
VCC → 5V (Arduino)
GND → GND
TX → RX (Arduino)
RX → TX (Arduino)
✅ L293D Motor Driver
Input 1, Input 2, Input 3, Input 4 → Connected to Arduino Digital Pins
Motor Output Pins → Connected to DC motors
VCC → 5V
GND → Common Ground
Enable Pins → HIGH for activation
✅ DC Motors
Connected to the L293D Motor Driver Outputs
✅ Power Supply
12V Battery → Connects to L293D & Arduino
🛠️ Programming (Arduino Code)
You’ll need the Arduino IDE to upload the code. The program will receive Bluetooth commands (e.g., 'F' for Forward, 'B' for Backward) and control motor movements accordingly.
cpp
Copy
Edit
#include SoftwareSerial.h
SoftwareSerial BT(10, 11); // RX, TX for Bluetooth module
int motor1A = 3;
int motor1B = 4;
int motor2A = 5;
int motor2B = 6;
void setup() {
pinMode(motor1A, OUTPUT);
pinMode(motor1B, OUTPUT);
pinMode(motor2A, OUTPUT);
pinMode(motor2B, OUTPUT);
BT.begin(9600); // Bluetooth HC-05 default baud rate
Serial.begin(9600);
}
void loop() {
if (BT.available()) {
char command = BT.read();
Serial.println(command);
if (command == 'F') { // Forward
digitalWrite(motor1A, HIGH);
digitalWrite(motor1B, LOW);
digitalWrite(motor2A, HIGH);
digitalWrite(motor2B, LOW);
}
else if (command == 'B') { // Backward
digitalWrite(motor1A, LOW);
digitalWrite(motor1B, HIGH);
digitalWrite(motor2A, LOW);
digitalWrite(motor2B, HIGH);
}
else if (command == 'L') { // Left
digitalWrite(motor1A, LOW);
digitalWrite(motor1B, HIGH);
digitalWrite(motor2A, HIGH);
digitalWrite(motor2B, LOW);
}
else if (command == 'R') { // Right
digitalWrite(motor1A, HIGH);
digitalWrite(motor1B, LOW);
digitalWrite(motor2A, LOW);
digitalWrite(motor2B, HIGH);
}
else if (command == 'S') { // Stop
digitalWrite(motor1A, LOW);
digitalWrite(motor1B, LOW);
digitalWrite(motor2A, LOW);
digitalWrite(motor2B, LOW);
}
}
}
📌 Final Steps:
✅ Upload the Arduino code to your Arduino Uno R3.
✅ Use a Bluetooth control app (e.g., Arduino Bluetooth Controller) to send movement commands. 📲
✅ Power up your robot and watch it move wirelessly! 🚀🎮
Let me know if you need any modifications or additional features! 😊
Видео Build Your First Robot Car using #arduinouno | Step-by-Step Guide 🛠️#roboticsengineering #robotics канала NextGen Robotics Academy
Arduino Bluetooth robotics robotics project Bluetooth-controlled car Arduino Bluetooth car DIY robotics HC-05 module motor driver L298N Arduino programming robotics for beginners IoT projects Arduino car project remote control car Bluetooth RC car Arduino wireless control STEM robotics DIY Arduino projects Arduino motor control smart car project tech innovation Bluetooth automation engineering projects Arduino tutorial electronic projects
Комментарии отсутствуют
Информация о видео
13 марта 2025 г. 22:28:17
00:06:47
Другие видео канала