- Популярные видео
- Авто
- Видео-блоги
- ДТП, аварии
- Для маленьких
- Еда, напитки
- Животные
- Закон и право
- Знаменитости
- Игры
- Искусство
- Комедии
- Красота, мода
- Кулинария, рецепты
- Люди
- Мото
- Музыка
- Мультфильмы
- Наука, технологии
- Новости
- Образование
- Политика
- Праздники
- Приколы
- Природа
- Происшествия
- Путешествия
- Развлечения
- Ржач
- Семья
- Сериалы
- Спорт
- Стиль жизни
- ТВ передачи
- Танцы
- Технологии
- Товары
- Ужасы
- Фильмы
- Шоу-бизнес
- Юмор
How to Build an "Obstacle-Avoiding Robotic 🤖 Car"🚗for Engineering Project! 🚀⚙️ #roboticsengineering
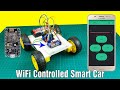
🚗🤖 How to Build an Obstacle-Avoiding Robotic Car for Your Engineering Project! 🚀⚙️
🔹 Project Overview:
Build a smart robotic car that automatically detects and avoids obstacles using ultrasonic sensors and a microcontroller. Perfect for engineering students looking for an exciting and practical robotics project! 🎓⚡
🛠️ Components Required:
✔️ Arduino Uno / NodeMCU / Raspberry Pi – Brain of the car 🧠🔌
✔️ Ultrasonic Sensor (HC-SR04) – Detects obstacles 📡🚧
✔️ Motor Driver Module (L298N) – Controls motor movement ⚙️🔄
✔️ DC Motors (2x) & Wheels – For smooth motion 🏎️🔋
✔️ Servo Motor (Optional) – For sensor rotation 🔄🤖
✔️ Battery Pack (Li-ion or 9V) – Power supply ⚡🔋
✔️ Chassis / Car Body – Holds all components 🏗️🚗
✔️ Jumper Wires & Breadboard – For connections 🔌📲
📌 Step-by-Step Procedure:
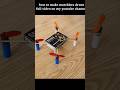
🔹 Step 1: Assemble the Car Chassis
🛠️ Fix the DC motors and wheels onto the chassis.
🔗 Attach the L298N motor driver to control speed & direction.
🔹 Step 2: Set Up the Ultrasonic Sensor
📡 Mount the HC-SR04 sensor on the front (or on a servo for rotation).
🔗 Connect it to the Arduino to detect obstacles.
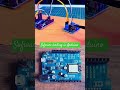
🔹 Step 3: Wiring & Circuit Connections
🔌 Connect Arduino, motor driver, ultrasonic sensor, and power supply.
⚙️ Ensure correct wiring using a breadboard or PCB.
🔹 Step 4: Write & Upload Code
💻 Use Arduino IDE to program obstacle detection & movement.
📜 Logic:
🚀 Move forward if no obstacle detected.
⏪ Turn left or right when an obstacle is detected.
🔄 Reverse if blocked completely.
🔹 Step 5: Testing & Debugging
✔️ Power up the car & test obstacle detection.
✔️ Adjust sensor angles for better accuracy.
✔️ Optimize speed and turning response.
🚀 Features & Enhancements:
✅ Hands-Free Navigation – Automatically avoids obstacles. 🛑🔄
✅ Smart Movement – Detects & decides best path. 🧠📡
✅ Wireless Control (Optional) – Add Bluetooth / WiFi to control via a mobile app 📱🔗
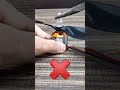
⚠️ Safety Tips:
⚡ Use a regulated power supply to prevent overheating 🔋🔥
🔧 Secure all wires properly to avoid short circuits 🛠️
🌍 Test in a safe, open area for smooth performance 🚗🛑
✨ Your Obstacle-Avoiding Robotic Car is Ready! 🚗🤖
Perfect for engineering projects, robotics competitions, and AI automation research! 🎓🔬
Would you like the Arduino code as well? 💻📜🚀
Видео How to Build an "Obstacle-Avoiding Robotic 🤖 Car"🚗for Engineering Project! 🚀⚙️ #roboticsengineering канала NextGen Robotics Academy
🔹 Project Overview:
Build a smart robotic car that automatically detects and avoids obstacles using ultrasonic sensors and a microcontroller. Perfect for engineering students looking for an exciting and practical robotics project! 🎓⚡
🛠️ Components Required:
✔️ Arduino Uno / NodeMCU / Raspberry Pi – Brain of the car 🧠🔌
✔️ Ultrasonic Sensor (HC-SR04) – Detects obstacles 📡🚧
✔️ Motor Driver Module (L298N) – Controls motor movement ⚙️🔄
✔️ DC Motors (2x) & Wheels – For smooth motion 🏎️🔋
✔️ Servo Motor (Optional) – For sensor rotation 🔄🤖
✔️ Battery Pack (Li-ion or 9V) – Power supply ⚡🔋
✔️ Chassis / Car Body – Holds all components 🏗️🚗
✔️ Jumper Wires & Breadboard – For connections 🔌📲
📌 Step-by-Step Procedure:
🔹 Step 1: Assemble the Car Chassis
🛠️ Fix the DC motors and wheels onto the chassis.
🔗 Attach the L298N motor driver to control speed & direction.
🔹 Step 2: Set Up the Ultrasonic Sensor
📡 Mount the HC-SR04 sensor on the front (or on a servo for rotation).
🔗 Connect it to the Arduino to detect obstacles.
🔹 Step 3: Wiring & Circuit Connections
🔌 Connect Arduino, motor driver, ultrasonic sensor, and power supply.
⚙️ Ensure correct wiring using a breadboard or PCB.
🔹 Step 4: Write & Upload Code
💻 Use Arduino IDE to program obstacle detection & movement.
📜 Logic:
🚀 Move forward if no obstacle detected.
⏪ Turn left or right when an obstacle is detected.
🔄 Reverse if blocked completely.
🔹 Step 5: Testing & Debugging
✔️ Power up the car & test obstacle detection.
✔️ Adjust sensor angles for better accuracy.
✔️ Optimize speed and turning response.
🚀 Features & Enhancements:
✅ Hands-Free Navigation – Automatically avoids obstacles. 🛑🔄
✅ Smart Movement – Detects & decides best path. 🧠📡
✅ Wireless Control (Optional) – Add Bluetooth / WiFi to control via a mobile app 📱🔗
⚠️ Safety Tips:
⚡ Use a regulated power supply to prevent overheating 🔋🔥
🔧 Secure all wires properly to avoid short circuits 🛠️
🌍 Test in a safe, open area for smooth performance 🚗🛑
✨ Your Obstacle-Avoiding Robotic Car is Ready! 🚗🤖
Perfect for engineering projects, robotics competitions, and AI automation research! 🎓🔬
Would you like the Arduino code as well? 💻📜🚀
Видео How to Build an "Obstacle-Avoiding Robotic 🤖 Car"🚗for Engineering Project! 🚀⚙️ #roboticsengineering канала NextGen Robotics Academy
obstacle avoiding robot robotics project engineering project Arduino robot ultrasonic sensor DIY robotics autonomous car smart robot obstacle detection Arduino car IoT robotics mobile controlled robot sensor based car line following robot Raspberry Pi robot coding for robotics robotic car tutorial self-driving car AI robotics microcontroller project robotic automation mechatronics project beginner robotics school science project STEM robotics
Комментарии отсутствуют
Информация о видео
20 марта 2025 г. 20:47:44
00:06:14
Другие видео канала