VFD Wiring Done Correctly & Amp Usage On The Digital Interface..
This video covers the overview of wiring your spindle correctly using double shielded cable for maximum stability from EMI pentration. This isn't an option, and must be done to properly to assure your system's reliability.
I included the VFD programming parameters below. If you would like an emailed copy in Microsoft word format please message me.
If you have questions, please email me at storm2313@gmail.com, or contact me through my store eDealers Direct https://www.ebay.com/str/edealersdirect
The VFD parameters:
First, reset the VFD to factory settings. You don't know where that thing's been. On the front panel, hit PROG or PRGM, and then the up and down buttons until you reach PD013. Hit SET. Change the value to 8 using the up and down buttons.
Hit SET again. Now your VFD is reset.
For setting multi-digit values, use up and down to increase and decrease the value, and the Shift key to move one digit to the right.
PD001: Command source. Set to 0. 0 means you're controlling the spindle via the front panel controls. 1 means you're using controls that you've wired up to the screw terminals. 2 means you're going to control it using RS-485.
PD002: Speed control source. Set to 1. 0 means you're controlling the speed through the up and down front panel buttons. 1 means you're going to control the speed with either the knob on the front or an external potentiometer. 2 means RS-485.
When PD002 is set to 1, there is also a jumper next to the screw terminals that you have to set. If the jumper is on the right pair, the control is the front panel knob. If the jumper is on the left pair, the control is via an external potentiometer connected to the screw terminals. Make sure the jumper is on the right-side pair.
PD003: Default frequency. If PD002 was set to 0, this is the frequency the motor will start running at. The frequency is directly related to the speed. Since we set PD002 to 1, we can leave this alone. But you can set it to something like 200 Hz to start at mid-range.
PD004: Rated frequency: This setting can be ignored.
PD005 through PD010 set three points on a voltage/frequency curve. As the motor ramps up to your desired speed, it follows this curve. These values listed are for the constant torque graph.
PD005: High-end frequency: 400 Hz
PD006: Middle frequency: 2.5 Hz
PD007: Low-end frequency: 0.5 Hz
PD008: High-end voltage: 220 V
PD009: Middle voltage: 15 V
PD010: Low-end voltage: 8 V
PD011: Minimum allowed frequency. Set to 120 Hz.
Skip ahead to these parameters next
PD070: Speed control input: Set to 1. This means that the speed will be controlled by an input voltage between 0 and 5V. This is what the front panel knob delivers. 0 means 0-10V. 2 means the control is by an input current between 0 and 20mA. 3 means 4-20mA. 4 is a combination of voltage and current.
PD071: Speed control responsiveness: Leave at the factory setting of 20.
PD072: High-end frequency: Set to 400. This sets the frequency represented by the top end of the speed control.
PD073: Low-end frequency: Set to 120. This sets the frequency represented by the bottom end of the speed control.
PD141: Rated motor voltage: Set to 220V.
PD142: Rated motor current: Set to 10A.
PD143: Number of motor poles: Set to 2. This is the number of magnetic poles in the motor. It should be either 2 or 4. If your using the matching 2.2kW spindle the setting is 2.
PD144: RPM at 50Hz: Set to 3000. Since the max RPM is 24000 at 400Hz, this means that the RPM at 50Hz will be 3000.
Your Set To Run!
Testing
Now twist the knob all the way counterclockwise so that you'll start at the lowest speed setting. You can now hit the RUN button and your spindle should start rotating clockwise if you're looking at it from above.
If it rotates counterclockwise, press STOP, shut off the power, unplug the VFD, and swap any two of the motor wires. Then try again.
The display may now be showing a frequency rather than a rotational speed -- that is, the HZ light above the display may be lit. Hit Shift until the ROTT light above the display is lit. That's RPM.
Now slowly turn the knob clockwise. You should get all the way to 24000 RPM.
Hitting Shift until A is lit shows you the current being used by the motor.
Видео VFD Wiring Done Correctly & Amp Usage On The Digital Interface.. канала corvetteguy50
Показать
Комментарии отсутствуют
Информация о видео
Другие видео канала
 Build Your Own CNC Machine - 11. Setting up the VFD and Mach3 - Part 1
 How to wire a VFD / variable frequency drive
 Lathe VFD 8: How to Wire Circuit Protection (Breaker and Fuse)
 Single phase output VFD controls 1-phase motor speed
 AT1 single phase to 3 phase VFD
 How to make a SILENT Huanyang Variable Frequency Drive.
 Installing a Spindle Part 2 - CNCnutz Episode 145
 Lathe VFD Wiring Conversion With Like Factory Controls
 Huanyang VFD Quick Start Setup
 How to control VFD with push button switch/ terminal control/wire control
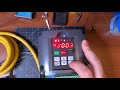 Blukman 3D/Workbee/QueenBee Pro CNC Spindle Wiring, Inverter Programing & Mach3. Series episode 10
 Installing a Spindle Part 3 - CNCnutz Episode 146
 Lathe VFD 2: How to Program a VFD for a lathe (Teco-Westinghouse L510)
 Huanyang VFD 220v cnc spindle
 ATC Spindle Part 1: Wiring, Programming and Testing the Hitachi WJ200 VFD
 Cnc Spindle not working correctly
 How to install a VFD on Masso - Masso Edition 09
 VFD set up for nvr push button on/off, fwd/rev and jog.
 Making & Wiring A Chinese Mini Lathe VFD Control Box
 How to wire up remote/external switches to a VFD