How to Sew A Camper Themed Sewing Machine Cover by Sewspire
Hey y'all and welcome to the first video tutorial in the Sewspire 2017 Slipcover Series!
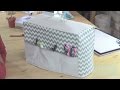
Today I am here to show you how to create a custom cover for your sewing machine. For this project you will need a soft sided measuring tape, 3/4 yard canvas or twill fabric, embroidery thread and assorted cotton scraps to embellish the cover as you'd like.
Good news! If you own a standard size sewing machine that measures 15" at the base, 11" to 12" tall and 7" to 8" deep, then this cover, as measured will fit your machine perfectly!
To begin, precut a cotton handle that measures 6" x 10", two canvas or twill rectangles to measure 17" wide by 13" tall and one larger canvas or twill rectangle to measure 38.5" long by 9" wide.
To create my camper themed cover, rotary cut and layer the following shapes as outlined below in the detailed instructions, before assembling the cover.
Camper embellishment pattern pieces
Trim at the base of the front and rear panels: (2) 17" x 4" and (2) 17" x 3"
Camper Door: 6" x 10" (slightly rounded at the top)
Door Window: 4" x 4" square folded in quarters and rounded into a circle.
Front and Rear Windows: (2) 6" x 6"
Front and Rear Curtains: (4) 6" x 3"
Side Windows: (2) 5" x 5"
Side Curtain Valance Toppers: (2) 5" x 2"
You will need to attach the design to the twill using a standard zigzag stitch and a coordinating embroidery thread before assembling the cover as outlined in the video tutorial.
Step by step instructions to for the Camper embellishment
Stitch one 3" wide trim piece and one 4" wide trim piece right sides together to create a larger two toned panel. Fold over the top edge of that panel and position that atop of one of the front twill panel with the bases aligned. Stitch along the top edge of the trim panel to secure. Repeat for rear panel.
Fold the longest edge of each curtain panel over 1/4" and stitch to hem.
Position the curtains vertically on the larger windows and horizontally on the smaller side windows to create a valance topper. Pin in place.
Position the larger windows with side curtains on the lefthand side of the front and rear panels. Pin in place.
Fold the door panel in half, longways and angle the top edges to create a rounded door frame. Attach the circle window towards the center top of the door and zigzag stitch around the edge of the circle twice with embroidery thread.
Position the door to the right of the window on the front panel. Pin in place.
Position the smaller windows at each end of the longer rectangular panel approximately 5" from the base with the curtain towards the top (please note the windows are positioned incorrectly in my photo as the curtain valance should not be upside down).
Zig zag stitch twice around all the windows and the door.
Then assemble as outlined in the video tutorial.
If you enjoyed this video, please subscribe to this YouTube Chanel and my blog www.sewspire.com
If you have a special request for our slipcover series which will run through the Spring of 2017, please comment here or on Instagram or Facebook using @sewspire
Until we meet again...
The creative genius in me, salutes the creative genius in you!
XO,
Andrea
Видео How to Sew A Camper Themed Sewing Machine Cover by Sewspire канала Sewspire
Показать
Комментарии отсутствуют
Информация о видео
Другие видео канала
 Make a sewing machine dust cover! by Debbie Shore
 Sewspire Design Board #040621: How to sew a custom planner cover
 33 SEWING TIPS TO MAKE YOUR LIFE EASIER
 How to sew my Ultimate Craft Tote: In celebration of YOU & our 50K subscriber milestone!
 How to sew a sewing machine mat with pockets by Debbie Shore
 How to Make Your Own Custom Sewing Machine Cover
 27 Smart Sewing Hacks! Useful Sewing Tips & Tricks | Artkala
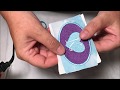 SewArt - Digitize a Filled Patch
 Make a Sewing Machine Pad with Jenny
 Sewspire Design Board #041321
 How to Sew a coat hanger zipped cover by Debbie Shore
 almost real time sewing a needle case using the quilt as you go technique!
![DIY BIG TRAVEL BAG | Sewing Machine Carrying Case TUTORIAL [sewingtimes]](https://i.ytimg.com/vi/KIedz3kwo80/default.jpg) DIY BIG TRAVEL BAG | Sewing Machine Carrying Case TUTORIAL [sewingtimes]
DIY BIG TRAVEL BAG | Sewing Machine Carrying Case TUTORIAL [sewingtimes] How to add a zipper top closure and a removable adjustable messenger strap to my Ultimate Diaper Bag
 EASY GIFTS ~ Sewing Machine Dust Cover with Opening for Handle Tutorial
 Gift bag by Debbie Shore
![DIY IRON STORAGE BAG | How to make Iron Case Tutorial & Sewing Pattern [sewingtimes]](https://i.ytimg.com/vi/VjTPsfCHOiA/default.jpg) DIY IRON STORAGE BAG | How to make Iron Case Tutorial & Sewing Pattern [sewingtimes]
DIY IRON STORAGE BAG | How to make Iron Case Tutorial & Sewing Pattern [sewingtimes] Mini Iron Tote Process Video
 How to Make a Fabric Basket
 How to Sew Fleece Slippers Detailed Instructions by learncreatesew