BLUE HOUR Mountain Landscape Editing with Adobe Photoshop CC | QE #263
In this quickedit video I‘m working on a blue hour mountain landscape photo which I’m #editing using #Adobe #Photoshop, the TK Panel and the Nik Collection Plug in
If you'd like to support me, Patreon: https://www.patreon.com/phlog
Instagram: http://www.instagram.com/thephlog
Facebook: http://www.facebook.com/phlog
As the original raw was quite dark (the exposure did look good on the camera display) my goal for this shot was to first increase it’s brightness. Besides that, I still wanted to have a rather dark, dramatic sky and overall a strong contrast. Besides using Photoshop with the camera raw editor, I also used the TK Panel plug in to do the dodging and burning with luminosity masks and the Nik Collection plug in for some final processing. At this point I want to say most of the editing could have been done in Lightroom!
1. Basic Raw Adjustments
I started with activating the lens corrections, then changed the camera profile to Adobe Standard which reduced the contrast a bit (so I have more control over it myself). I slightly changed the white balance by increasing the temperature and making everything a bit warmer.
To counter the darkness of the image I increased the exposure slightly and the whites quite a bit. Straight away I added some contrast and further boosted it by dropping the shadows. Now to get more details in the photo I carefully increased the clarity which works great on mountain landscapes.
2. Local Adjustments
Not much going on here. I dragged a graduated filter over the sky and dropped the exposure to make it darker. I added a small radial filter over the left mountain and inside it increased the clarity for more detail.
3. Colour grading
To bring out the orange tones of the mountain I increased it’s saturation, as well as the blue saturation. Now since it was blue hour I went with a purple-ish colour tone for the highlights and a cold colour tone for the shadows using the split toning.
4. Photoshop
I started by using the TK panel to create luminosity masks. With those I can target specific luminosity ranges which I used to do the dodging and burning. Then I used the Nik Collection Plug in to apply the brilliance / warmth filter which adds a nice warmth to the photo.
Видео BLUE HOUR Mountain Landscape Editing with Adobe Photoshop CC | QE #263 канала Christian Möhrle - The Phlog Photography
Показать
Комментарии отсутствуют
Информация о видео
28 июля 2020 г. 21:07:45
00:06:55
Другие видео канала
 How to Edit Moody Black Photos in Photoshop
 The Best Way And Fastest Way To Select Hair In Adobe Photoshop Cc New Tutorial 2018
 How to Create Glowing Lines on Portrait Image - Photoshop Easy Tutorial
 How to Photograph Stunning Sunsets & Sunrises | B&H Event Space
 The Orton Effect Made Easy
 BEST way to Focus Stack in Photoshop
 Top 5 Best Free Photoshop Alternatives
 Fine Art Architecture Photography in New York: The Shoot and Photoshop tutorial
 Understanding Natural Light: Golden Hour, Blue Hour and Twilights
 Fastest way to Select Hair in Photoshop | Select and Mask Tool Photoshop 2020
 Beginner's Guide to Editing with Lightroom Classic - Lightroom Tutorial
 Are cloudless days good conditions for LANDSCAPE photography?
 Bracketing frames, Merging in Lightroom and Editing in Photoshop. Landscape Photography
 Make your DRONE Photos POP with Photoshop!
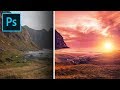 3-Step Formula for Colorful Landscapes in Photoshop!
 How to Change a Sky in Photoshop 2021
 How to Edit Landscapes Like @aronsche Instagram Lightroom Editing Tutorial
 A 'Smart' Way to Fix Motion Blur in Photoshop!
 How Much Post Processing Goes Into My Landscape Photos?