How to build a bay window seat with storage part 1
First I would like to thank you for stopping by to watch. 2nd, for some reason when I rendered my video the music I had placed into it disappeared. So I apologize for that. Grrrr.
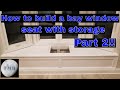
Hi guys. Thanks for visiting my channel again. In this video, "How to build a bay window seat with storage" I will be showing you how I built this unit for my friend Tony and his wife Sue.
I used dimensional lumber for the framing, 2 sheets of 3/4" hardwood plywood, a piece of 1"x 3" poplar, 1 sheet of 1/2" hardwood plywood, new baseboard and new shoe base.
For the finishing my client purchased basic primer and Behr semi gloss water based latex paint.
We started out shopping for all our supplies at the local big box store. Upon returning to his house I quickly started cutting the old painter's caulk to remove the old baseboard and base shoe molding. A small pry bar assists in this. After that I scraped off the remaining caulk.
Then it was time to locate the studs and mark them with a pencil using a small level to keep the lines straight up and down. I then measured for the 1st 2x4 that would go under the window. I place a level on the wall and mark a line that represents the top of the 2x4. Then start the crews in the 2x4 before placing it on the wall. Keep the level near by you will need it. Do this for all three sides.
Then measure for the lower support 2x4's that will serve as braces. This is done on all three walls as well.
Then I measured for a 1 1/2" setback for the front portion of the build. I cut all the 2x4's for this portion of the build and drilled some pocket holes. Once upstairs I build a small wall / ladder and secured it in place.
I placed bottom supports so it would keep the front plumb. Then top braces for seating purposes.
Then I cut the 1/2" plywood for the front of the build and secured them with liquid nails and 18 gauge brad nails.
Then I climbed inside to mark the location of the pull up door location with a pencil.
From there I drilled 4 holes into the plywood for starting points for the jigsaw. I cut the opening using a jigsaw. A perfect square was not necessary at this point.
I then used a pizza box to make a template. I prefer this method over just measuring. It works well. I did this for both sides and transferred the template to the sheet goods. Once the pieces were cut out I installed them. That is it for the 1st day.
Tools I used on this build the 1st day:
Tony's Makita 7 1/2" circular saw with a poor blade,
Tony's Craftsman 10" miter saw that did not cut all the way through,
Skill brand jigsaw form 1994,
A 4' level,
A 12" level,
Liquid Nails,
Tony's broke ass Caulking gun,
Stanley instant change box cutter knife,
Craftsman 18g nailer,
Craftsman air compressor,
A #2 pencil,
Kreg K4 pocket hole jig,
2" pocket hole screws,
96" straight edge by Empire,
3" star drive deck screws.
Filmed on my Samsung Galaxy S8 plus, a GoPro 2, GoPro 3, and a GoPro 4.
Edited on a 2013 Macbook Pro and iMovie.
Cut into two separate videos with MPEG Streamclip,
Compressed and uploaded via Handbrake.
Stay tuned for part two!
Follow me on Instagram @themidnighthandyman
On Facebook @The Midnight Handyman
Thanks!
Видео How to build a bay window seat with storage part 1 канала Marrazzo Woodworking
Показать
Комментарии отсутствуют
Информация о видео
Другие видео канала
 How to build a bay window seat with storage part 2
 HOW TO BUILD a Modern Dining Nook Banquette - Breakfast Nook - Bench Seats
 DIY: Easiest 2x4 Drawer Bench
 DIY Window Seat with Ikea Nordli Hack
 Ask This Old House | Storage Bench, Old Shower Valve (S17 E6) | FULL EPISODE
 You're a "HACK" if you use 1/4 ROUND TRIM or SHOE MOLDING
 How to Build a Dining Nook/Banquette : Budget Renos #01
 My Window Bench
 DIY Window Seat with Drawers
 How to make a window seat with storage, Part 1 of 2 #007
 IKEA Hack | How to Build a Bench from Kitchen Cabinets | The DIY Mommy
 Mudroom Bench
 DIY BUILT-IN READING NOOK | NURSERY MAKEOVER
 Woodworking : Kitchen Banquette Bench W/ Storage // How-To Part 1
 Shoe Storage Bench // Built In Bench
 Building a Window Seat with Drawers
 Making a Breakfast Nook ( With Storage)!
![My DIY Window Seat Storage Hack [Full Project]](https://i.ytimg.com/vi/l6z1Jl12dDA/default.jpg) My DIY Window Seat Storage Hack [Full Project]
My DIY Window Seat Storage Hack [Full Project] DIY Bay Window Seat
 How to Build a Window Banquette with Leather Seat // DIY