Swingblade SAWMILL Build Ep.2 - Saw Carriage Fabrication
This time I'm building a circular swingblade sawmill from scratch. The function of the mill is in its name - the blade swings 90 degrees making it possible to cut both ways while moving the carriage up and down the log resulting in dimensional lumber in one pass. I built a chainsaw mill ten years ago and milled lumber that I used for my cabin / sauna house project. Then I built a bandsaw mill five years ago and used the cut lumber to build a partition in my barn I currently call my workshop. Both of them worked great, bandsaw mill was faster than chainsaw mill for sure. But I think I can make an even faster mill and swingblade sawmill in my opinion is just what I'm looking for. There are different types of swingblade sawmills, one type utilizes a railway system where the saw carriage rides on rails so both rails are in the way when loading the logs. I want to build a beam-type mill where the saw carriage is suspended on a beam over the log that sits on a couple of wedges so it doesn't roll off while cutting. There will be no need to clamp the log down. Cut depth and width adjustments are all going to be made on the sawmill beam end frames. And to top it off - it will basically be a portable sawmill due to its build properties but I think it's only going to sit in my yard regardless of the portability. I've been "sitting on" this custom order circular blade for over a year now and I can finally start working on this dream. In this video I'm showing you saw carriage fabrication. I make the saw carriage out of rectangular tube and sheet metal. The legs where the pivot point bearing blocks mount to are 60x40x4mm square tubes. The rear piece is 60x30x2mm and the front cross piece is 40x40x2mm. I made the legs from a thicker material so there is no additional reinforcing needed in the tubes when clamping down the pivot point bearings. Those bearings have horizontal and vertical slots in them so the blade is adjustable in two planes, horizontal and vertical plane. I still need to make proper tensioners that sit under the bearing blocks and have threads on'em so I can precisely adjust the running of the blade. The rollers are just plain bearings on a calibrated shaft with a circlip in the end of it. Really simple and durable. I also made a test beam from materials I had laying around. The final beam will have 20x20x3 square tube rails. The test beam had 20x20x2mm and it was clearly too thin wall thickness due to suffering under all kinds of distortions when welding the rebar cross pieces and diagonals. I am enjoying this build very much and I hope you do too!
My other videos: https://www.youtube.com/DonnDIY/videos
Support me on: https://www.patreon.com/DonnDIY Follow me on: https://www.instagram.com/DonnDIY
#donndiy #homemade #sawmill
Welding equipment borrowed from Spetselektroodi AS, Estonia:
Fronius TransSteel 2700 welder
Optrel Crystal 2.0 Welding Helmet
Hypertherm Powermax 45 XP plasma cutter
Видео Swingblade SAWMILL Build Ep.2 - Saw Carriage Fabrication канала Donn DIY
Показать
Комментарии отсутствуют
Информация о видео
Другие видео канала
 Fully Rebuilt - 8x8 Amphibious Vehicle Argo REBUILD Ep.10
 Assembly - 8x8 Amphibious Vehicle Argo REBUILD Ep.9
 Brake Differential Steering etc. - 8x8 Amphibious Vehicle Argo REBUILD Ep.8
 Sprocket TIG Welding & Assembly - 8x8 Amphibious Vehicle Argo REBUILD Ep.7
 ASSEMBLY - 8x8 Amphibious Vehicle Argo REBUILD Ep.6
 2 YEARS Timelapse - House is Built in 37 MINUTES
 Engine Maintenance - 8x8 Amphibious Vehicle Argo REBUILD Ep.5
 Gearbox Assembly - 8x8 Amphibious Vehicle Argo REBUILD Ep.4
 Gearbox Repair - 8x8 Amphibious Vehicle Argo REBUILD Ep.3
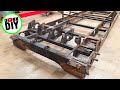 Frame Repair Welding - 8x8 Amphibious Vehicle Argo REBUILD Ep.2
 Complete Teardown - 8x8 Amphibious Vehicle Argo REBUILD Ep.1
 Swingblade SAWMILL Build Ep.4 - Frame Sliders & Lockers
 Swingblade SAWMILL Build Ep.3 - Steel Frame Fabrication
 Swingblade SAWMILL Build Ep.1 - Blade Adapter Machining & Swing Frame Fabrication
 Lathe work #shorts
 Hauling, Cutting & Splitting Firewood & Log Splitter MOD
 Hydraulic Log Splitter BUILD Part 6 - Wood Tray & TEST
 Hydraulic Log Splitter BUILD Part 5 - FIRST TEST!
 Hydraulic Log Splitter BUILD Part 4 - Wedge Linkage
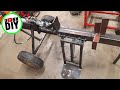 Hydraulic Log Splitter BUILD Part 3 - Log Loader & Four Way Wedge