MAKING BEAUTIFUL TIMELAPSES || DIY Timer Remote From Scratch
Hello everyone, today I will show you how I made an Arduino based timer remote or intervallometer from scratch.
0:00 Intro
0:38 Building of the remote
10:07 Final & Demo
11:54 Timelapses
It’s a device use to take picture every given interval in which you can set the number of pictures, the interval (obvious) and a self-timer. It also has also a bunch of other modes as bulb mode, self-timer and single shot.
I started with a PVC tube that I flatened and used to make the enclosure. Each side was cut in the PVC plate and finished using a bench grinder and files. I cut the front panel using my CNC. I could have done it by hand but it’s much easier with it and it made cleaner cuts.
The boxe was then assembled using PVC glue. The enclosure mesure 11x4x3,2cm (LxWxH) or about 4,3x1,6x1,25inch.
The brain of the system is an Arduino Nano along with 2 optocoplers, some LEDs, switches, battery, connectors and an lcd display. It was a pain to fit everything in such a small box but I managed to do it. I used optocoplers to isolate the camera circuitry from the controller one. There is one optocopler for the focus button and one for the trigger button.
As I have a nikon camera, I use a MC-DC2 to 3.5mm jack cable but it’s compatible with any other camera and camera brand.
I also glued a hard drive magnet to the back of the controller so that I can stick it to my tripod when I’m shooting.
You can find the circuit diagram along with the code here :
Code : -Available soon-
Circuit diagram : -Available soon-
The timelapses were shoot in the magnificient Lorraine in France as some of you will recon. They were made using this remote during the last year, in between confinements.
Gears used :
Nikon d5300 camera
AF-P DX Nikkor 18-55mm f/3.5-5.6 G VR (standard kit lens)
Velbon VS-3 tripod (the rusty boy)
K&F Concept ND2-400 filter
My trusty remote
If this is note the proof that you can do great things on a budget…
I hope you enjoyed watching the video as much as I enjoyed making the remote and shooting those timelapses. Don’t forget to like share and subscribe !!
Leave a comment and share your impression !
Musics :
"The Interpretation" of Dreams by Savfk : https://youtu.be/Y3sRpyBkY1w
Music from #InAudio: https://inaudio.org/
MokkaMusic - Get Drunk
Music from #InAudio: https://inaudio.org/
Infraction - Northern Lights
Music from #InAudio: https://inaudio.org/
MokkaMusic - Fast Car.
"Easy" Chill Trap Beat 2020 (Prod By Safemi Beatz) : https://youtu.be/OU2C5uGL2xI?list=PLpJaGghQpvnNXv7m3hz1gf3UhlxQ03zn3
"Frame" — KV [Audio Library Release]
Music provided by Audio Library Plus Watch: https://youtu.be/KkfvLLUtfhI
Free Download / Stream: https://alplus.io/frame
"Flight" by LiQWYD https://soundcloud.com/liqwyd
Creative Commons — Attribution 3.0 Unported — CC BY 3.0 Free
Download / Stream: https://bit.ly/flight-liqwyd
Music promoted by Audio Library https://youtu.be/alLrAofCU9U
Видео MAKING BEAUTIFUL TIMELAPSES || DIY Timer Remote From Scratch канала The French Maker
Показать
Комментарии отсутствуют
Информация о видео
Другие видео канала
 4K Timelapse movie - A Place You've Never Heard of | Lorraine
 Fireworks Basics : MAKING FIREWORKS STARS
 Fireworks basics : MAKING FIREWORKS FOUNTAINS
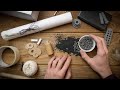 BUILDING A FIREWORK SHELL | Cinematic
 Fireworks Basics : MAKING A 50mm (2 inch) FIREWORK SHELL
 MAKING A NIXIE CLOCK
 Fireworks Basics : MAKING A BALL MILL
 MAKING AN AIRSOFT GRENADE