How To Draw An Impossible Triangle Optical Illusion - Impossible Shapes
Drawing Fundamentals course: https://mydrawingtutorials.com/basics
More Drawing Courses: https://mydrawingtutorials.com/store
For more drawing tutorials, sign up for our FREE newsletter: https://mydrawingtutorials.com/join
Link to the pen I used:
http://mydrawingtutorials.com/how-to-draw-an-impossible-triangle
Connect With Us:
Facebook: https://www.facebook.com/MyDrawingTutorials
Google+: http://mydrawingtutorials.com/googleplus
Twitter: https://twitter.com/MyDrawingTutor
Pinterest: http://pinterest.com/mydrawingtutor/
Video Transcript:
In this lesson, you're going to learn how to draw a simple optical illusion called, "the impossible triangle."
The reason is this illusion is called "the impossible triangle" is because it is a shape that can not actually exist in real life.
But despite the name, this illusion is actually very simple to draw. So let's get started!
Step 1 - Drawing The Layout
The first step is to draw a simple triangle. Try to make all the sides as uniform as possible.
Next within the triangle you just drew, draw the 3 sides again to form a smaller triangle.
The gap between the larger and smaller triangle will determine the thickness of your impossible triangle. I try to keep this distance relatively thin so that my drawing does not get too crowded.
Repeat this process one more time to create a third (and even smaller) triangle.
Now go to each of 3 the diamond shapes at the outer corners of your drawing and put a short line through the middle of each.
And that's it! That's all the lines we have to make. Our impossible triangle is in there somewhere. We just have to make it visible.
Step 2 - Make The Triangle Visible
First, erase the 3 corner tips of the larger triangle. Notice that we now have a large triangle-like shape at the outer edge of the drawing. And we also have a small triangle at the very center.
Let's ink in these 2 shapes. I'm using a 0.5 Copic multiliner pen.
The ink on these pens take a few seconds to dry fully so be careful not to smudge them when you are drawing.
Now we just have to ink in the rest of the drawing. There's a lot of lines here so it can get a bit confusing.
The best way to think about this is to imagine you are trying to get from the large triangle to the small triangle using these roads.
Here's what I mean. Let's start with this corner. Here we have a choice of 2 roads. For the first one, it doesn't matter which road you pick. So let's just go with the one on the left.
Follow this road down until you get to the far end of the small triangle and then make a turn to connect to it.
Now let's do the same thing for this corner. Again, you have 2 roads to choose from. But since this one is already used, we'll have to use the other one. And again, once you get to the far end of the small triangle, make a turn to connect to it.
And lastly, we'll do the same for the 3rd corner.
Now let's wait for a minute for the ink to dry and then erase the pencil lines to reveal our impossible triangle.
Step 3 - Shading The Triangle
We are pretty much done with our triangle and you can stop here if you'd like. But I'm going to add a few finishing touches to make it really pop.
I'll use a 1.0 size pen to create a thick outline at the outer edge and the center of the triangle.
And lastly, let's add some shading. We'll use a 2B pencil to put a gradation at the 3 inner corners of the triangle.
Then, let's add a lighter gradation at the 3 outer corners.
And we're all done!
Music: "Carefree"
Kevin MacLeod (http://incompetech.com)
Licensed under Creative Commons: By Attribution 3.0
http://creativecommons.org/licenses/by/3.0/
Видео How To Draw An Impossible Triangle Optical Illusion - Impossible Shapes канала My Drawing Tutorials
Показать
Комментарии отсутствуют
Информация о видео
Другие видео канала
 How to Draw a Simple Optical Illusion: The Impossible Oval: Narrated
 How to Draw The Impossible Triangle in 5 Easy Steps
 27 AMAZING DRAWING TIPS || ILLUSIONS, 3D DRAWINGS AND ONE-STROKE PAINTINGS
 Amazing Optical Illusions
 How To Draw An Impossible Square - 3D Square - Impossible Shapes (Narrated)
 7 Incredible 3D Printed Illusions
 How To Draw An Impossible Star Step By Step - 3D Star - Impossible Shapes
 I Built the IMPOSSIBLE LEGO Triangle! (Crazy LEGO Illusions)
 How To Draw An Impossible Circle - 3D Circle - Impossible Shapes
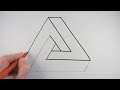 How to Draw an Impossible Triangle in a Very Simple Way
 How to Draw an Impossible Star of David - 3D Star - Impossible Shapes (Narrated)
 Very Easy!! How To Draw 3D Hole - Anamorphic Illusion - 3D Trick Art on paper
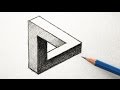 How to Draw an Optical Illusion Triangle the Easy Way
 how to draw impossible triangle ? in one minute
 How To Draw 3D ART illusion On Paper
 How to Draw an Impossible Cube: Step by Step
 How to Draw An Impossible 3D Star Narrated Step By Step
 How To Draw A Penrose Triangle - Optical Illusion
 How to Draw 3D Arrows Optical Illusion: Narrated