Bowl Demonstration #1 -- using two pounds of clay
Bowl Demonstration #1
Introduction and comments
0:01 Introduction
0:35 speed recommendations
1:03 water comments
Start piece with hole in middle
1:12 start the first hole
1:46 anatomy and technique thumbs vs fingers
2:40 start hole with thumbs
3:39 finish hole with fingers
4:02 decision for bowl form starts at floor
4:16 “Frisbee” tip/technique of counteracting wheel spin
Establish deepest part of curve of bowl
5:12 pull out curved bottom with curved fingers
6:00 compression of bottom for looks, strength
Early height efforts start with broad touching
6:54 first raising of wall, broad hand shove
8:14 second raising of wall, also broad hand shove
8:36 shift from broad hand shove to smaller fingerprint pinch
Remaining height with fingerprint pinching
8:55 first fingerprint raising
9:52 rim correction technique with sponge
10:34 second fingerprint raising
11:40 water using comments
12:00 third fingerprint raising
At full height, but generic form, hand and tool shaping starts
12:48 first hand shaping of rim
13:08 hanging string curve structure guideline
13:36 sponge shaping, several gentle changes
14:11 precleaning the bottom (pot not finished yet!)
Final shape refinement with tools
14:39 rib shaping from inside
15:16 rib shaping from outside
15:40 correcting the unnecessary bump (“shelf”)
Summary
15:46 summary of steps
Видео Bowl Demonstration #1 -- using two pounds of clay канала Marc Mancuso
Показать
Комментарии отсутствуют
Информация о видео
Другие видео канала
 How to Make a Stoneware Pottery Bowl, from Beginning to End — Narrated Version
 Throwing a Large Bowl with 25 lbs of Clay!
 How a Master Potter Makes Giant Kimchi Pots Using the Traditional Method — Handmade
 Ingenious Ceramic Workers with Skills you Must See ▶2
 Ceramic Review: Masterclass with John Jelfs
 Chris Gustin - Walter Gropius Master Artist Ceramic Symposium
 Trimming For Beginners + Tap Centering Trick
 Different ways of pulling
 317. A Cylinder Pulling Lesson with Hsin-Chuen Lin 林新春 示範拉瓶坯
 Whiskey cup 火酒碗を作る
 5 steps to CENTERING CLAY on the wheel!...for beginners
 7 steps to throwing a bowl (general purpose - ‘GP’ ) May 9 with Simon Leach
 Making a Pebble Cup from start to finish
 Making Stoneware Bowls, from Throwing to Firing – Back to Basics
 Throwing 1 Pound Vases
 Tips for Throwing a Perfect Tall Cylinder | ADAM FIELD
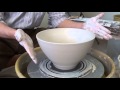 171. Throwing a Thin Wall 4-lb Bowl with Hsin-Chuen Lin 林新春 四磅大碗拉坯示範
 How to throw a large bowl on the potter's wheel .
 Whichford Pottery: How we make our pots
 More on Centering