Coolaroo Exterior Shades Installation
Featured Product: http://blnds.cm/2oqFx95
Do you need to know how to install your Coolaroo exterior shades? This short tutorial overview video will explain how to properly achieve Coolaroo sun shade installation, in four easy steps. These shades require no specialty tools, or training. Let's get started! First you will need to begin by marking above your window opening. You've done this so you can screw in the brackets where they need to go with ease, and so your shades lays properly. Now you need to install the clutch and idle end brackets. When you've completed this task, you can install the shade. When you're installing the shade, start by inserting the left side, and then the right side. Carefully push in the idle end plug until it snaps into place, and adjust the brackets so they snugly fit. There should be no gap or open spaces when installed properly. To install the tie downs, thread the bungee through the end cap ring and back through itself. When you install the receiver, it should be 5" inches below the bottom of where the cord will stop. Now you're done! These Coolaroo exterior shades are easy to install and will provide the privacy that you and your family deserve, while also insulating your home!
Subscribe to our channel:
https://www.youtube.com/blinds
SHOP BLINDS.COM:
http://blnds.cm/2GjQUIT
Follow us:
https://www.facebook.com/Blindscom
https://www.instagram.com/blindsdotcom
https://twitter.com/BlindsDotCom
https://www.pinterest.com/blindsdotcom/
https://www.houzz.com/pro/blindsdotcom/blindscom
Видео Coolaroo Exterior Shades Installation канала Blinds.com
Показать
Комментарии отсутствуют
Информация о видео
Другие видео канала
 Coolaroo patio sun shade 8 ft W by 6 ft L how to install
 Sunshade by Coolaroo review and Install
 How to Install a Shade Sail | Ask This Old House
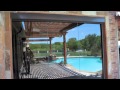 Exterior Shades Dallas | Motorized Shades Dallas
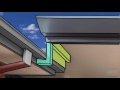 How to attach a patio or verandah to a house
 Cellular (Honeycomb) Shades | What to Know Before You Buy
 How to Make 3- Sided Shade Sails
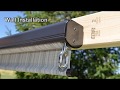 2018 Kool Spot Installation
 Manual Outside Patio Screen Shades Austin
 Coolaroo Outdoor Shade Ceiling Mount
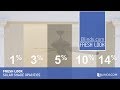 Solar Shade Openness Comparison
 How to install a Coolaroo Shade Sail
 How to Re-string a Horizontal Blind with Looping Lift Strings
 How to hang a Coolaroo roller shade on an Alumawood or Duralum Aluminum patio cover
 Custom Exterior Shades | Everything You Should Know
 How to Make a Slide-On Wire Hung Canopy (Pergola Canopy)
 Coolaroo Simple Lift Roller Shade: Quick Tips
 Installing Coolaroo Sunshades wth Southern California Patios
 Coolaroo Simple Lift Roller Shades Brown Light Filtering Cordless Outdoor Roller Shade 457105 930965
 How to Install Sun Guardian Chain Shades Inside Frame Mount