How to attach a patio or verandah to a house
How to attach a patio or verandah to a house
1st option: 0:00 (Attached below original gutter on fascia)
2nd option: 1:07 (Remove original gutter, attach higher on fascia)
3rd option: 1:52 (Attach riser brackets)
4th option: 2:21 (Sheeting overlaps roof with riser brackets)
5th option: 2:44 (attach to wall below eaves)
6th option: 3:01 (remove eaves, fascia and gutter to cut rafters to wall line)
7th option: 3:29 (remove eaves, fascia and gutter to cut rafters to wall line, add SHS columns for extra height)
Transcript
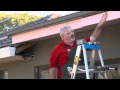
For those who have a house with a conventional roof overhang with Eaves or a Soffit, I am going to show you seven different ways what we can attach a verandah or patio to your house.
The first type of connection is where we fix a back channel or receiver channel directly to the fascia board underneath the house gutter. The back channel and fascia is then strengthened by reinforcing it to the rafters, inside the roof. The patio sheets are then fixed and supported inside this channel which has a seal. This is a simple method and effective if you have the desired height. A typical height is to try and match your ceiling height inside your house, but you can go higher or lower.
The second option is similar to the first, but this time we remove the house gutter, and the back channel is placed higher on the fascia giving the whole unit extra height. The back channel is reinforced the same as the first, and because we've removed the house gutter, we must install the transfer flashing from the roof of the house onto the new patio. This can give the patio up to 1500mm of extra height.
If your fascia is a little low or you would like to reach a specific height, the third and fourth options have greater flexibility. We use Stratco riser brackets, which penetrate neatly through the fascia and attach to the main rafters of the house where they are reinforced. These standard brackets give the flexibility to raise the ceiling an extra 600mm or 2ft. Or can be easily adjusted to achieve the desired height.
With option three, the patio roof sits flush with the back of the beam on top of the Riser Bracket. This type requires a custom barge cap at the back and opens to a variety of options to infill and seal the rear opening. Clear or opaque twin wall sheeting may be used to allow light to come through, or the use of Colorbond to match and block the light may be installed. We can also install an extra flashing or cover, to conceal the brackets on the front and create a nice facade.
Option four is where the patio sheeting is overlapped back on top of the roof around 300mm to provide a shield from the rain and allow airflow throughout the patio area. This is a great option if you don't have much airflow in the area you are covering. It also gives the flexibility to install removable snap on covers for when you don't want airflow.
The fifth option is used when there is enough height to attach the back channel and patio directly to the wall underneath the eaves of the main house. With this type of finish the eaves, fascia and gutters are not seen from the inside of the Patio, giving it the simplest, cleanest and neatest appearance.
The sixth option is where the desired look of option five is wanted, but more height is needed. Here we remove the eaves, fascia and gutter and cut the rafters back to the wall line. The back channel is then connected directly to the rafters and reinforced. This option will give up to 500mm or 600mm of extra height and leave a clean finish where it's connected to the wall line. A transfer flashing on top and some type of padding or flashing on the underside may be necessary to complete the look.
The seventh and final option we will look at in this video is where extra height is required. The eaves, fascia and gutter are removed, and rafters cut back as in option six, and now we install SHS columns on top of the wall plate and reinforce them to the rafters. A beam is then placed on top at the desired height, and the patio is connected on top of that. We need to install a custom box gutter on the house side up against the unit and a custom barge on top to be sure everything is water tight. Some sort of cladding underneath is also necessary to complete the job creating a look this is neat and tidy.
This is only seven of the most common connections that suit the majority of houses in South Australia. Our expert consultants will provide details for the engineered reinforcing, specific flashing types and options during the design and planning with you while on site.
When it's done correctly, a Cooldek Flat Patio is a great option to compliment your house and provide an excellent entertaining area for all year round.
Видео How to attach a patio or verandah to a house канала Utter Gutters
1st option: 0:00 (Attached below original gutter on fascia)
2nd option: 1:07 (Remove original gutter, attach higher on fascia)
3rd option: 1:52 (Attach riser brackets)
4th option: 2:21 (Sheeting overlaps roof with riser brackets)
5th option: 2:44 (attach to wall below eaves)
6th option: 3:01 (remove eaves, fascia and gutter to cut rafters to wall line)
7th option: 3:29 (remove eaves, fascia and gutter to cut rafters to wall line, add SHS columns for extra height)
Transcript
For those who have a house with a conventional roof overhang with Eaves or a Soffit, I am going to show you seven different ways what we can attach a verandah or patio to your house.
The first type of connection is where we fix a back channel or receiver channel directly to the fascia board underneath the house gutter. The back channel and fascia is then strengthened by reinforcing it to the rafters, inside the roof. The patio sheets are then fixed and supported inside this channel which has a seal. This is a simple method and effective if you have the desired height. A typical height is to try and match your ceiling height inside your house, but you can go higher or lower.
The second option is similar to the first, but this time we remove the house gutter, and the back channel is placed higher on the fascia giving the whole unit extra height. The back channel is reinforced the same as the first, and because we've removed the house gutter, we must install the transfer flashing from the roof of the house onto the new patio. This can give the patio up to 1500mm of extra height.
If your fascia is a little low or you would like to reach a specific height, the third and fourth options have greater flexibility. We use Stratco riser brackets, which penetrate neatly through the fascia and attach to the main rafters of the house where they are reinforced. These standard brackets give the flexibility to raise the ceiling an extra 600mm or 2ft. Or can be easily adjusted to achieve the desired height.
With option three, the patio roof sits flush with the back of the beam on top of the Riser Bracket. This type requires a custom barge cap at the back and opens to a variety of options to infill and seal the rear opening. Clear or opaque twin wall sheeting may be used to allow light to come through, or the use of Colorbond to match and block the light may be installed. We can also install an extra flashing or cover, to conceal the brackets on the front and create a nice facade.
Option four is where the patio sheeting is overlapped back on top of the roof around 300mm to provide a shield from the rain and allow airflow throughout the patio area. This is a great option if you don't have much airflow in the area you are covering. It also gives the flexibility to install removable snap on covers for when you don't want airflow.
The fifth option is used when there is enough height to attach the back channel and patio directly to the wall underneath the eaves of the main house. With this type of finish the eaves, fascia and gutters are not seen from the inside of the Patio, giving it the simplest, cleanest and neatest appearance.
The sixth option is where the desired look of option five is wanted, but more height is needed. Here we remove the eaves, fascia and gutter and cut the rafters back to the wall line. The back channel is then connected directly to the rafters and reinforced. This option will give up to 500mm or 600mm of extra height and leave a clean finish where it's connected to the wall line. A transfer flashing on top and some type of padding or flashing on the underside may be necessary to complete the look.
The seventh and final option we will look at in this video is where extra height is required. The eaves, fascia and gutter are removed, and rafters cut back as in option six, and now we install SHS columns on top of the wall plate and reinforce them to the rafters. A beam is then placed on top at the desired height, and the patio is connected on top of that. We need to install a custom box gutter on the house side up against the unit and a custom barge on top to be sure everything is water tight. Some sort of cladding underneath is also necessary to complete the job creating a look this is neat and tidy.
This is only seven of the most common connections that suit the majority of houses in South Australia. Our expert consultants will provide details for the engineered reinforcing, specific flashing types and options during the design and planning with you while on site.
When it's done correctly, a Cooldek Flat Patio is a great option to compliment your house and provide an excellent entertaining area for all year round.
Видео How to attach a patio or verandah to a house канала Utter Gutters
Показать
Комментарии отсутствуют
Информация о видео
Другие видео канала
 How To Build A Pergola Frame - DIY At Bunnings
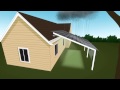 SkyLift Roof Riser Hardware System
 How to Build a Pergola Attached to Your House | Mitre 10 Easy As DIY
 Installing a Lean-to Roof on an existing Deck
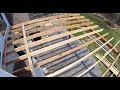 Covered porch build - Do I fall or not....
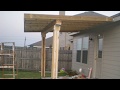 How To Build a Patio Cover (must watch)
 Home Inspector Seattle WA Explains Patio Cover | (425) 207-3688 | CALL US!
 How to Pour a Concrete Slab for Beginners DIY
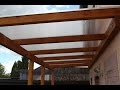 DIY Selbstgebautes Hausvordach aus Holz / Self-built house canopy wood
 Como Construir Una Pergola Para Patio o Jardin Por Ti Mismo - How to Build a Pergola.
 Stratco HowTo. Install the Roof - Outback Flat Cooldek
 How to Make a Four Season Room from a Porch
 Regent Flat Patio
 Scribed apron flashing: permanent stop to verandah leaks
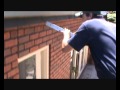 How to connect your pergola to your home
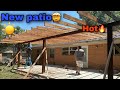 Patio cover 🔥 (how to)
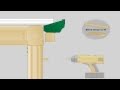 Stratco Outback | Flat Attached | Veranda, Patio, Carport | How-To Installation
 One Man Builds a PERGOLA in TWO DAYS on a Concrete Patio
 Porch Roof Framing & Shingles - How To
 How To Attach Home Addition Roof Framing To Existing Sloping Roof