Warm SUNSET COLOR GRADING with Adobe Photoshop | QE #316
In this quickedit video I will be restoring sunset colors and details from a blown-out sky using #Adobe #Photoshop CC plus the Nik Collection plug in.
▬▬▬▬▬▬▬▬▬▬▬▬▬▬▬▬▬
Thank you for watching my video!
► Prints: http://www.the-phlog.com
► Patreon: https://www.patreon.com/phlog
► Instagram: http://www.instagram.com/thephlog
► Facebook: http://www.facebook.com/phlog
▬▬▬▬▬▬▬▬▬▬▬▬▬▬▬▬▬
0:00 Intro
My intention for this edit was to bring back warm sunset colors, while also getting back details from the sky and making the foreground a little brighter. This was done using a single exposure. Of course, to be on the save side I could have merged an HDR photo, but in my opinion, this was not needed in this case. For the raw adjustments I used the camera raw editor and then finalized the photo in Photoshop with the help of the Nik Collection plug in.
0:27 1. Basic Raw Adjustments
After activating the lens corrections, I switched the camera profile to Adobe Landscape (more saturated colors), then changed the white balance to cloudy for warmer colors. I increased the exposure for a brighter foreground. Since this results in an overexposed sky, I dropped the highlights. Also, I raised the shadows. To get a clearer looking image, I added texture, clarity and dehaze.
2:15 2. Local Adjustments
Using a graduated filter over the sky I made it darker by bringing down the exposure, blacks and increasing the contrast. I added another graduated filter over the foreground to get more structure in the field by increasing clarity and texture.
Of course, I also wanted to add some glow. Here, I simply used two differently sized radial filters and increased the blacks and dropped the dehaze inside them. For a warmer color tone, I simply increased the white balance temperature.
5:03 3. Color Grading
In the red channel of the tone curve, I dragged the upper right point slightly to the left which adds a subtle red color cast to the highlights. Next, I boosted the orange saturation and dropped the blue luminance (darker blue sky). For the split toning I went with warm tones for the mid-tones and the highlights, while adding a blue tone to the shadows.
7:13 4. Photoshop
I added some more glow using a soft light layer and a soft brush with a warm color tones to the sky on the right side. Finally, with the Nik Collection plug in I added the glamour glow filter to add a very subtle, soft look.
Видео Warm SUNSET COLOR GRADING with Adobe Photoshop | QE #316 канала The Phlog Photography
▬▬▬▬▬▬▬▬▬▬▬▬▬▬▬▬▬
Thank you for watching my video!
► Prints: http://www.the-phlog.com
► Patreon: https://www.patreon.com/phlog
► Instagram: http://www.instagram.com/thephlog
► Facebook: http://www.facebook.com/phlog
▬▬▬▬▬▬▬▬▬▬▬▬▬▬▬▬▬
0:00 Intro
My intention for this edit was to bring back warm sunset colors, while also getting back details from the sky and making the foreground a little brighter. This was done using a single exposure. Of course, to be on the save side I could have merged an HDR photo, but in my opinion, this was not needed in this case. For the raw adjustments I used the camera raw editor and then finalized the photo in Photoshop with the help of the Nik Collection plug in.
0:27 1. Basic Raw Adjustments
After activating the lens corrections, I switched the camera profile to Adobe Landscape (more saturated colors), then changed the white balance to cloudy for warmer colors. I increased the exposure for a brighter foreground. Since this results in an overexposed sky, I dropped the highlights. Also, I raised the shadows. To get a clearer looking image, I added texture, clarity and dehaze.
2:15 2. Local Adjustments
Using a graduated filter over the sky I made it darker by bringing down the exposure, blacks and increasing the contrast. I added another graduated filter over the foreground to get more structure in the field by increasing clarity and texture.
Of course, I also wanted to add some glow. Here, I simply used two differently sized radial filters and increased the blacks and dropped the dehaze inside them. For a warmer color tone, I simply increased the white balance temperature.
5:03 3. Color Grading
In the red channel of the tone curve, I dragged the upper right point slightly to the left which adds a subtle red color cast to the highlights. Next, I boosted the orange saturation and dropped the blue luminance (darker blue sky). For the split toning I went with warm tones for the mid-tones and the highlights, while adding a blue tone to the shadows.
7:13 4. Photoshop
I added some more glow using a soft light layer and a soft brush with a warm color tones to the sky on the right side. Finally, with the Nik Collection plug in I added the glamour glow filter to add a very subtle, soft look.
Видео Warm SUNSET COLOR GRADING with Adobe Photoshop | QE #316 канала The Phlog Photography
Показать
Комментарии отсутствуют
Информация о видео
Другие видео канала
 How to use Adobe Lightrooms MOST POWERFUL Tool
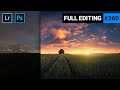 COLORFUL HDR Panorama with Adobe Lightroom & Photoshop | QE #260
 8 Reasons to NEVER Use Levels in Photoshop!
 Soft, Pastel Sunset Editing with Adobe Lightroom Classic | QE #305
 How to CAPTURE & EDIT Minimalistic Photos
 Photoshop 2021 Full Portrait Tutorial (Frequency Separation, Dodge & Burn, Color Grading)
 Match Color with 3 Major Clicks in Photoshop!
 Steal the Color Grading from Any Image with Photoshop!
 All 50+ Adobe apps explained in 10 minutes
 My Color Grading Process with the NEW Adobe Lightroom Classic
 30 Adobe Lightroom Tips & Tricks
 How to MOODY, BROWN Color Grading with Adobe Lightroom Classic + Preset
 Exposure Blending with Adobe Photoshop & the TK Panel | QE #304
 Adding EPIC Sunset Light with Adobe Photoshop | QE #313
 This Will Change Your Editing Forever - Lightroom Calibration
 How to create an HDR PANORAMA using Adobe Camera Raw
 How To Argue With Someone Who Won’t Listen
 VIBRANT Landscape Editing with Adobe Photoshop | QE #308
 Working with HAZY Photos in Adobe Photoshop | QE #312