COLORFUL HDR Panorama with Adobe Lightroom & Photoshop | QE #260
In this quickedit video I‘m creating an HDR Panoramic photo using #Adobe #Lightroom and #Photoshop for the editing.
If you'd like to support me, Patreon: https://www.patreon.com/phlog
Instagram: http://www.instagram.com/thephlog
Facebook: http://www.facebook.com/phlog
0:00 Intro
The main goal for me was to first restore details from the darks and nicely balance the overall exposure, but also make this image really, really colourful, especially in the sky. To merge the HDR Panorama and do the basic raw adjustments I used Adobe Lightroom, while I used Photoshop to fix distortion, remove sensor spots and apply a few Nik Collection Filters.
0:41 1. Basic Raw Adjustments
After I had merged the HDR panorama I started by changing the camera profile to Adobe Standard and the white balance to Daylight. Then, I wanted to make the field I the foreground visible again, so I simply increased the exposure a lot. Of course, this results in a overexposed sky, but that’s easily fixed by simply dropping the highlights. Then, I added vibrance for some more saturation.
2:30 2. Local Adjustments
First, I wanted to work some more on the sky. I wanted it to be darker and have a stronger contrast between the darks of the sky and the bright clouds. I dragged a graduated filter above the sky and dropped the exposure, then increased the contrast and clarity to make the bright clouds more dominant. I added another graduated filter on the very top and dropped the exposure some more to add some kind of vignetting effect there. Furthermore, I wanted to also work on the foreground for which I applied another graduated filter and here simply boosted the clarity which adds more detail to the field.
Of course, I also wanted to apply glow :-) For this I placed two radial filters with different sizes above the sun and inside those I increased the blacks.
4:53 3. Colour Grading
I started I the saturation tab by increasing the orange and yellow saturation and dropping the greens slightly. To add even more contrast in the sky I switched to the luminance tab and dropped the blue luminance (this just makes the blue tones darker)
Then, very important for colourful sunset images, I applied a very warm, very saturated colour to the highlights using the split toning tool. For the shadows I applied a colder colour.
Finally, I headed to the calibration tab all the way down in Lightroom and just played around with the sliders which will slightly change the overall colours of the photo.
7:05 4. Photoshop
First, I filled the gaps that were created by merging the panorama using the lasso tool with the content aware fill. Next, I removed the sensor spots using the spot healing brush. Now I wanted to fix the horizon and make it straight. For this I dropped the guideline above the horizon and hit STRG+T to transform the image. With the transformation active I right clicked on the image and chose the warp transformation tool which helped me straighten the horizon easily.
Of course, I wanted to enhance the glow some more since I just love this effect. So I added a new layer, switched the blending mode to hard light and with a low opacity brush and a warm foreground colour I carefully painted I the glow effect.
Finally, I used the Nik Collection Plug in to add their brilliance / warmth filter and add a subtle dreamy look by adding the classical soft focus filter.
Видео COLORFUL HDR Panorama with Adobe Lightroom & Photoshop | QE #260 канала The Phlog Photography
Показать
Комментарии отсутствуют
Информация о видео
Другие видео канала
 Dreamy sunset seascape with Lightroom and Photoshop | QE #258
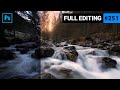 Adding Golden Hour Light with Adobe Lightroom & Photoshop | QE #251
 Landscape Photography | How to be a happy Photographer
 Blending Your HDR Photos WITHOUT HDR Software
 Drone PANORAMA PHOTOS - all you need to know - explained on DJI Mavic 2 Pro
 Lightroom & Photomatix Tutorial: Make an Amazing HDR Sunrise Photo! - PLP # 4 by Serge Ramelli
 Focus Stacking MISTAKES to AVOID for SHARPER Landscape Photos!!
 Completely TRANSFORM any photo with the Diamond Gradient in Photoshop
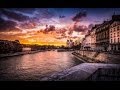 Creating Ultra High Dynamic Range - PLP #99 by Serge Ramelli
 How to get the Faded Look @niceguytravels - Landscape Lightroom Editing Tutorial For Instagram
 Panorama Landscape Editing with Lightroom & Photoshop | QE #186
 A unique way to use Lightrooms Automask feature
 Dark, Mysterious Forest Editing with Adobe Photoshop | QE #250
 How to make a Panorama Photo (Shoot and edit) Lightroom or Photoshop
 How to use the DETAIL PANEL in LIGHTROOM
 Landscape Photography / SLOW Down
 B&W HDR with Nik HDR Efex Pro & Silver Efex Pro
 Cozy Village Long Exposure Editing in Photoshop | QE #257
 MAVIC MINI // HOW YOU CAN CREATE PROFESSIONAL PANORAMIC PHOTOS
 INSANE COLORS & TONES! Unlock In Lightroom Calibration Panel - Editing Tutorial