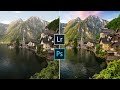
Panorama Landscape Editing with Lightroom & Photoshop | QE #186
In this quickedit video I'm creating a panoramic landscape image in Adobe #Lightroom. Besides Lightroom I will also be using a little bit of #Photoshop for the #PostProcessing.
If you'd like to support me, Patreon: https://www.patreon.com/phlog
Instagram: http://www.instagram.com/thephlog
Facebook: http://www.facebook.com/phlog
For this image I wanted to apply strong, vibrant colors with a warm tone to make it feel more like sunset. Also I wanted to 'divide' it into two sides, a darker one on the left and a brighter one on the right. Finally I also wanted to bring more attention to the moon on the left side of the image (didn't actually think about including it in the shot while I took the panorama, just discovered it was there while editing the photo :D ).
So first I merged the panorama in Lightroom (selecting all the shots, then pressing CTRL + M), after merging it I activated the lens correction settings. Since I want to have a vibrant image I changed the color profile to Adobe Landscape which boosts the saturation and helps restoring detail from darker parts of the photo. To further work on the colors I increased the white balance temperature which made everything a bit warmer and also added some vibrance. To reduce the brightest parts the highlights were reduced and then some contrast was added.
Then it was time fore some local adjustments. First I wanted to improve the foreground by adding two graduated filters there. To get more structure there I increased the clarity as well as the texture. To add contrast I increased the highlights and made the shadows darker. Then I created a big radial filter and decreased the exposure which created a fake vignetting effect. I placed a radial filter over the mountains and increased the exposure and clarity to bring more attention to this area. One last radial filter was created to add a glow effect over the brighter area on the right by increasing the blacks and reducing the clarity.
The last part in Lightroom was the color grading. Here I reduced the yellow and blue saturation and applied a warm color tone to the highlights with lot of saturation and a cold color tone to the darker areas (split toning).
Finally I opened the picture in Photoshop were I first got rid of some sensor spots with the spot healing brush. Then I placed a sunstar overlay above the sun (you can find the overlays here: https://drive.google.com/open?id=1vPsO_IgTpkIqHb6kTjaQ3VlKINMbCLVK ). Next I wanted to further boost the sunset colors, therefore I applied a Nik Collection filter. After that I created some more local glow by making a new layer, setting the blending mode to hard light and using a bright brush with low opacity to paint in the glow. Now since the moon isn't that noticeable I wanted to change that by making it brighter. For this I created a nother layer, set the blending mode to overlay and painted over the moon with a white brush making it brighter.
Видео Panorama Landscape Editing with Lightroom & Photoshop | QE #186 канала Christian Möhrle - The Phlog Photography
Показать
Комментарии отсутствуют
Информация о видео
24 августа 2019 г. 19:16:17
00:08:57
Другие видео канала
 How I Edit Photos | Lightroom & Photoshop Tutorial
 How to Shoot & Stitch Panoramic Landscape Photographs
 Create a glowing, colorful sunset Lightroom & Photoshop Editing | QE #54
 10 Surprising and Unique Features in DxO PhotoLab 5
 30 Amazing Photoshop SECRETS, TIPS, and TRICKS (You Probably DON'T Know!)
 Step-by-Step COLOR GRADING with Adobe Photoshop
 Retouching and Color Grading Portraits in Photoshop with Daniel Do (Light Shapers)
 Creating a dark brown tone to images using Adobe Lightroom.
 3-Step Formula for Colorful Landscapes in Photoshop!
 Geo Leon | Style Portrait Retouch tutorial | Photoshop Tutorials | Photoshop 2020
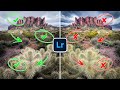 6 Signs You've OVER-DEVELOPED Your Landscape Photo!
 Landscape Photography Editing - Complete Post-Processing Workflow
 Remove a Fence with Spot Healing Brush in Photoshop
 HDR in Lightroom
 How I edit PAINTERLY photos using JUST Lightroom
 How I COLOR GRADE a Sunset Photo in Photoshop
 How to Add the Moon with Photoshop - Fast & Easy
 How to Edit Like Max Muench Lightroom Tutorial
 How to edit AMAZING LANDSCAPE PHOTOS with Adobe Lightroom & Photoshop