Decoupaged Christmas Ornament - PART 3 - "Trimming the Image and Applying Mod Podge"
In this video, PART 3, I will demonstrate how I used a small thin paintbrush and water to paint a water circle around the outer part of the image.
Leave a half inch gap between the image and the water circle because you can trim the excess after you glue it to the ornament and once it has dried.
The water circle makes it easier to tear the excess napkin or tissue away without damaging the image because it is extremely delicate. I will demonstrate how to pull the excess paper from the image by gently pulling it away from the main image using my finger.
After removing the excess paper, I demonstrate how I applied Mod Podge to the surface of the ornament. Mod Podge is a water based white glue that dries clear and it will allow you to dry any image onto any surface and is perfect for decoupage.
Lay your cut out image onto the wet Mod Podge. Tap gently to secure it. Do not rub it too hard.
Allow the image to dry thoroughly to the wet Mod Podge before moving to the next step.
After a few hours, see if your image is secure by genly rubbing with your finger. If it is dry, apply another coat of Mod Podge over the image to harden the surface so that the tissue or napkin won't tear off. It looks white, but will dry clear, so don't worry.
If you have just happened across this video and might be interested in seeing how I arrived at this point in the tutorial, please refer to the other videos below in the section entitled 'RELATED VIDEOS & INFORMATION' where you will find links to videos for the previous steps.
I hope you enjoyed this tutorial. If you did, please consider liking it by giving it a thumbs up and also by tapping the 'SUBSCRIBE' button and joining my channel so that you will get more craft videos like this one. In addition, if you tap the bell notification button, you will be notified when I upload a new video. Thank you!
Also below, you will find links to some of the supplies I used for this project. You may be able to find most of these in your local craft store like Hobby Lobby or Michaels, however I linked them in the section 'SUPPLIES' for your convenience to purchase them on line.
If you have any questions, please leave them in the 'Comments' section below and I will do my very best to get back to you as soon as possible. You can also, of course, leave any comments there as well.
Thank you so much for watching, and I hope to see you again for another video!
RELATED VIDEOS & INFORMATION:
Decoupaged Christmas Ornament - PART 1
"How to Print an Inkjet Image on a Napkin for Decoupaging"
https://www.youtube.com/watch?v=XUe7YyYoCTc&t=20s
Decoupaged Christmas Ornament - PART 2
"How to Find an Image, Resize and Download it to Print"
https://www.youtube.com/watch?v=eIFkzg3P0I0
Decoupaged Christmas Ornament - PART 3 (You are HERE)
"Trimming the Image and Applying the Mod Podge"
https://www.youtube.com/watch?v=Gp161qKH7ns
Decoupaged Christmas Ornament - PART 4
"The Finishing Touches, Glitter and all that Fun Stuff"
https://www.youtube.com/watch?v=5LTm5gsOaVA
SUPPLIES:
Mod Podge Gloss https://amzn.to/3aQVdx9
Paintbrushes https://amzn.to/2WFuWt0
Clear Glitter https://amzn.to/3pqSZsl
Assorted Glitter Colors https://amzn.to/3aEBNew
White Acrylic Paint https://amzn.to/3ph6iLN
Assorted Acrylic Paint Colors https://amzn.to/3mMBa5d
Toothpicks https://amzn.to/3nPXfkK
Painting Tray https://amzn.to/37JmX4t
Silver Ribbon https://amzn.to/2WIuIBC
Country Plaid Ribbon https://amzn.to/3pm44La
Metallic Christmas Ribbon Colors https://amzn.to/2M87O4J
Glass Christmas Ornaments Round https://amzn.to/3pknJef
Wood Ornaments https://amzn.to/3mLafGT
Tissues https://amzn.to/38xuNxp
Computer Paper https://amzn.to/37JbzWo
Scotch Tape https://amzn.to/3aQYYmf
Glass Christmas Ornaments 4” Wide Flat https://www.etsy.com/listing/482291982/free-shipping-20-pieces-x-diy?ref=shop_home_feat_1&frs=1&bes=1
Thanks again for being here and for your interest in this tutorial!
Видео Decoupaged Christmas Ornament - PART 3 - "Trimming the Image and Applying Mod Podge" канала Nancy Lewis
Показать
Комментарии отсутствуют
Информация о видео
Другие видео канала
 Decoupaged Easter Egg - "Learn How to Find, Download, and Format an Image to Print on a Napkin"
 Fairies & Bunny Rock Painting Tutorial - PART 3 - "Revealing the Image"
 Fairies & Bunny Rock Painting Tutorial - PART 1 - "Printing the Image from a WP Document"
 Decoupage an Ornament with a Gift Tissue Print - PART 2 - "How To Emboss an Image"
 Beach Bunny Family Rock - PART 2 - "Using Mod Podge Photo Transfer Medium to Transfer the Ink"
 October 26, 2017
 Fairies & Bunny Rock Painting Tutorial - PART 6 - "Adding Extra Flowers with Mod Podge"
 Hummingbird Rock - "Using a Stencil to Add Flowers"
 Halloween Rock Painting Tutorial - "How to Download & Print an Image to Trace onto a Rock"
 How to Stencil Poppy Flowers - PART 1 - "Adding the Flowers Using White Acrylic Paint & Stencil"
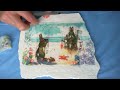 Beach Bunny Family Rock - PART 4 - "Revealing the Image Transferred to a Rock for Painting"
 Fairies & Bunny Rock Painting Tutorial - PART 9 - "Coloring in the Rock Using Paint Pens"
 Playing Fetch With my Cockapoo
 Decoupage an Ornament with a Gift Tissue Print - PART 1 -"Downloading an Image to Word Processing"
 "Learn How to Decoupage an Ornament with Images from your Favorite Christmas Movies"
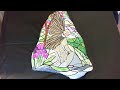 Stained Glass Angel Rock - PART 3 - "Adding Color to your Rock Painting"
 Tucker is playing his favorite game of catch
 Easter Egg Decoupage - "How to Download, Format, Copy and Paste an Image into Word Processing"
 Napkin Decoupage - Wooden Earring Tutorial
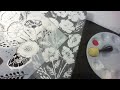 How to Stencil Poppy Flowers - PART 2 - "Adding Color to the Flowers over the White Outline"