How To Make Caged Beads Necklace
Hi there. In this video, I'm going to show you how to make caged beads and then put them together into this darling necklace. It's a technique you can use in lots of different projects.
To make this necklace, you will need, first of all, a length of chain in whatever length you'd like your necklace to be. Here I have about 24 inches of a fine chain. You'll need two jump rings for your chain and a clasp. And you'll also need a slightly larger jump ring to hold your pendant. To make the pendant, you will need some beads. Here I have three 10-millimeter acrylic beads from House of Gems. You'll also need two eye pins and a head pin. And then for making your wire cage, you will need some 20 gauge wire. For tools, you'll need flat nose pliers, wire cutters, chain nose pliers, and round nose pliers. And also a Sharpie will be helpful.
So we're going to get started by making our wire cages. And for each of these 10-millimeter beads, I'm going to use a 6-inch piece of 20 gauge wire. Now, depending on the size of your beads and how much of a cage you like around each bead, it will vary the amount of wire. So you may want to do a bit of experimenting. Once you've chosen your size of wire, you're going to use a Sharpie just to make a little mark right in the center of your wire. So here I've made it at the three-inch mark on this six-inch piece.
Then you're going to take round nose pliers and grasp one end and make a nice loop until it touches the wire again. And then this is where your flat nose pliers come in. You just want to hold that loop and work your way around, creating a spiral. And you're going to continue to spiral this wire until you get to the Sharpie mark that you made on it, the halfway point. The nice thing about using flat nose pliers here is that they don't mar your wire. They just hold it nice and tight for you. And when you get far enough along, you can actually just use your fingers. So there's a nice spiral, right up to the halfway point of that wire.
Next, you're going to repeat on the other end of the wire, making a loop. But you want it facing in the opposite direction. So here's how I've started. And now I'm going to again spiral this wire up to the halfway point. And what you will end up with is an S-shaped spirally thing. So there's our S shape, kind of cool all by itself.
But we're going to turn this into a cage. So the first step to doing that is to fold this whole thing in half, right along that wire that's in the middle. Next, take your round nose pliers again and grasp those loops that you started out with in the center and pull. It can be a little tricky to get in there. I'm just going to pull those loops out so that they make sort of a cone-shaped spring. And then repeat on the other side.
And look at that. There's your bead cage.
Next, you can just pop your bead in there. And the key here is to try to line up the holes of your bead with those first loops that you made. So I'm going to slide one of my eye pins through the loop and then through the hole of the bead, out through the other hole and finagle it, maneuver it, so that it comes out through the other loop. And if you want to, at this point, you can take some time and use your fingers to manipulate that cage so that it fits around that bead the way you want it to. And this is where more wire would make a cage that spirals more times around the bead and less would make just maybe a swipe or two of wire around the bead.
And then you're going to repeat for your other two beads. Here I have two more that I've made. And I'm just going to repeat sliding an eye pin through one. And then the holes in these acrylic beads are a little large. So I'm going to slide just a small gold bead onto the head pin. Otherwise, it'll go right through.
And now, we're just going to make simple loops at the ends of our eye pins and head pin. Trim the wire to about three-eighths of an inch from where it comes out of the bead. And then use your round nose pliers to make a loop. If you need to, just kick that loop back a little so that it's centered over the bead. And then use chain nose pliers to open that and add the next bead in line at the loop. And repeat to add, really, however many beads you want. I'm using three. You could just do one. You could do as many as you want. But this is basically making our pendant.
Add your jump ring to the top bead, to the loop of the top bead. Make sure that jump ring is closed nice and securely, and add your chain. And then all you need to do is add jump rings and your clasp to the ends of the chain, and your necklace is done.
So there's the necklace all completed. This is a great technique to use on so many different things. You could string a whole bunch of these together for a bracelet, add one or two for earrings, use different size beads, different amounts of wire. Have fun experimenting, and happy creating.
Видео How To Make Caged Beads Necklace канала houseofgemsonline
Показать
Комментарии отсутствуют
Информация о видео
Другие видео канала
 Rose Gold Filled Earring Findings ready for Vday! 💗 #rosegoldjewelry #rosegoldearrings
 Matubo Czech Glass Beads are almost here! 💛 #matuboczechbeads #matuboglass #beadedjewelry
 How To Make African Beaded Hoop Earrings -Jewelry Making Instructional Videos And Tutorials
 Learn how to make this sparkle hand chain! ✨ #diy #howto #handchain #howtojewelry
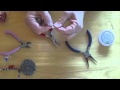 How to Make Your Own Spiral Jewelry Finding
 Dazzling 14k Rose Gold Filled Chains ⛓️ #rosegoldfilled #rosegoldchains #rosegoldjewelry
 Dazzling 14k Rose Gold Filled Chains 😍 #rosegoldjewelry
 Dazzling Rose Gold Filled Clasps 😍✨ #rosegoldjewelry #rosegoldclasps #rosegoldfindings
 Want creepy Skull Earrings this Halloween? ☠️ Stay tuned for our tutorial video 😁 #skullearrings
 Majestic Midnight Threader Earring Set- (How To)
 How To Make Red Dangle Earrings
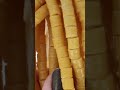 New Item Alert! We've got some beautiful African Beads dropping really soon! #diyjewelery #newitem
 How to Make a Sterling Silver Heart and Black Onyx Bracelet
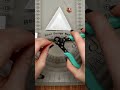 Orange Meteorite Earrings | How To Jewelry Making Instructional Videos And Tutorials
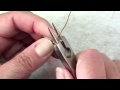 How To Make Wavy Washer Earrings
 How to Make Bead Wrapped Hammered Wire Earrings
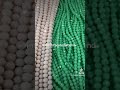 BRAND NEW BEADS JUST CAME IN! Visit our website to see more!#newbeads #beadjewelry #beadsupplier
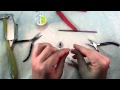 How To Make Moonglow Wire Wrapped Earrings
 How To Use Earring Chandelier Findings
 Lemon Lux earrings -how to video. Check out: HOUSE OF GEMS. #create #jewelry #diyjewelry